> ## Documentation Index
> Fetch the complete documentation index at: https://autoscaled.com/docs/llms.txt
> Use this file to discover all available pages before exploring further.
# Connecting Data Sources in AutoScaled
> Link HubSpot, Salesforce, Attio, and Google Sheets to AutoScaled in one click. Learn OAuth setup, permissions, and webhook config. Start connecting now.
Connecting your data sources to AutoScaled is easy. Most [integrations](https://autoscaled.com/integrations/) can be activated with just one click. On this page you will find more information about the different data sources, required permissions, and additional settings when needed.
## Different AutoScaled Integrations
As of **April 10th, 2026**, there are eight integrations available on AutoScaled. Our list of integrations is continuously expanding; the most up-to-date list is on the [integrations](https://autoscaled.com/integrations/) page.
Current integrations are:
### CRM integrations
* **HubSpot**: OAuth API connection
* **Salesforce**: OAuth API connection
* **Attio**: OAuth API connection
Setup steps, scopes, and uninstall guidance for HubSpot.
Setup steps, scopes, and uninstall guidance for Salesforce.
Setup steps, webhook guidance, scopes, and uninstall guidance for Attio.
### Spreadsheet integrations
* **Google Sheets**: OAuth API connection
* **Microsoft Excel:** File upload
* **CSV**: File upload
### Presentation integrations
* **Google Slides**: OAuth API connection
* **Microsoft PowerPoint**: File Export
* **PDF**: File Export
## Connecting Your Data Sources to AutoScaled
Integrations that require an OAuth API connection can be connected from the left-hand menu under **Data Sources**. Click **Connect** next to an integration and the setup wizard will launch.
### Connecting Google Drive to AutoScaled
Users signing up with Google during registration and login can skip this step. Your Google Drive will be automatically connected to your account.
AutoScaled relies on [Google Drive](https://workspace.google.com/intl/en_us/products/drive/) to generate, store and manage presentations. Google Drive is also required to generate presentations from Google Sheets.
To connect Google Drive, go to **Data Sources** and click **Connect** next to Google Drive. Google’s sign-in flow will open. Select the account you want to use with AutoScaled and confirm.
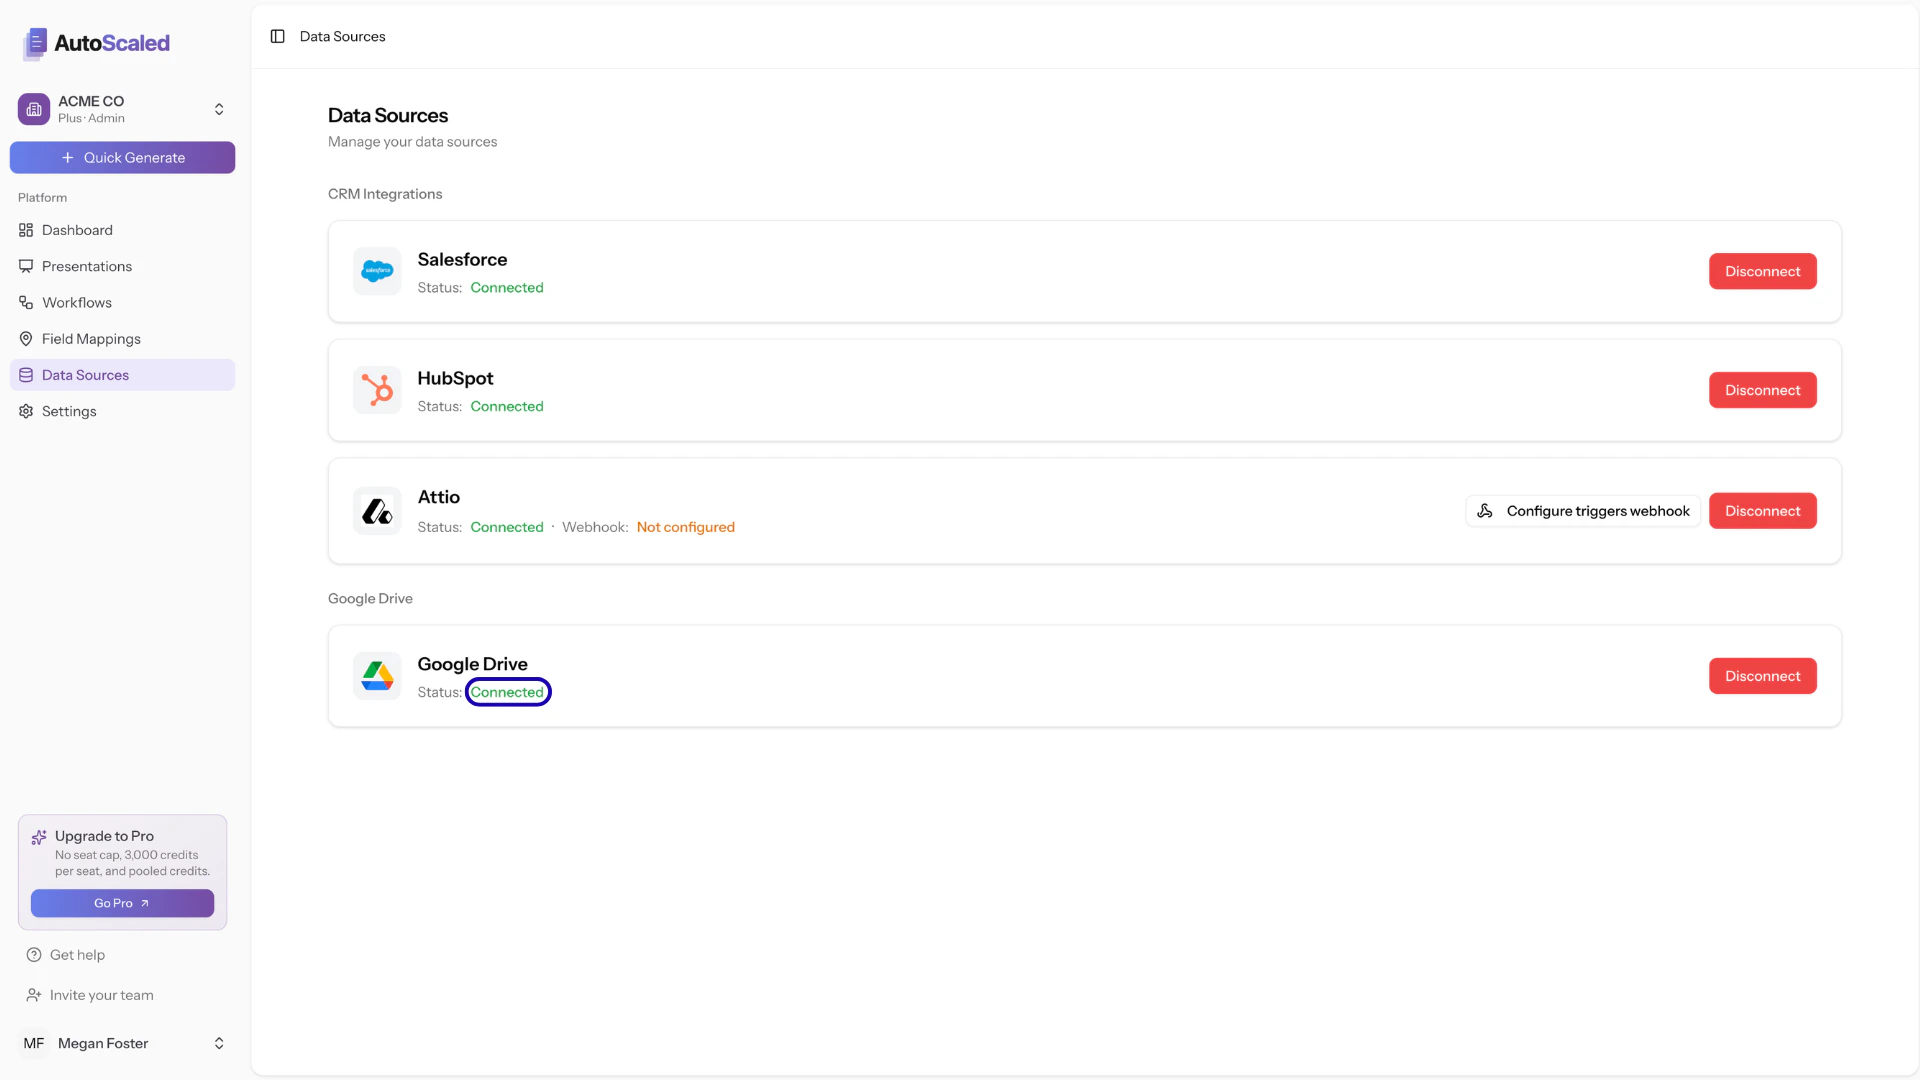
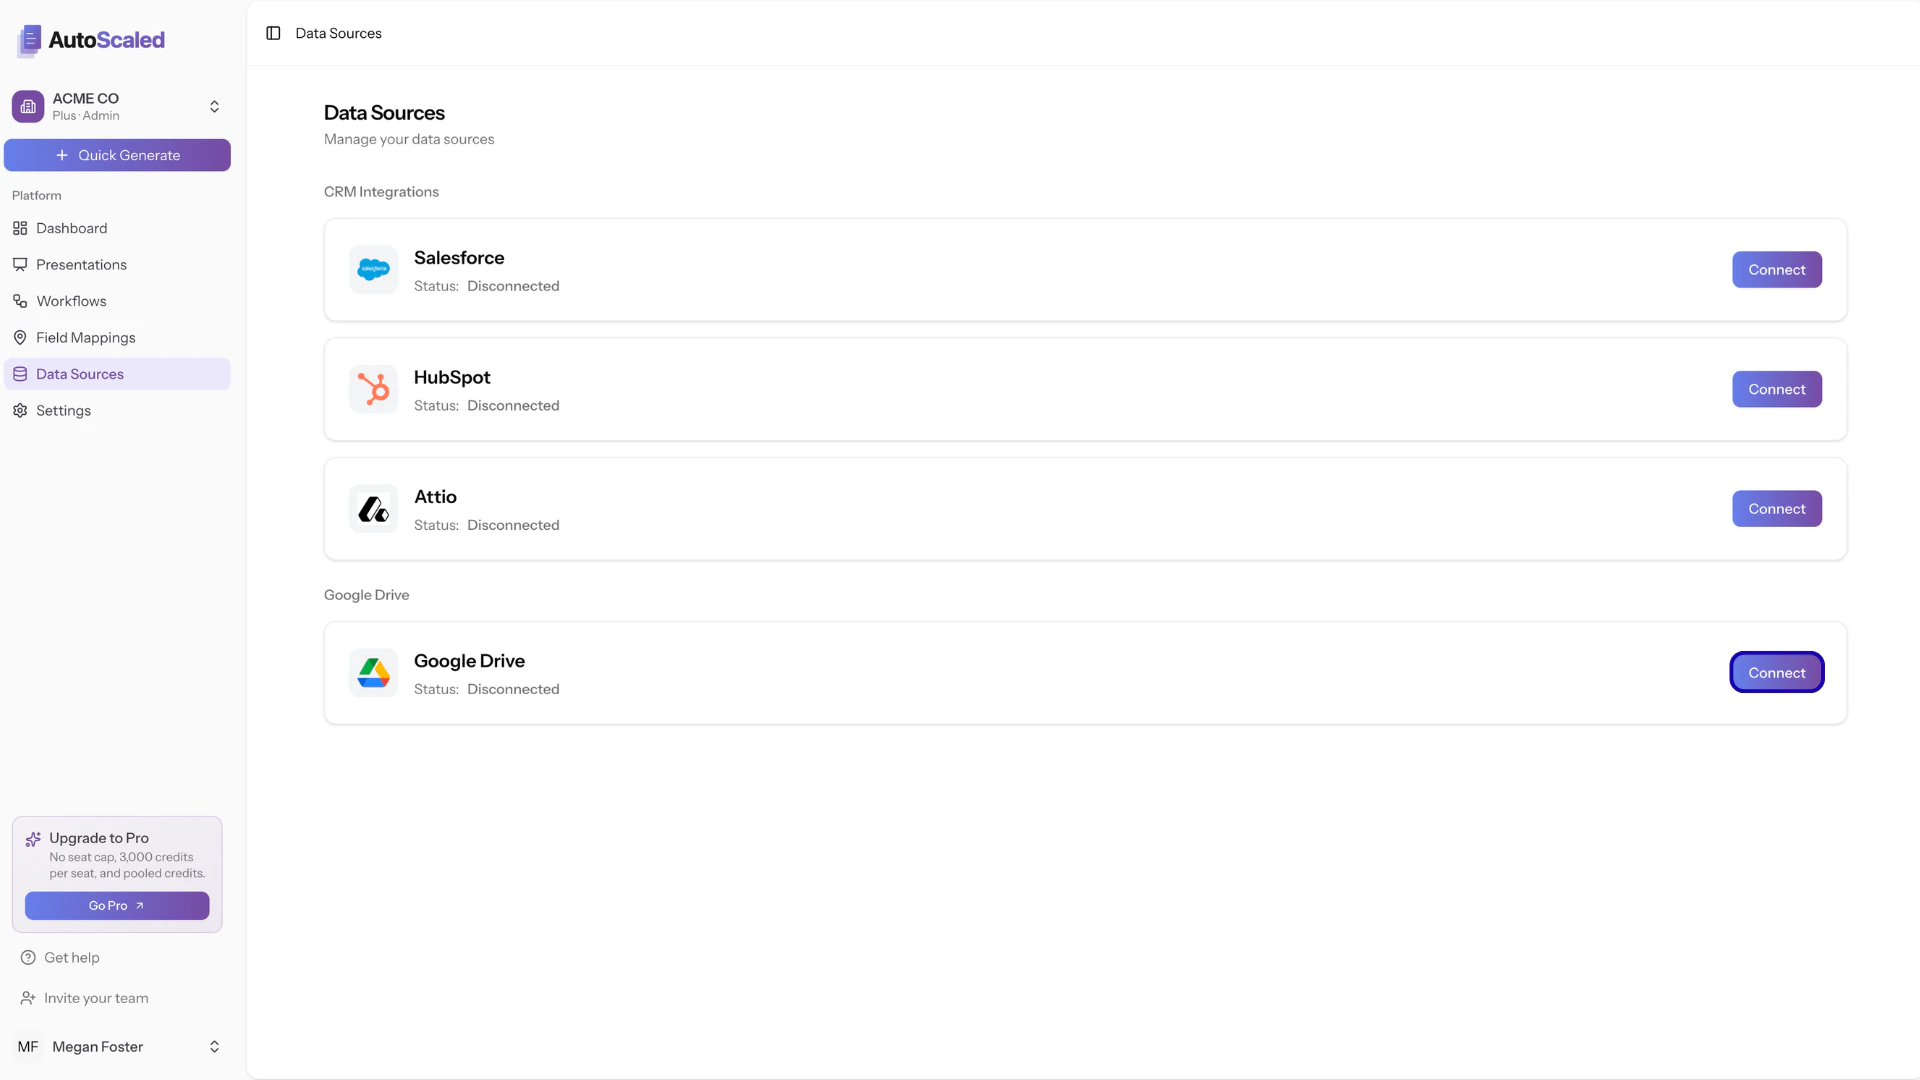 During the connection process, Google Drive will require a [set of permissions](/getting-started/setup#autoscaled-oauth-permissions). When the connection is complete, the status updates to **Connected**.
 ### Connecting Salesforce to AutoScaled
To use data from [Salesforce](https://salesforce.com), authenticate your Salesforce instance. Go to **Data Sources** and click **Connect** next to Salesforce.
### Connecting Salesforce to AutoScaled
To use data from [Salesforce](https://salesforce.com), authenticate your Salesforce instance. Go to **Data Sources** and click **Connect** next to Salesforce.
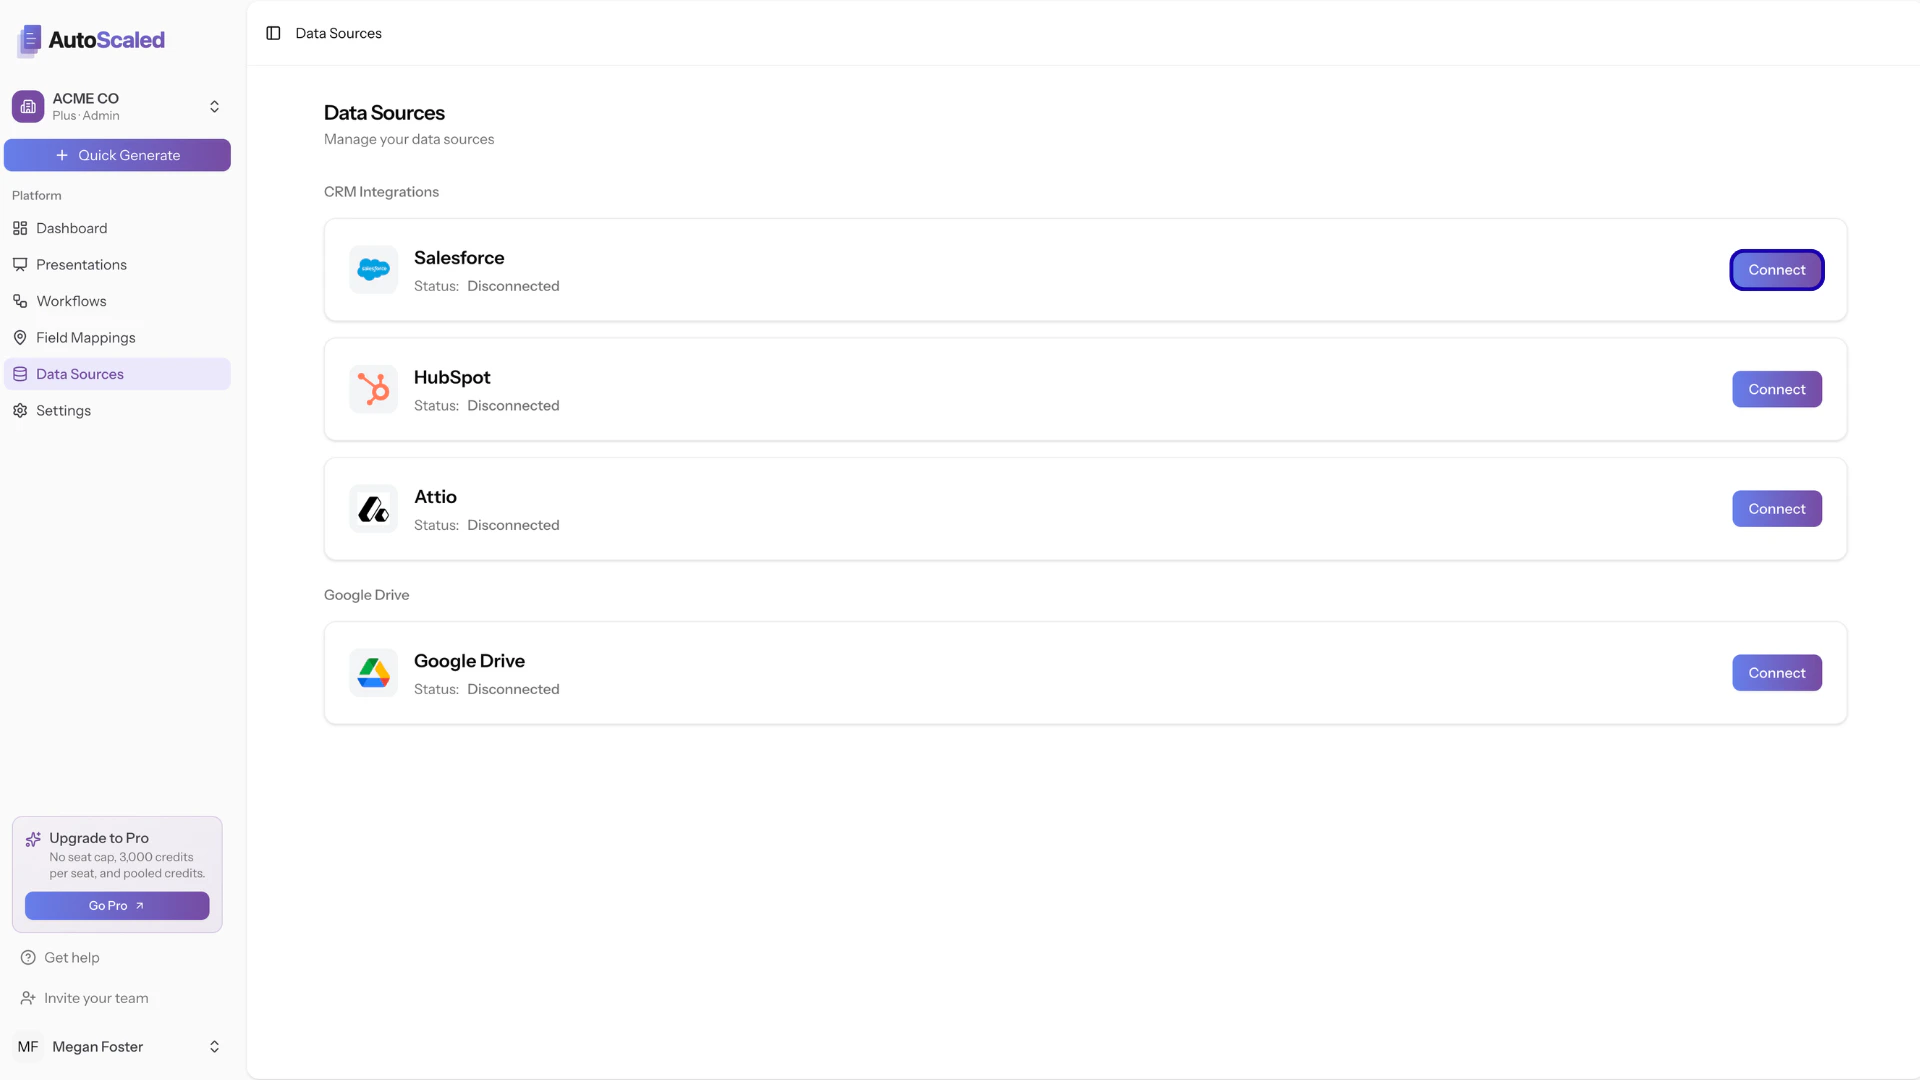 This opens a Salesforce dialog where you sign in and grant AutoScaled access to your Salesforce data. AutoScaled does not store this data; see our [data management](https://autoscaled.com/data-management/) page.
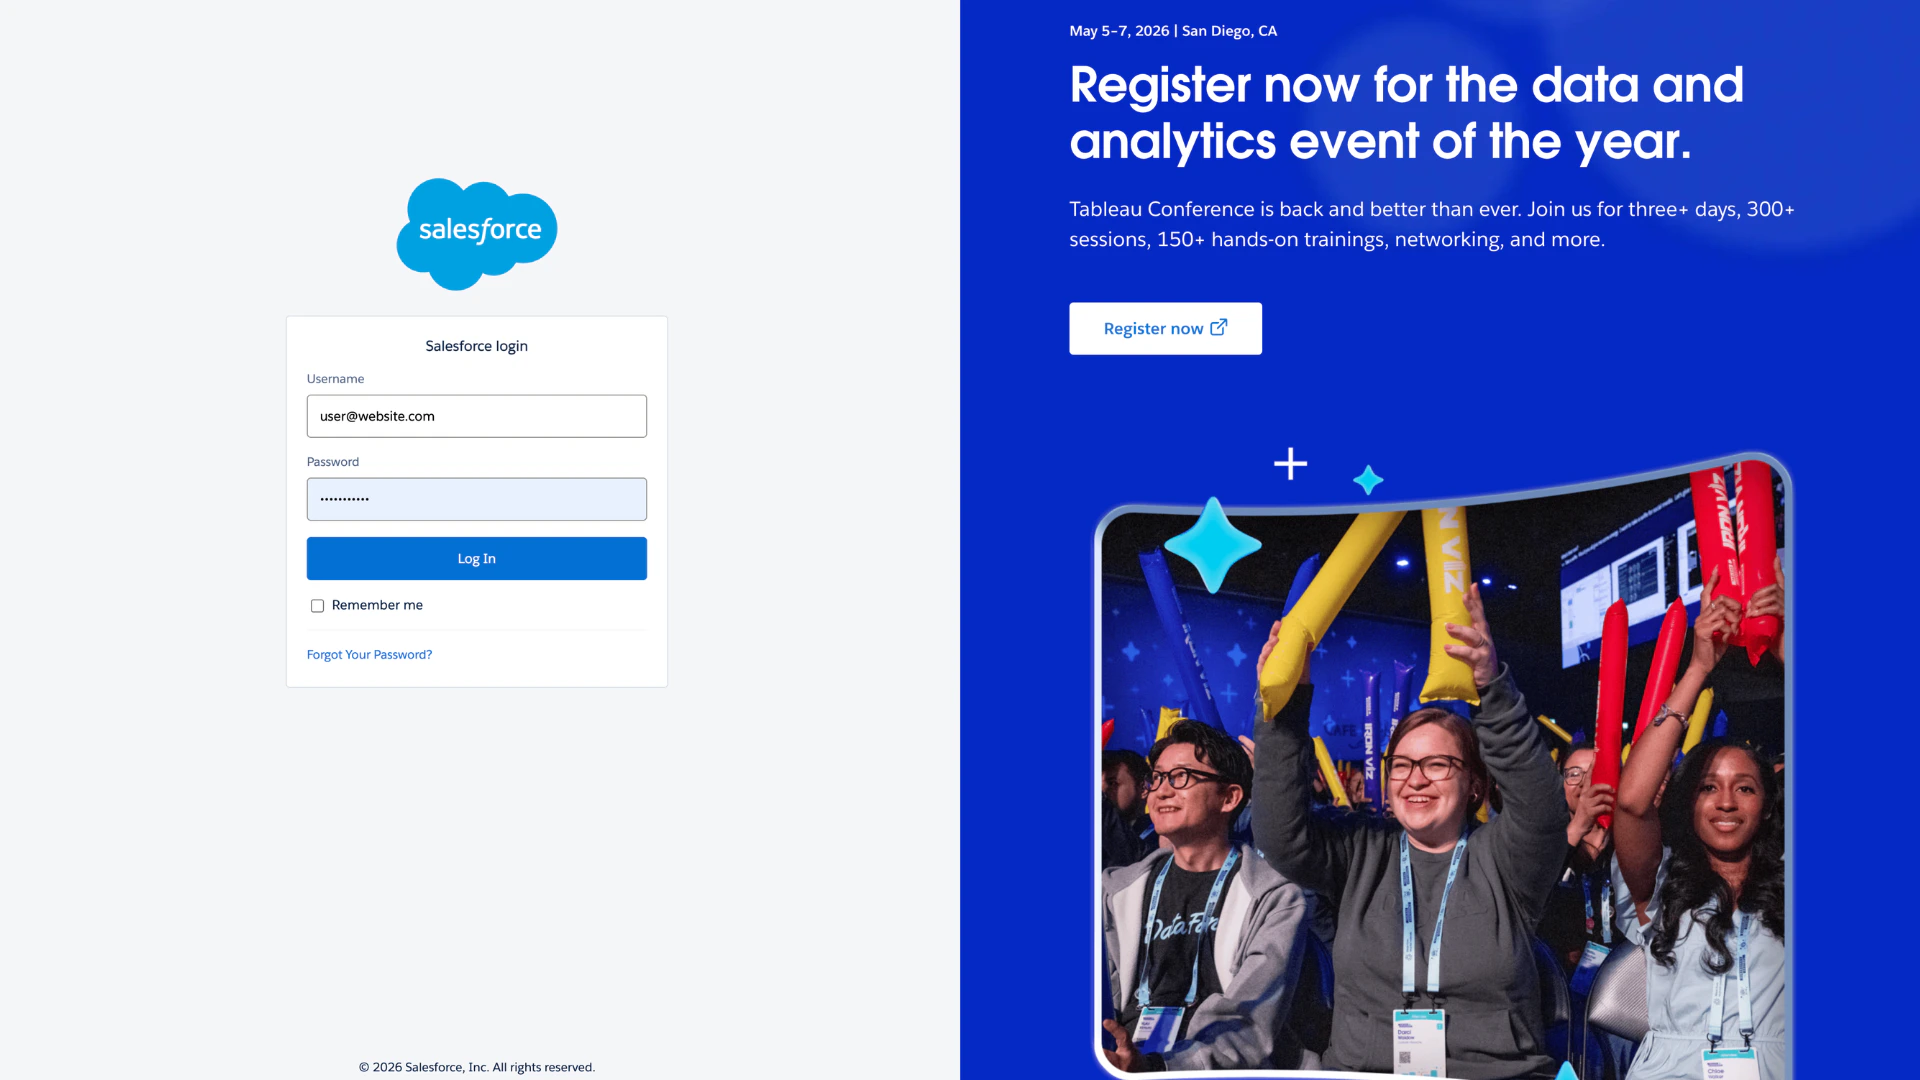 On the Salesforce login page, follow the instructions provided by Salesforce. This usually includes providing your credentials followed by selecting your instance.
Salesforce might show a warning as you're connecting a third-party tool to Salesforce. This is standard and default behavior. You can continue connecting AutoScaled and revoke access at any time.
Once connected, you will see the status update to **Connected**. You can use Salesforce for *running manual presentation generation*, *triggering deck creation*, and *content scheduling*.
### Connecting HubSpot to AutoScaled
To use data from [HubSpot](https://hubspot.com), authenticate your HubSpot account. Go to **Data Sources** and click **Connect** next to HubSpot.
On the Salesforce login page, follow the instructions provided by Salesforce. This usually includes providing your credentials followed by selecting your instance.
Salesforce might show a warning as you're connecting a third-party tool to Salesforce. This is standard and default behavior. You can continue connecting AutoScaled and revoke access at any time.
Once connected, you will see the status update to **Connected**. You can use Salesforce for *running manual presentation generation*, *triggering deck creation*, and *content scheduling*.
### Connecting HubSpot to AutoScaled
To use data from [HubSpot](https://hubspot.com), authenticate your HubSpot account. Go to **Data Sources** and click **Connect** next to HubSpot.
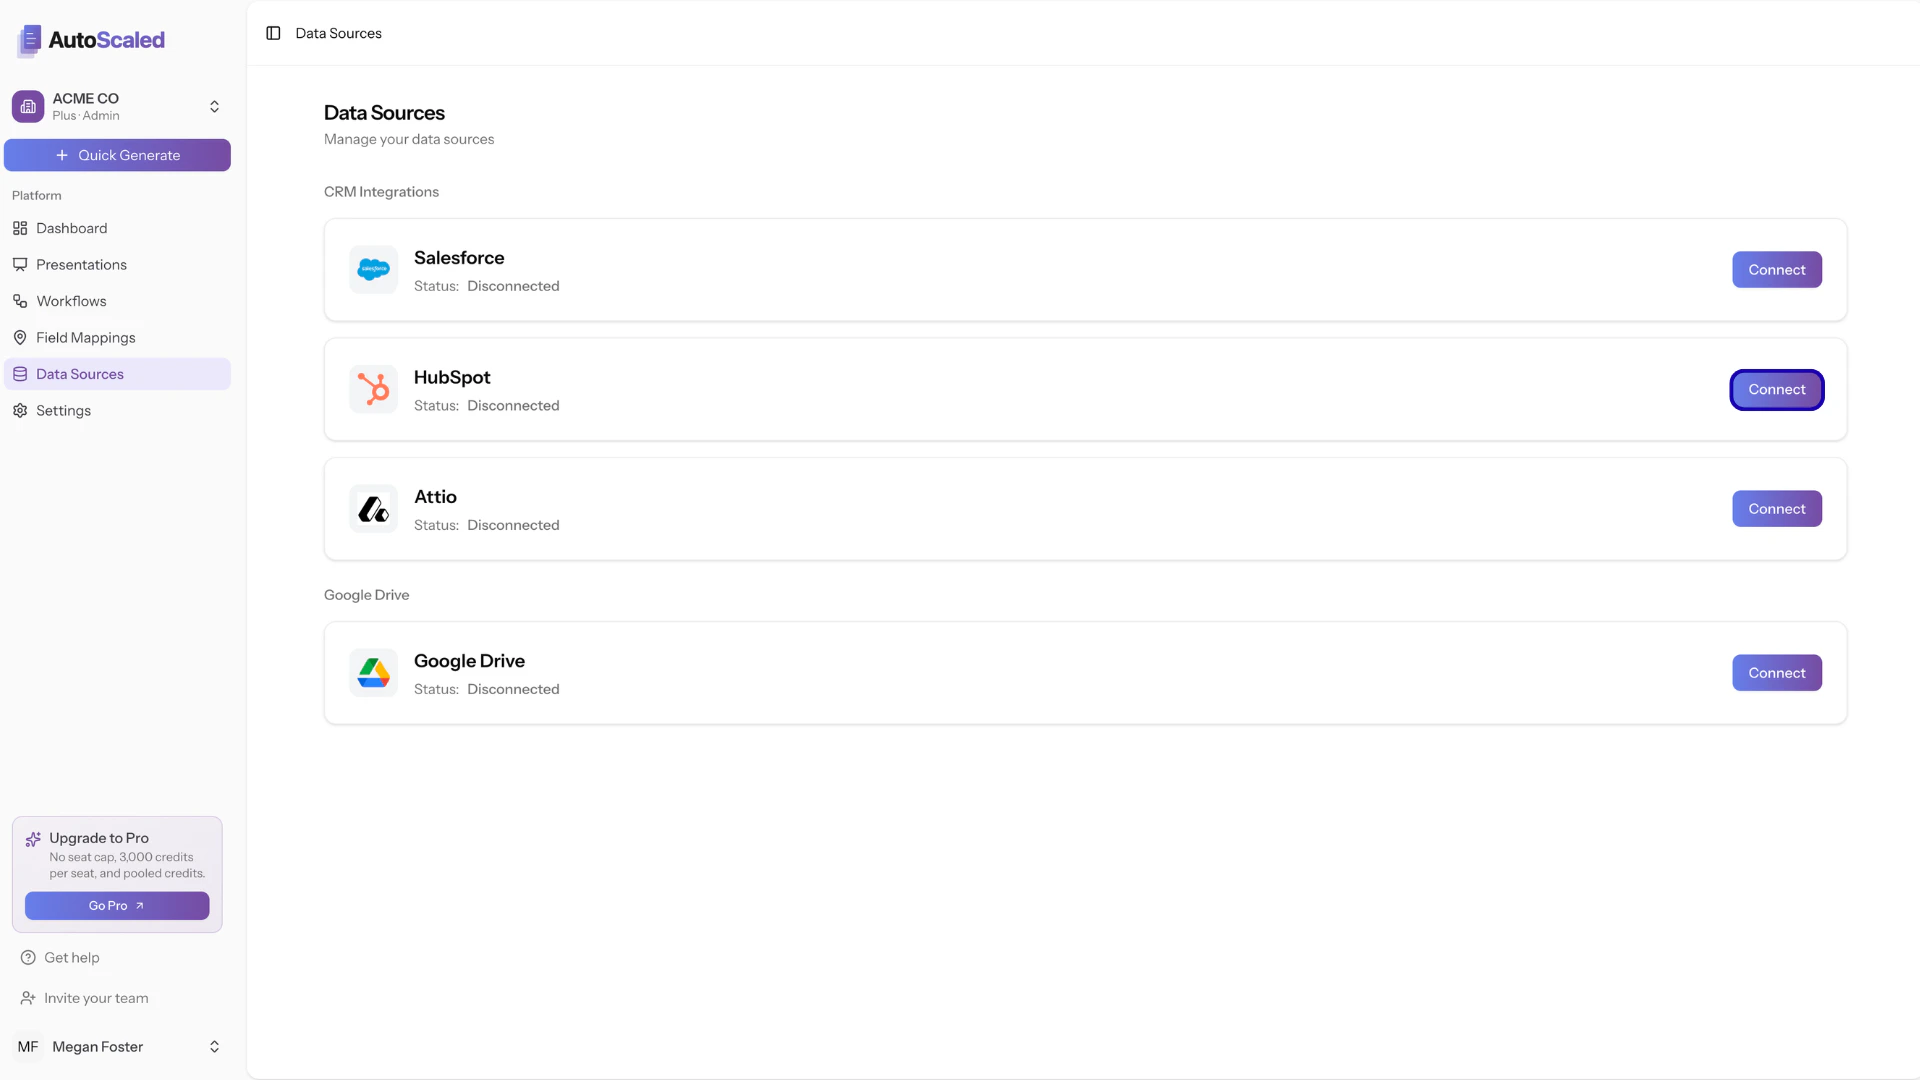 This will open a HubSpot dialog so you can sign in to your account. First, sign in to HubSpot:
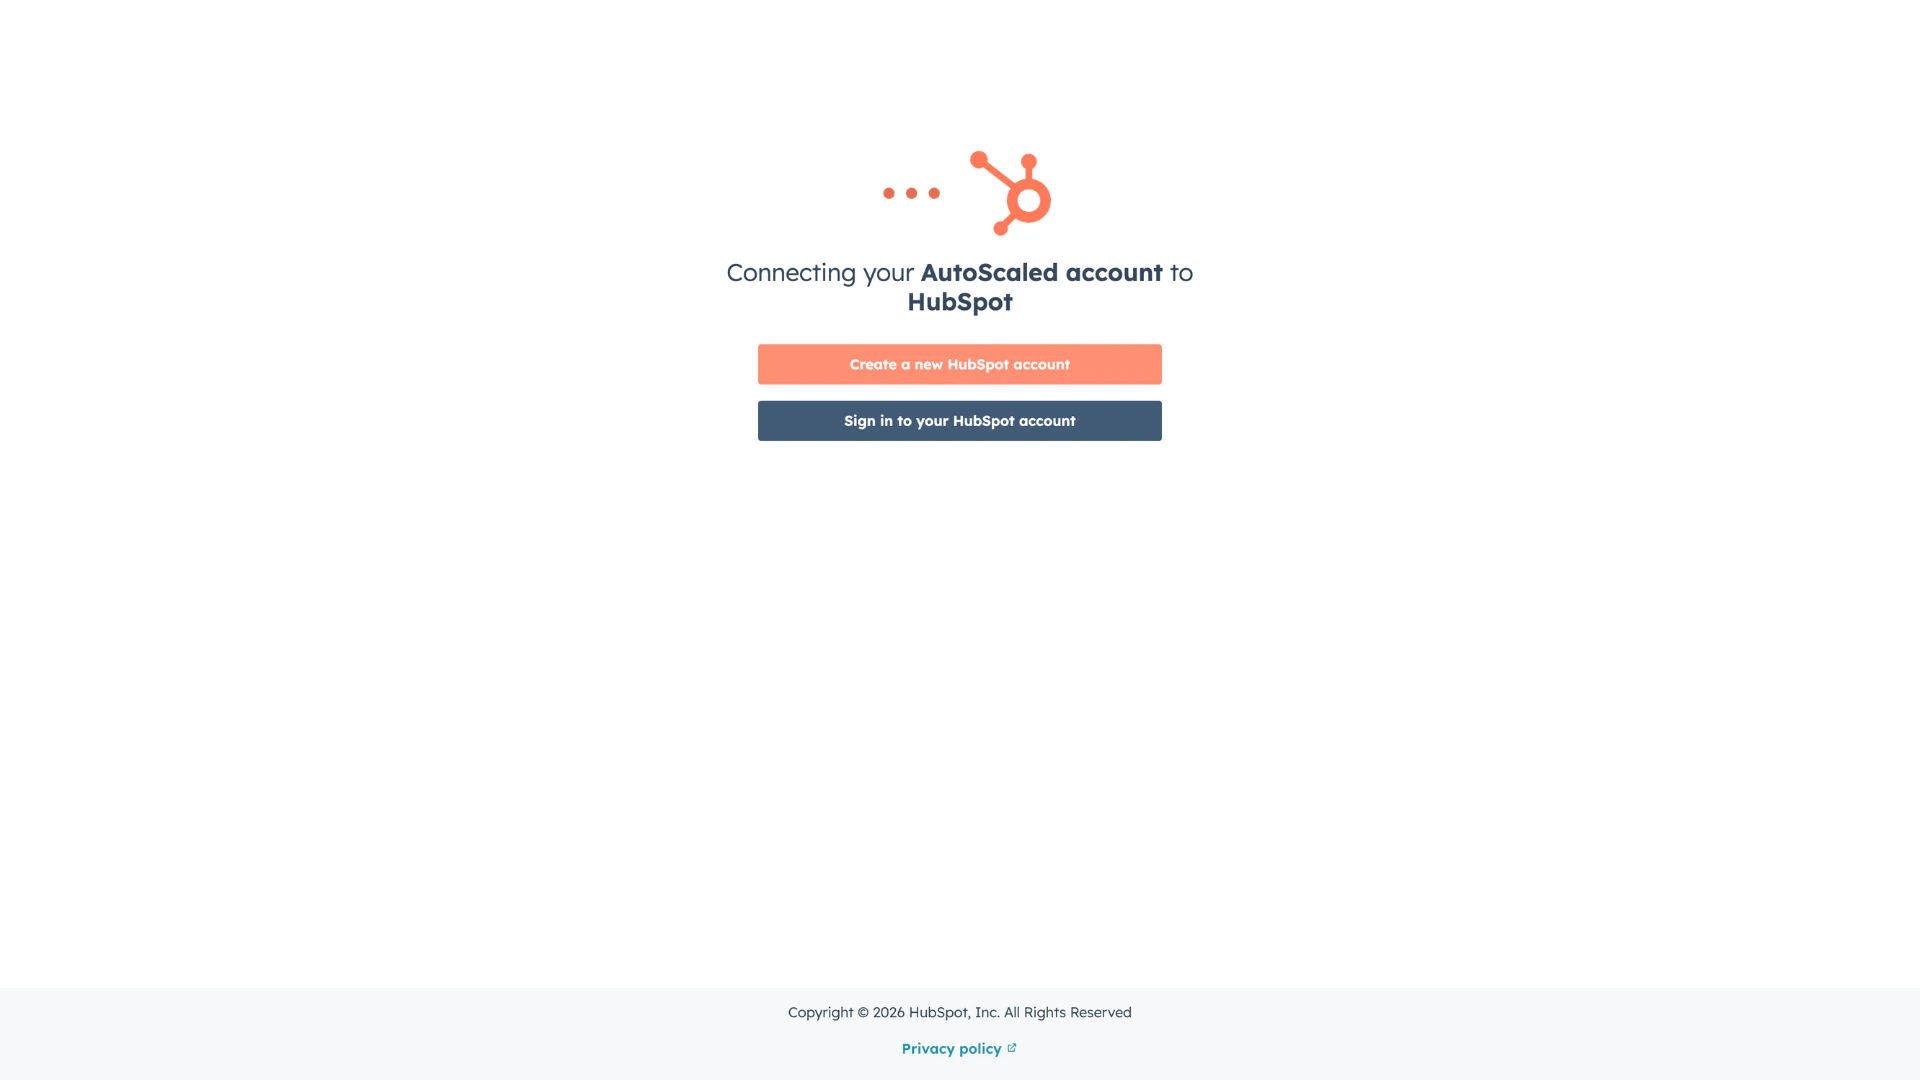 Next, select the instance you would like to use:
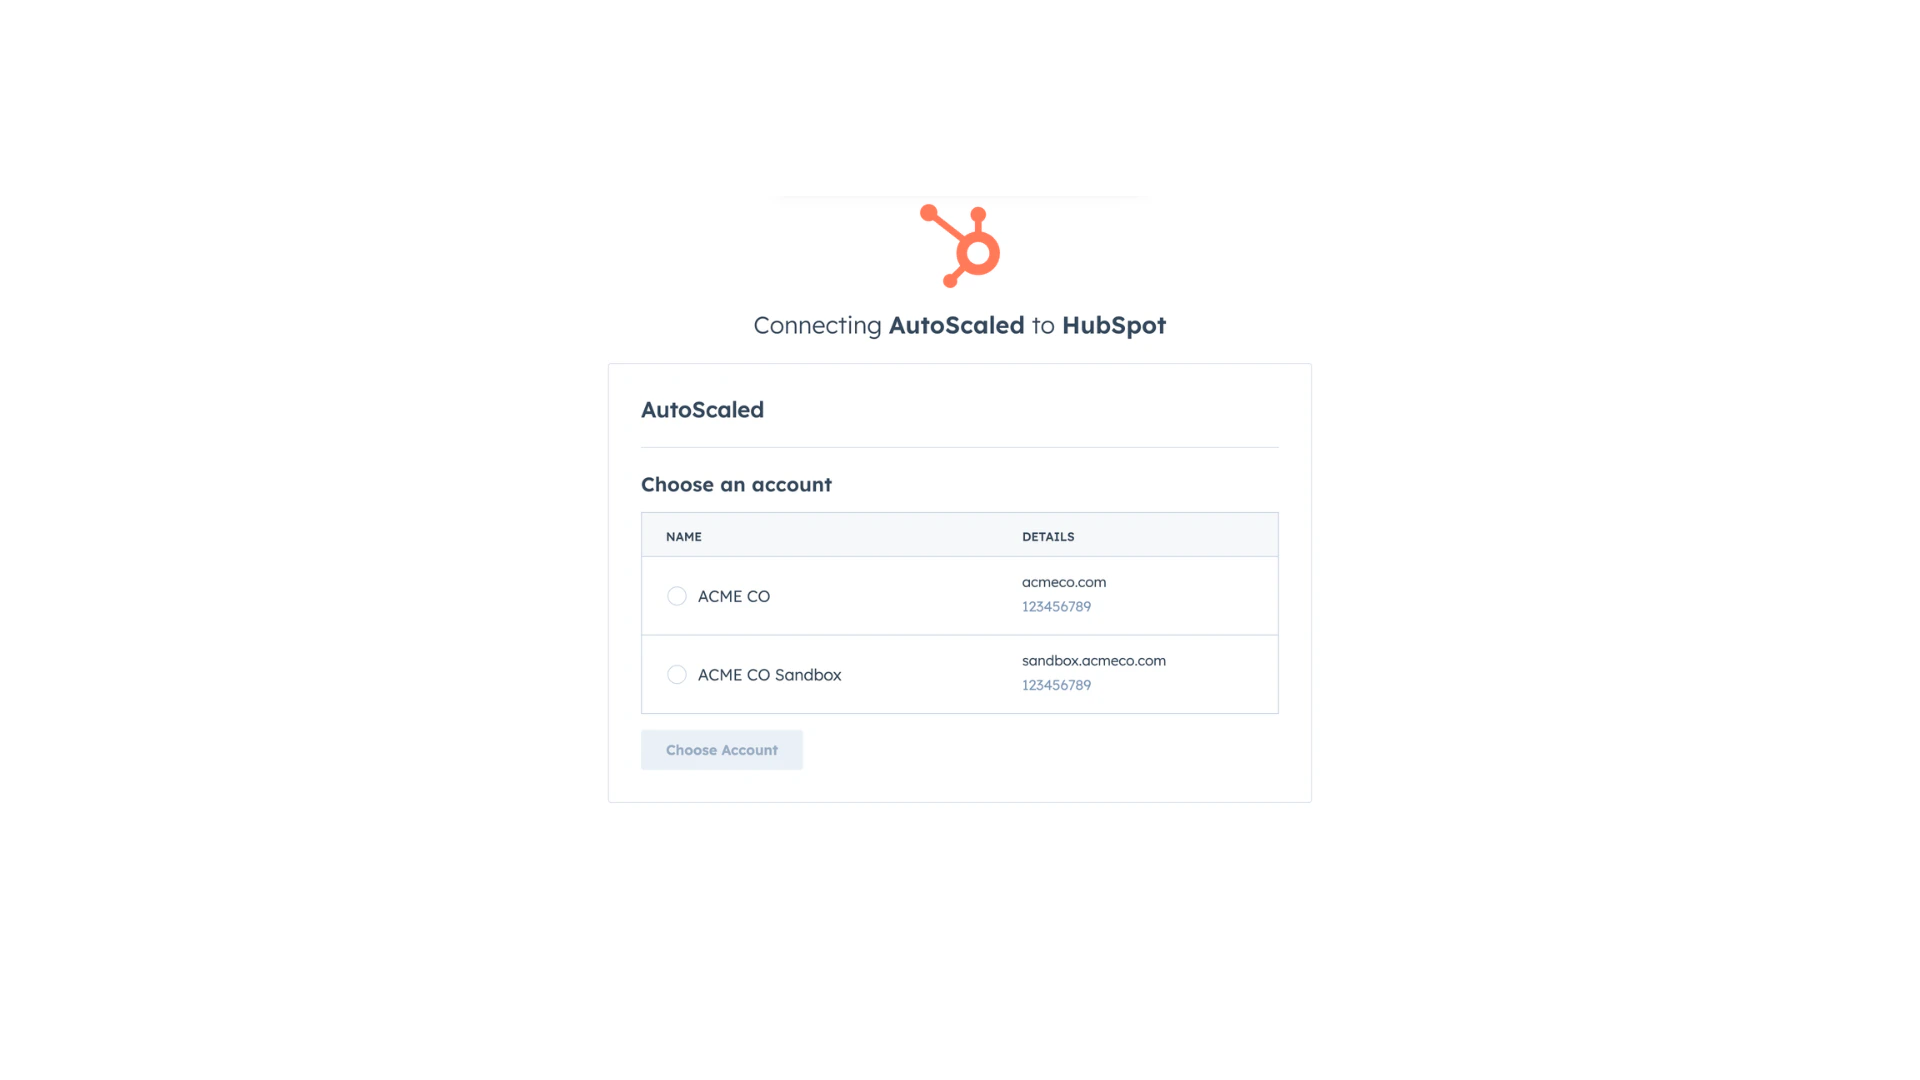 HubSpot might show a warning as you're connecting a third-party tool to HubSpot. This is standard and default behavior. You can continue connecting AutoScaled and revoke access at any time.
Once connected, you will see the status update to **Connected**. You can use HubSpot for *running manual presentation generation*, *triggering deck creation*, and *content scheduling*.
### Connecting Attio to AutoScaled
To use data from [Attio](https://attio.com/), authenticate your Attio account. Go to **Data Sources** and click **Connect** next to Attio.
HubSpot might show a warning as you're connecting a third-party tool to HubSpot. This is standard and default behavior. You can continue connecting AutoScaled and revoke access at any time.
Once connected, you will see the status update to **Connected**. You can use HubSpot for *running manual presentation generation*, *triggering deck creation*, and *content scheduling*.
### Connecting Attio to AutoScaled
To use data from [Attio](https://attio.com/), authenticate your Attio account. Go to **Data Sources** and click **Connect** next to Attio.
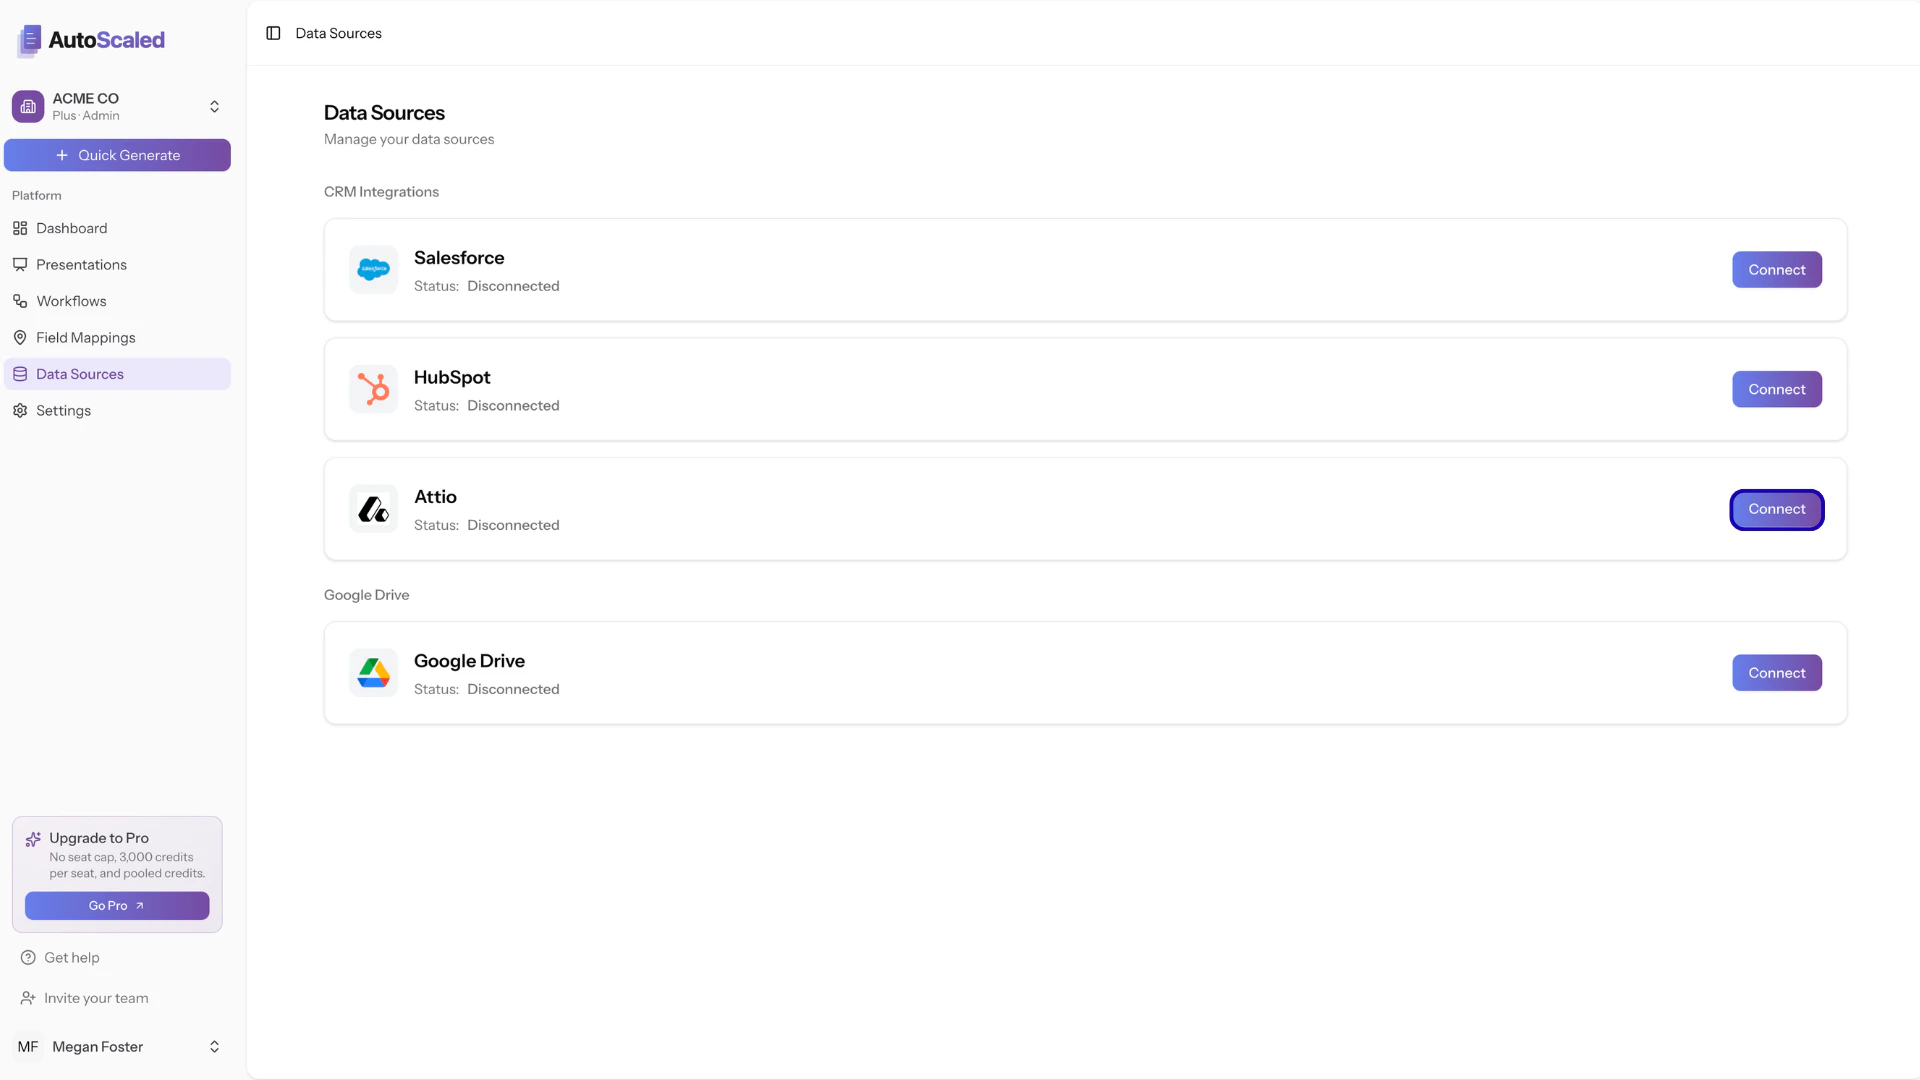 This will open an Attio dialog so you can sign in to your account:
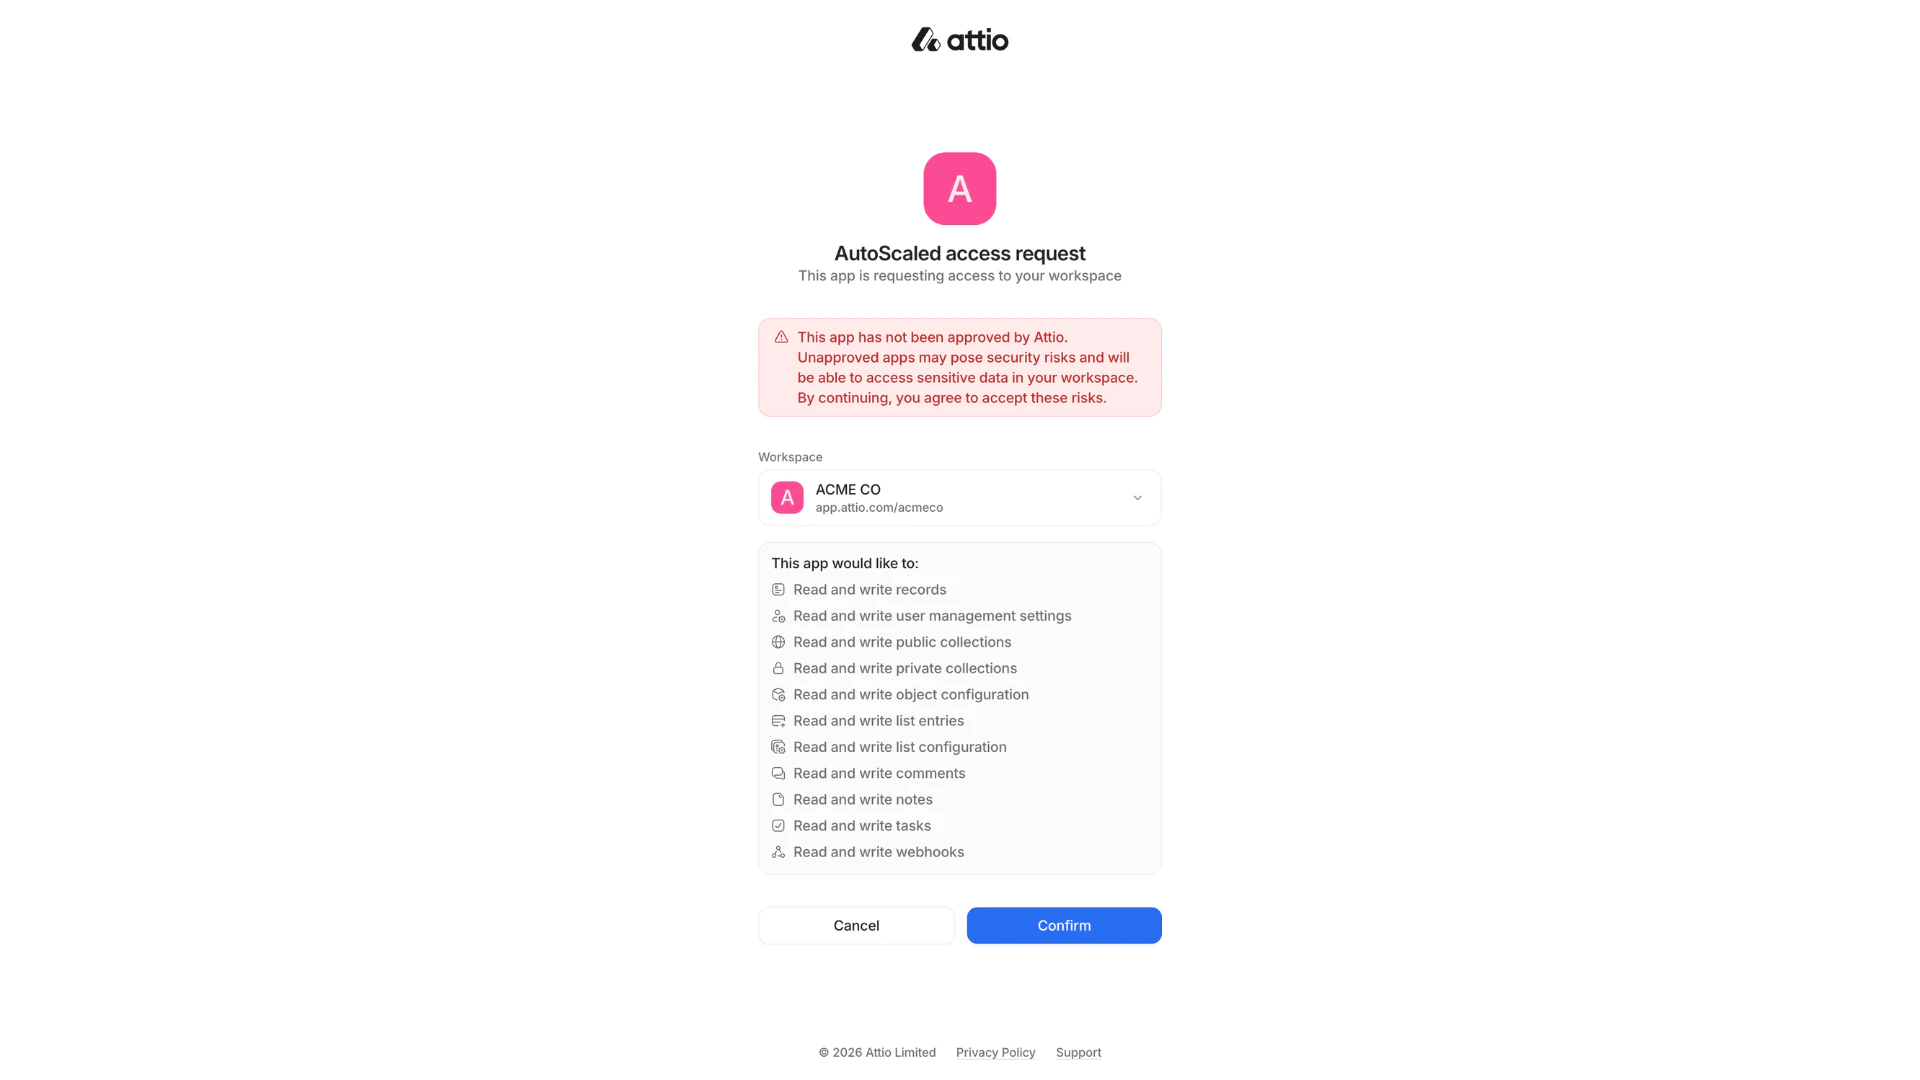 Attio might show a warning as you're connecting a third-party tool to Attio. This is standard and default behavior. You can continue connecting AutoScaled and revoke access at any time.
Once connected, you will see the status update to **Connected**. You can use Attio for *running manual presentation generation* and *content scheduling*.
To use **triggers in Attio**, you need to configure a **webhook**. The steps below walk through the full setup (four parts).
To use triggers (e.g. *generate a presentation when a deal gets updated in Attio* or *send a sales deck when a new lead signs up in Attio*) you will need to configure a webhook in Attio. The process is simple and straightforward.
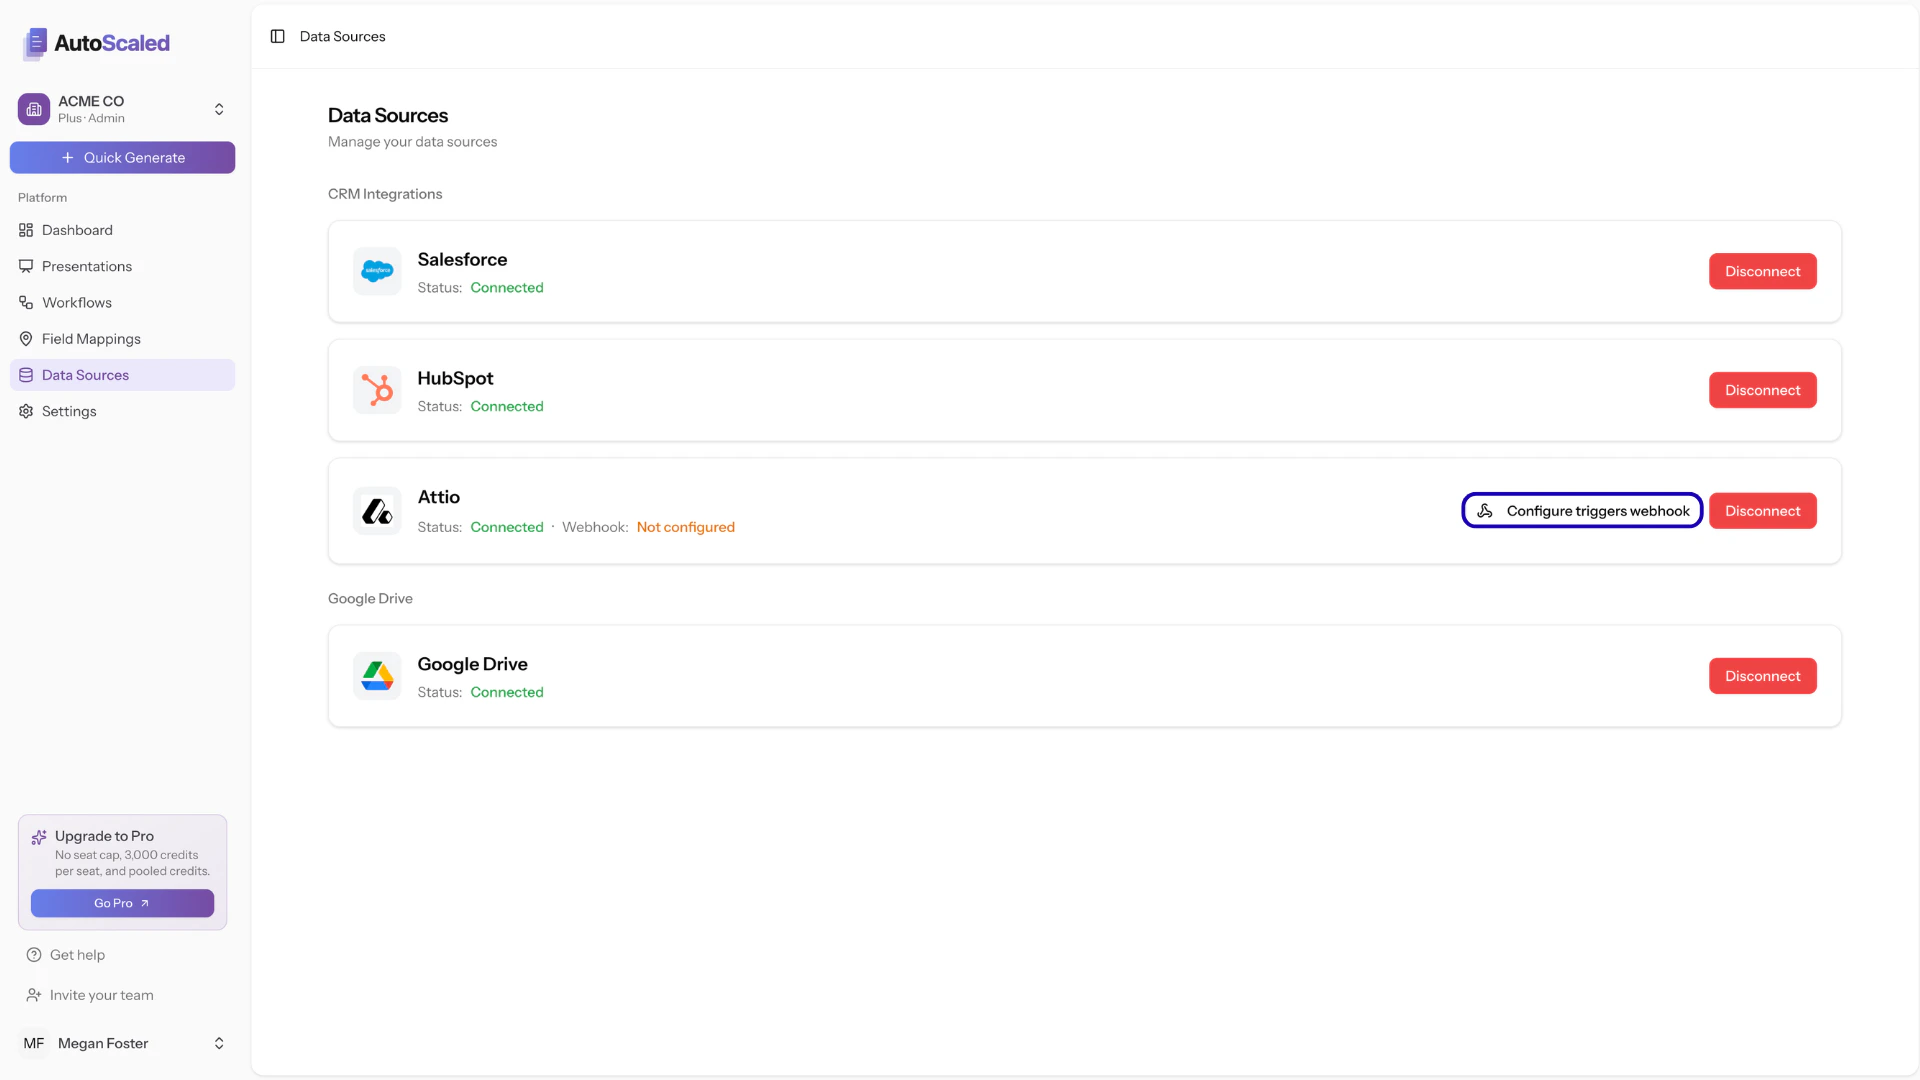
**Step 1:** In AutoScaled, open **Data Sources** and click **Configure Triggers Webhook**.
Attio might show a warning as you're connecting a third-party tool to Attio. This is standard and default behavior. You can continue connecting AutoScaled and revoke access at any time.
Once connected, you will see the status update to **Connected**. You can use Attio for *running manual presentation generation* and *content scheduling*.
To use **triggers in Attio**, you need to configure a **webhook**. The steps below walk through the full setup (four parts).
To use triggers (e.g. *generate a presentation when a deal gets updated in Attio* or *send a sales deck when a new lead signs up in Attio*) you will need to configure a webhook in Attio. The process is simple and straightforward.
**Step 1:** In AutoScaled, open **Data Sources** and click **Configure Triggers Webhook**.
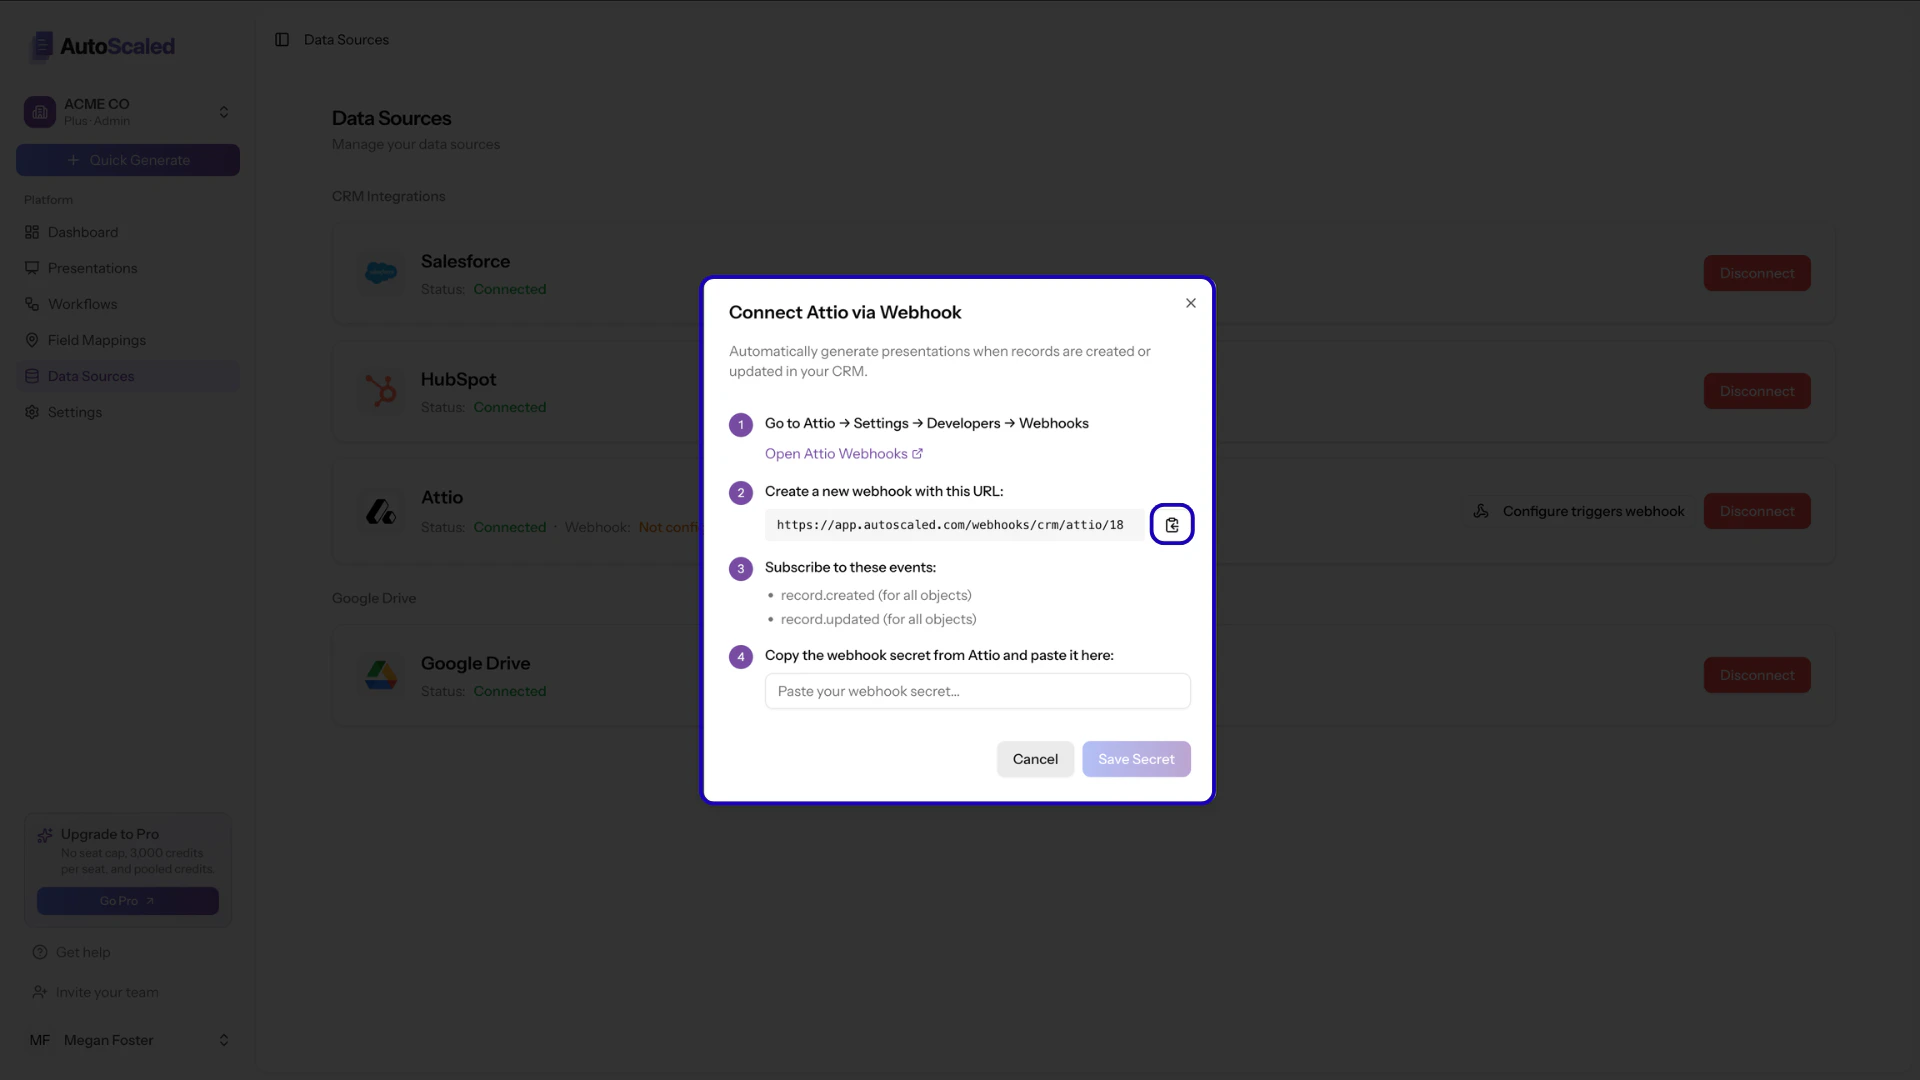
 A modal will open with instructions. Copy the **webhook URL**.
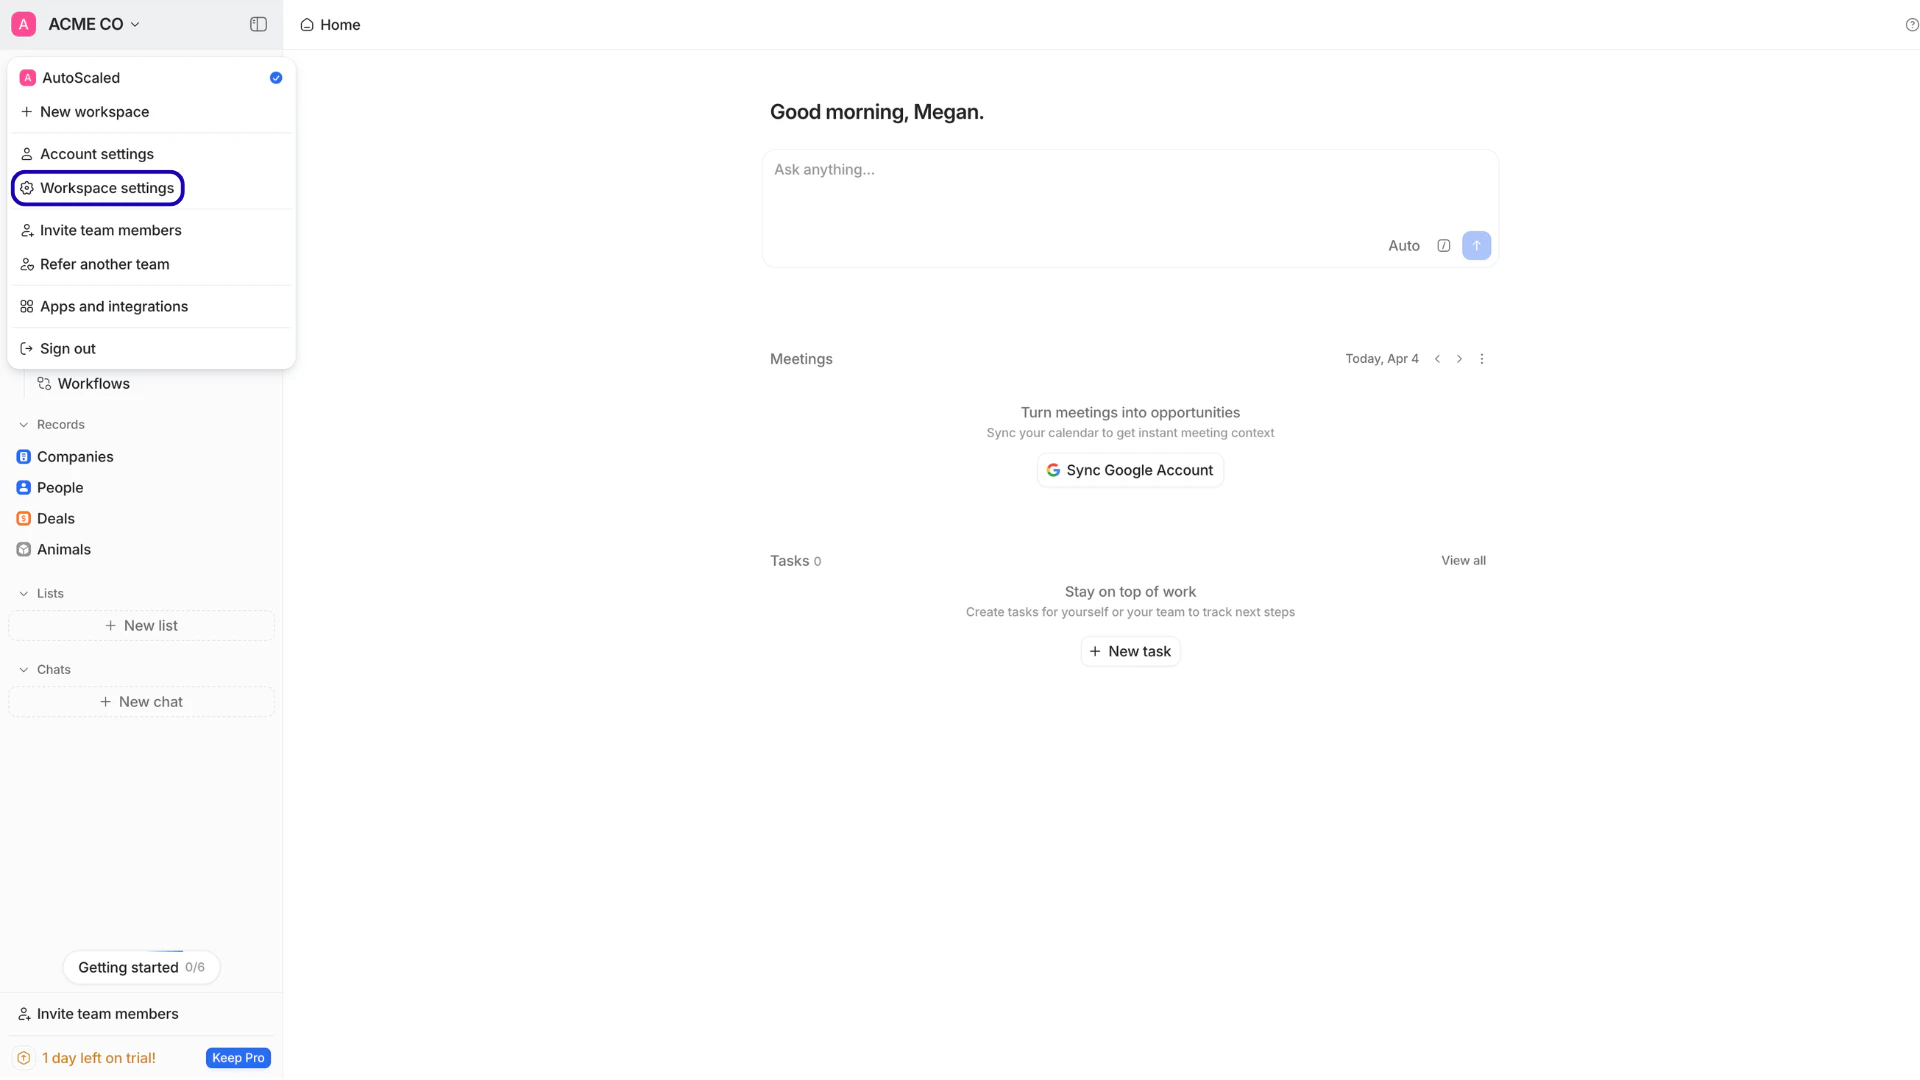
 **Step 2:** Open Attio workspace settings
In your Attio account, open the menu in the top left, click your user name, and select **Workspace settings**.
**Step 2:** Open Attio workspace settings
In your Attio account, open the menu in the top left, click your user name, and select **Workspace settings**.
 In the left-hand menu, select **Developers**, then **Webhooks**.
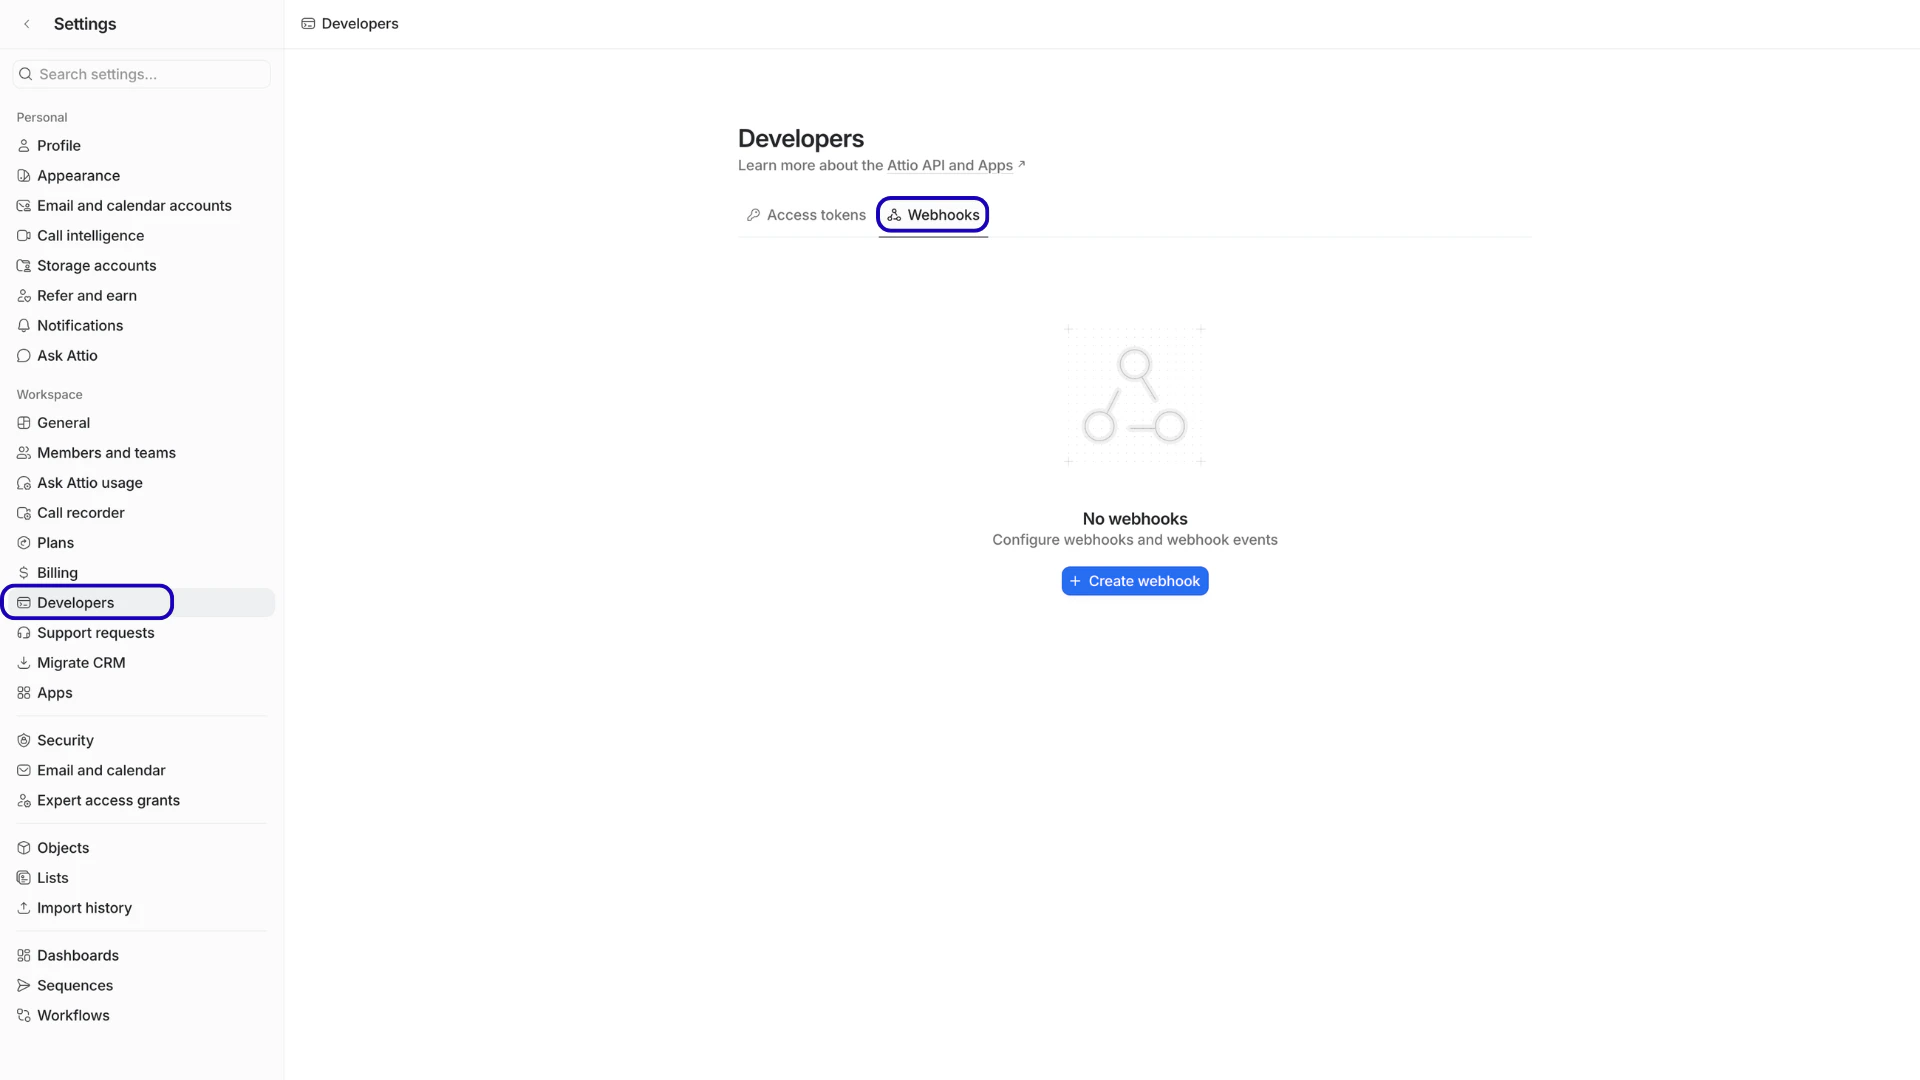 **Step 3:** Create a webhook and paste the URL
Click **Create Webhook**. When the modal opens, paste the URL you copied in step 1 into the **Target URL** field.
**Step 3:** Create a webhook and paste the URL
Click **Create Webhook**. When the modal opens, paste the URL you copied in step 1 into the **Target URL** field.
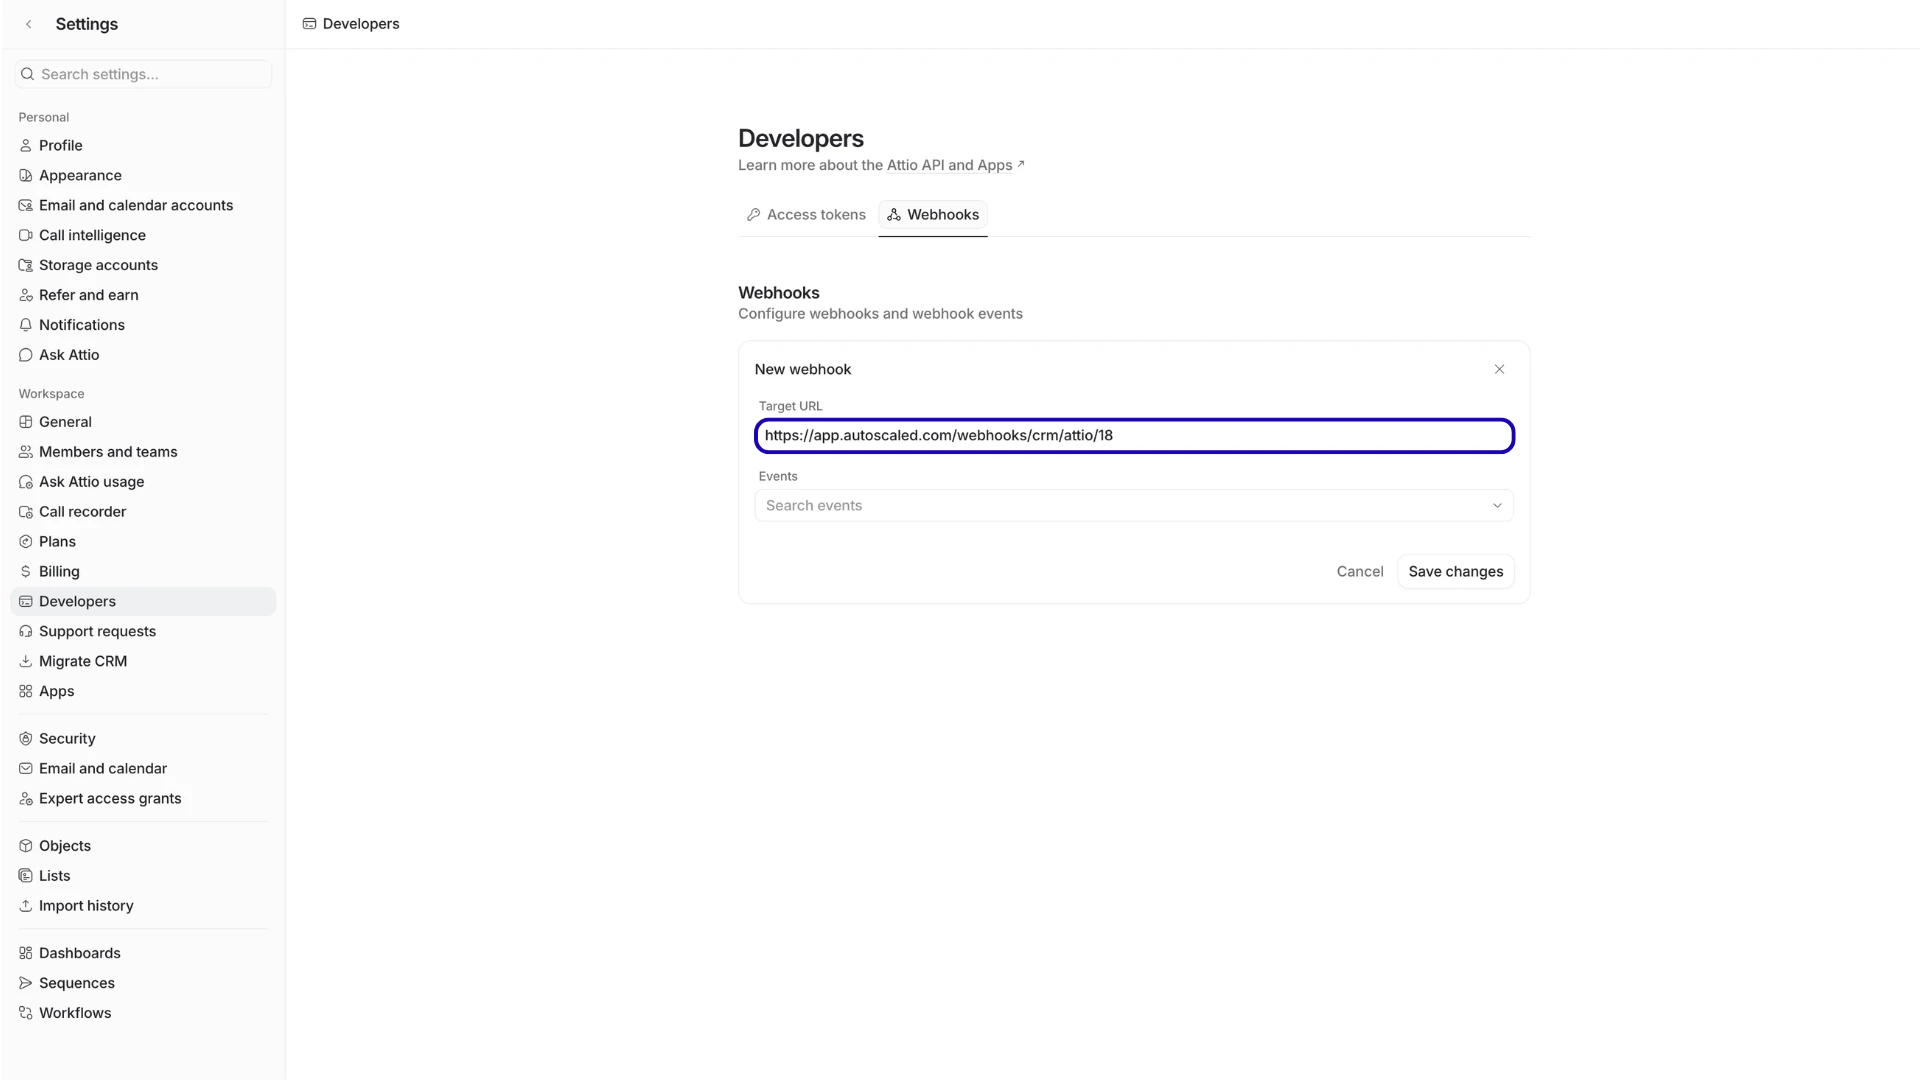 After pasting the target URL, search for the following two events:
```text theme={null}
record.created
record.updated
```
These events notify AutoScaled when a new record is created or when an object field is updated:
After pasting the target URL, search for the following two events:
```text theme={null}
record.created
record.updated
```
These events notify AutoScaled when a new record is created or when an object field is updated:
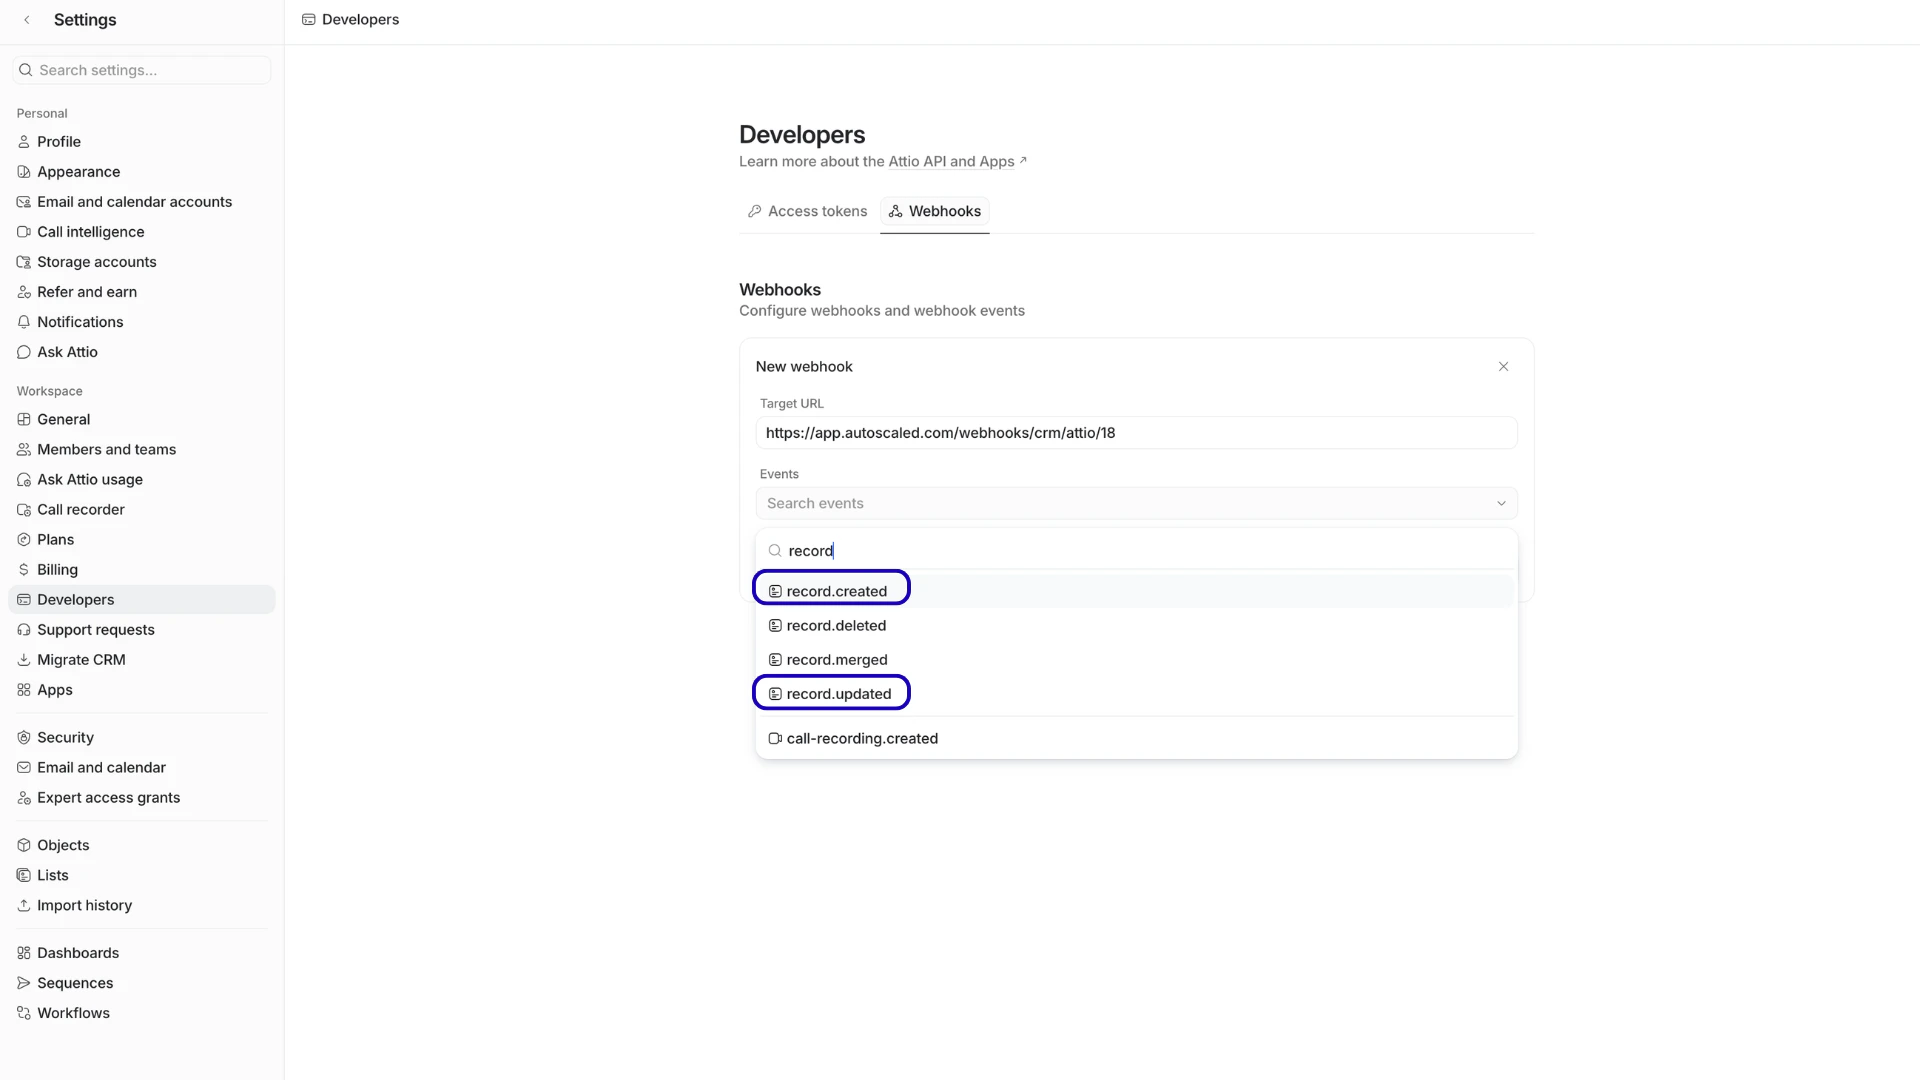 Now save the webhook in Attio:
 **Step 4:** Adding the webhook secret to AutoScaled
Your webhook is now set up in Attio. Follow these steps to add the webhook details to AutoScaled.
In the webhook overview in Attio, click on the *3-dots* next to the newly created webhook:
**Step 4:** Adding the webhook secret to AutoScaled
Your webhook is now set up in Attio. Follow these steps to add the webhook details to AutoScaled.
In the webhook overview in Attio, click on the *3-dots* next to the newly created webhook:
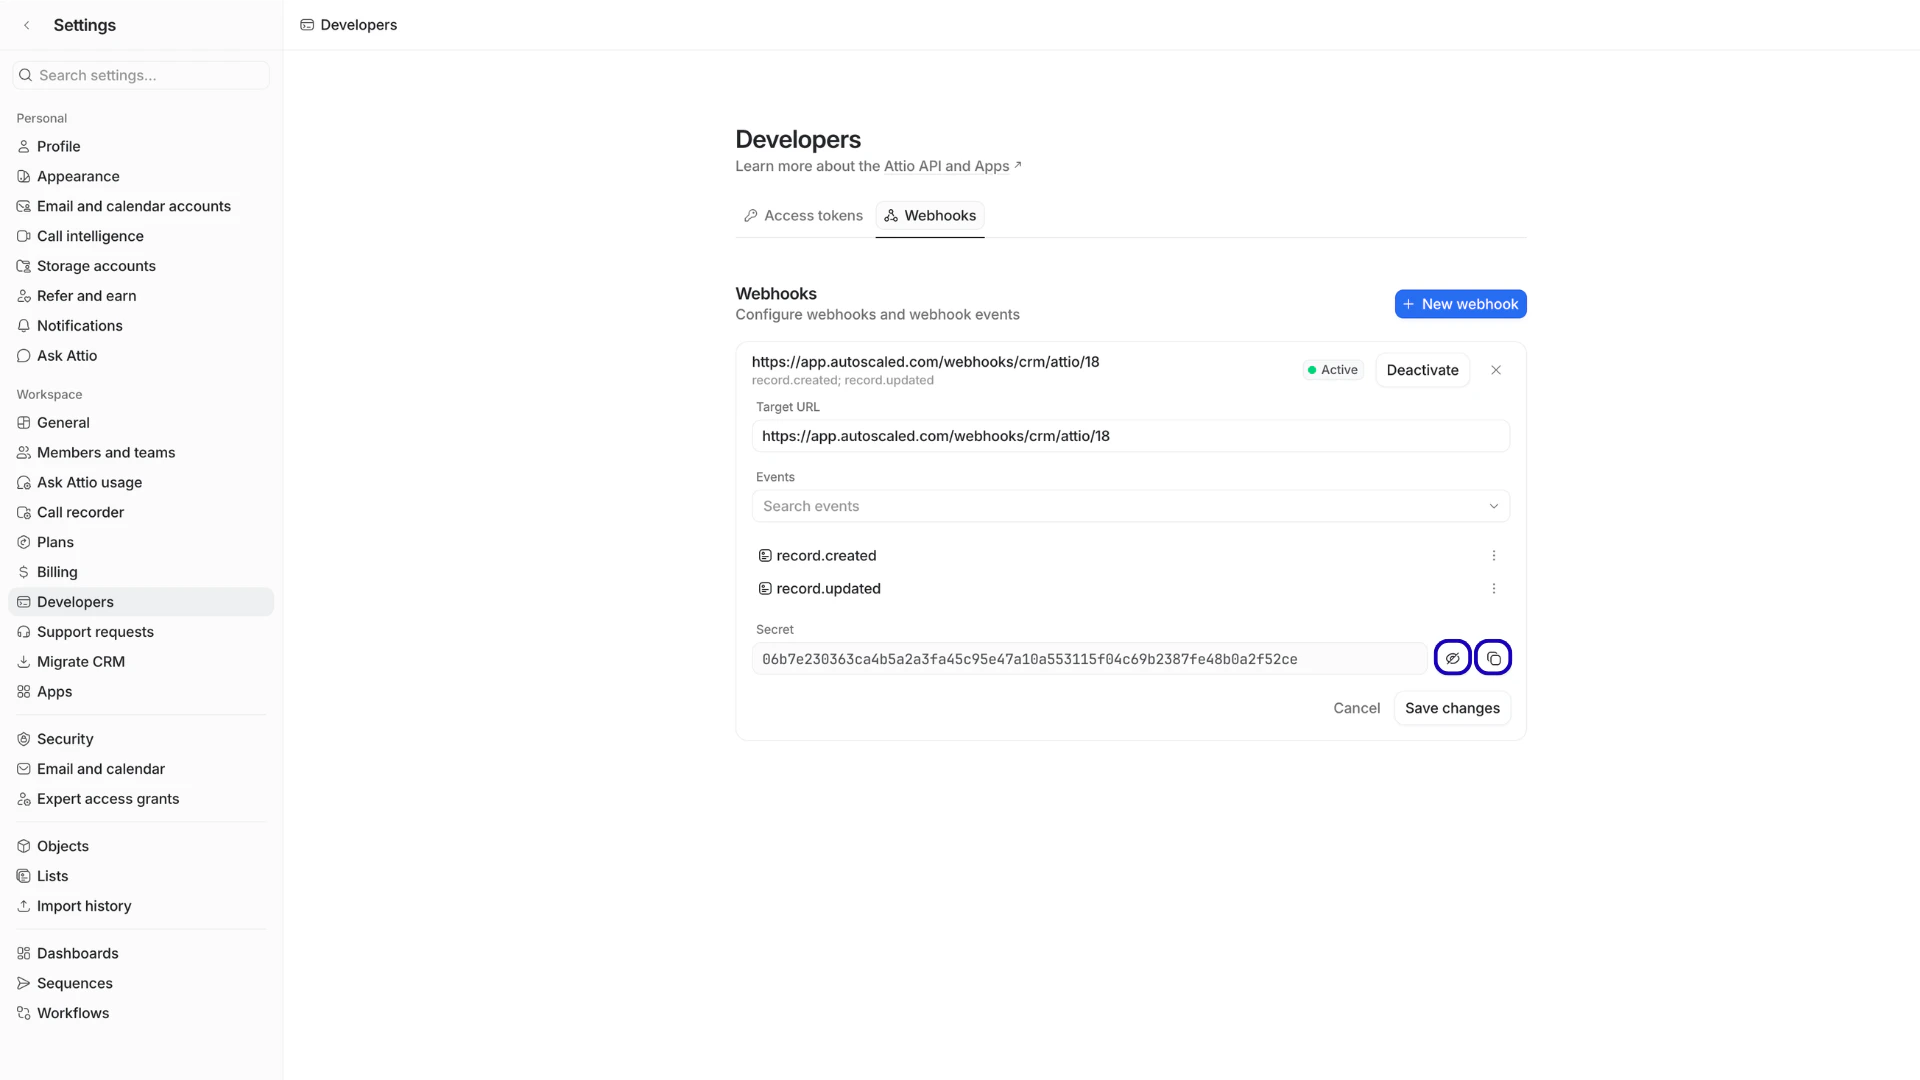
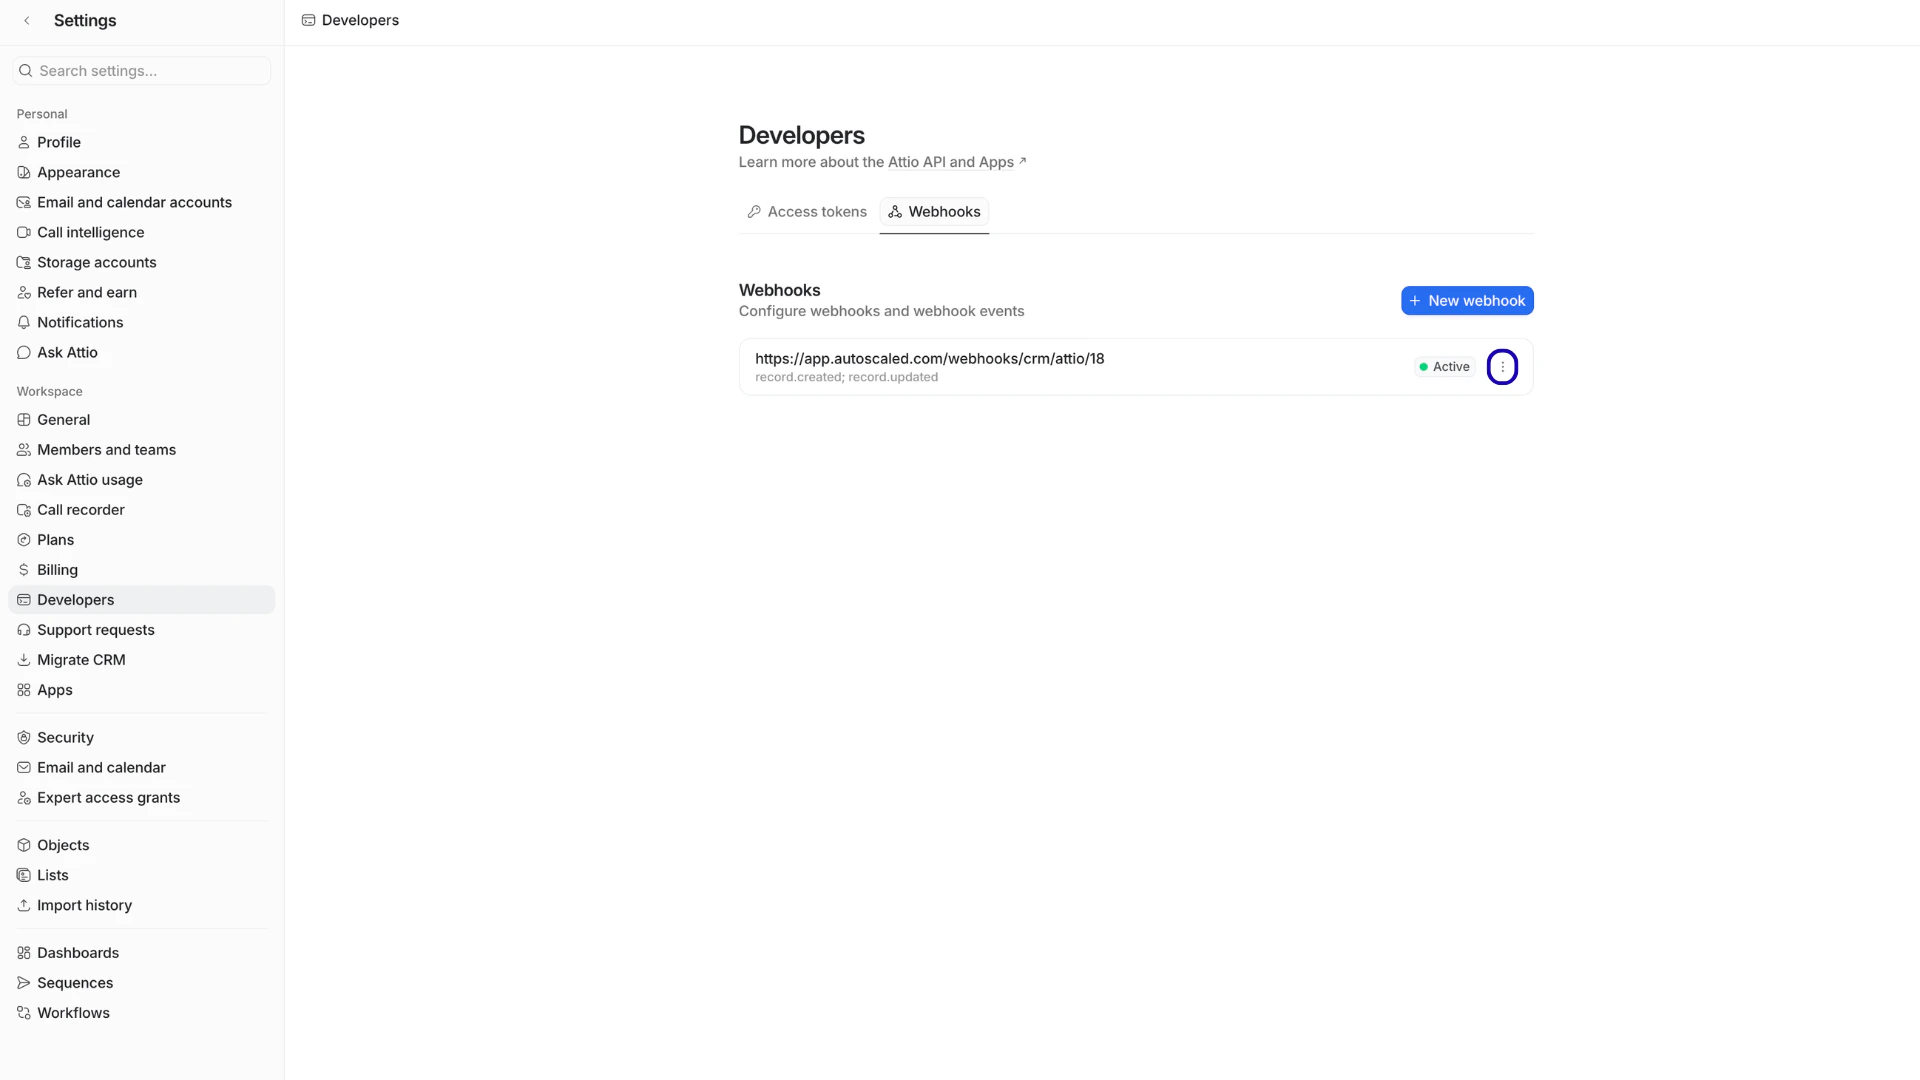 The modal reopens with the latest information about your webhook. Find **Secret** and copy the value to your clipboard.
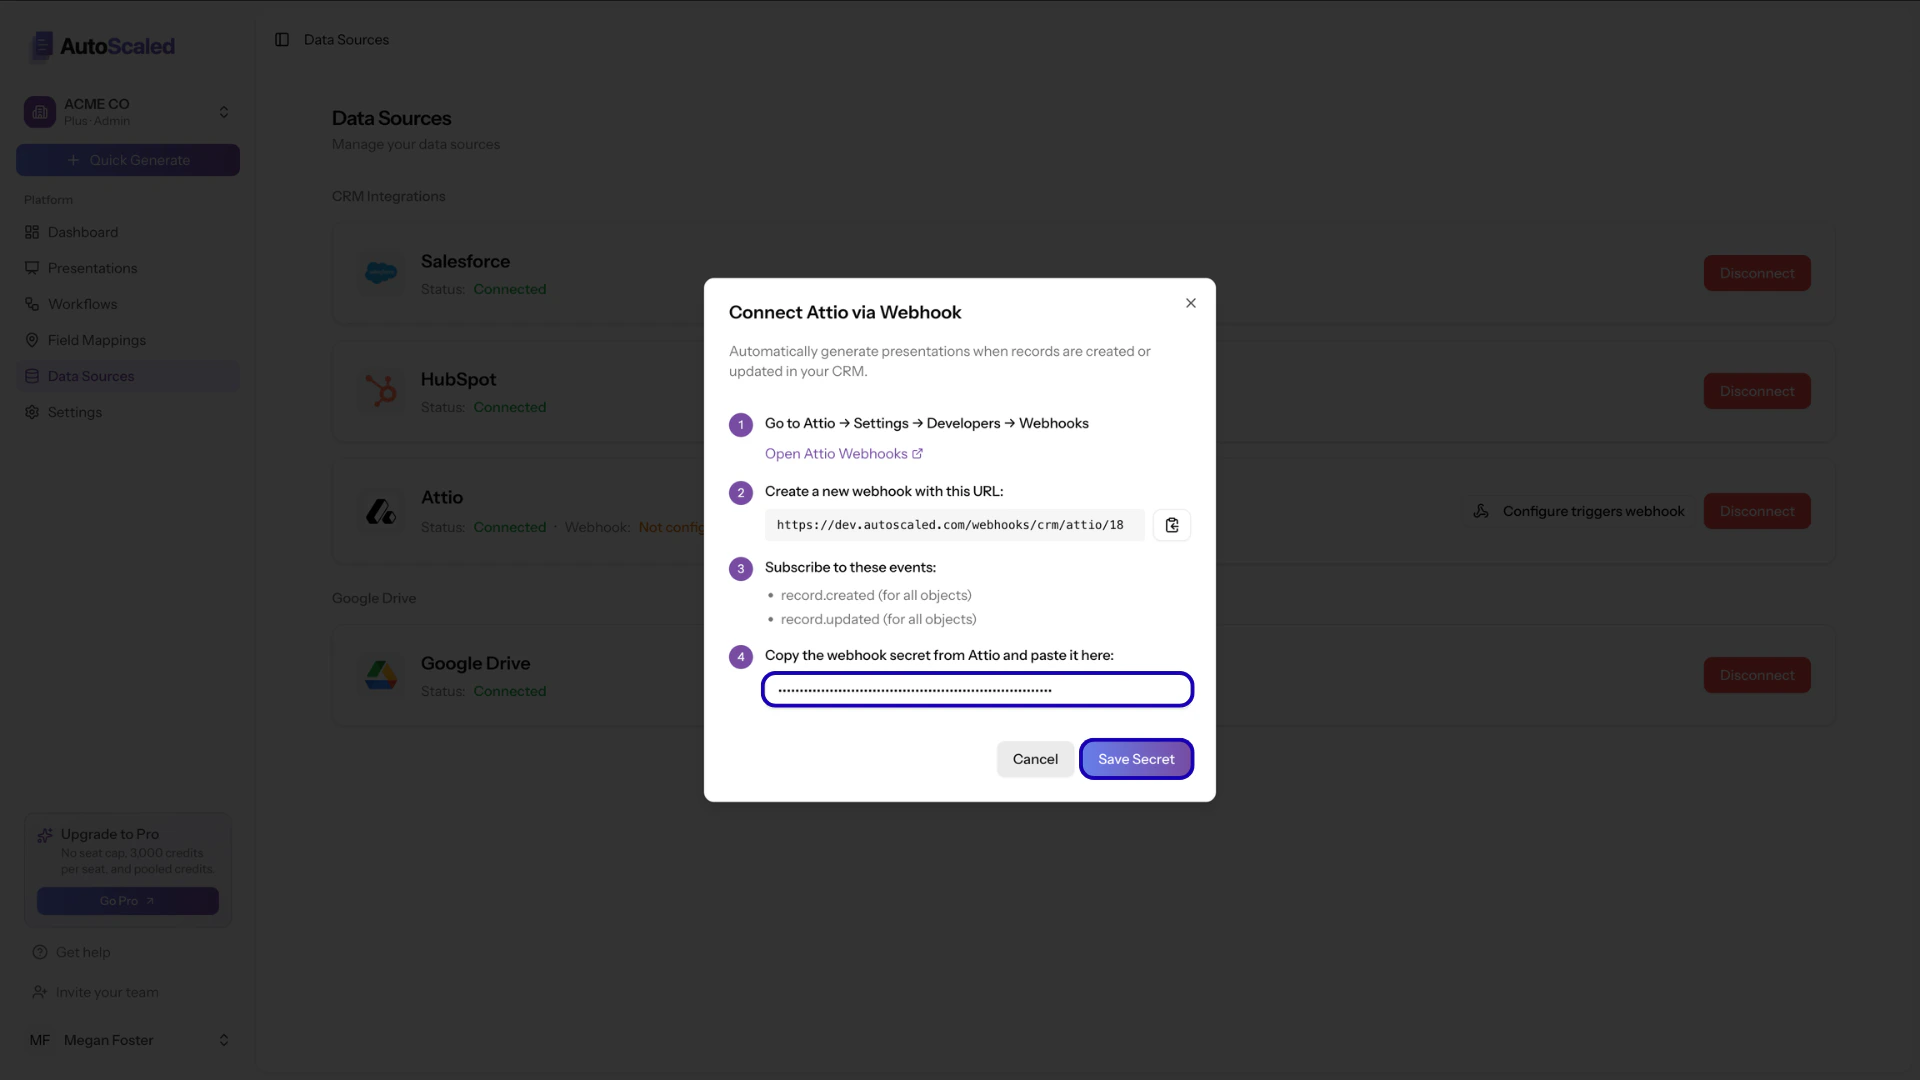
 Finally, return to the **Configure Triggers Webhook** modal in AutoScaled and paste the secret into the **webhook secret** field.
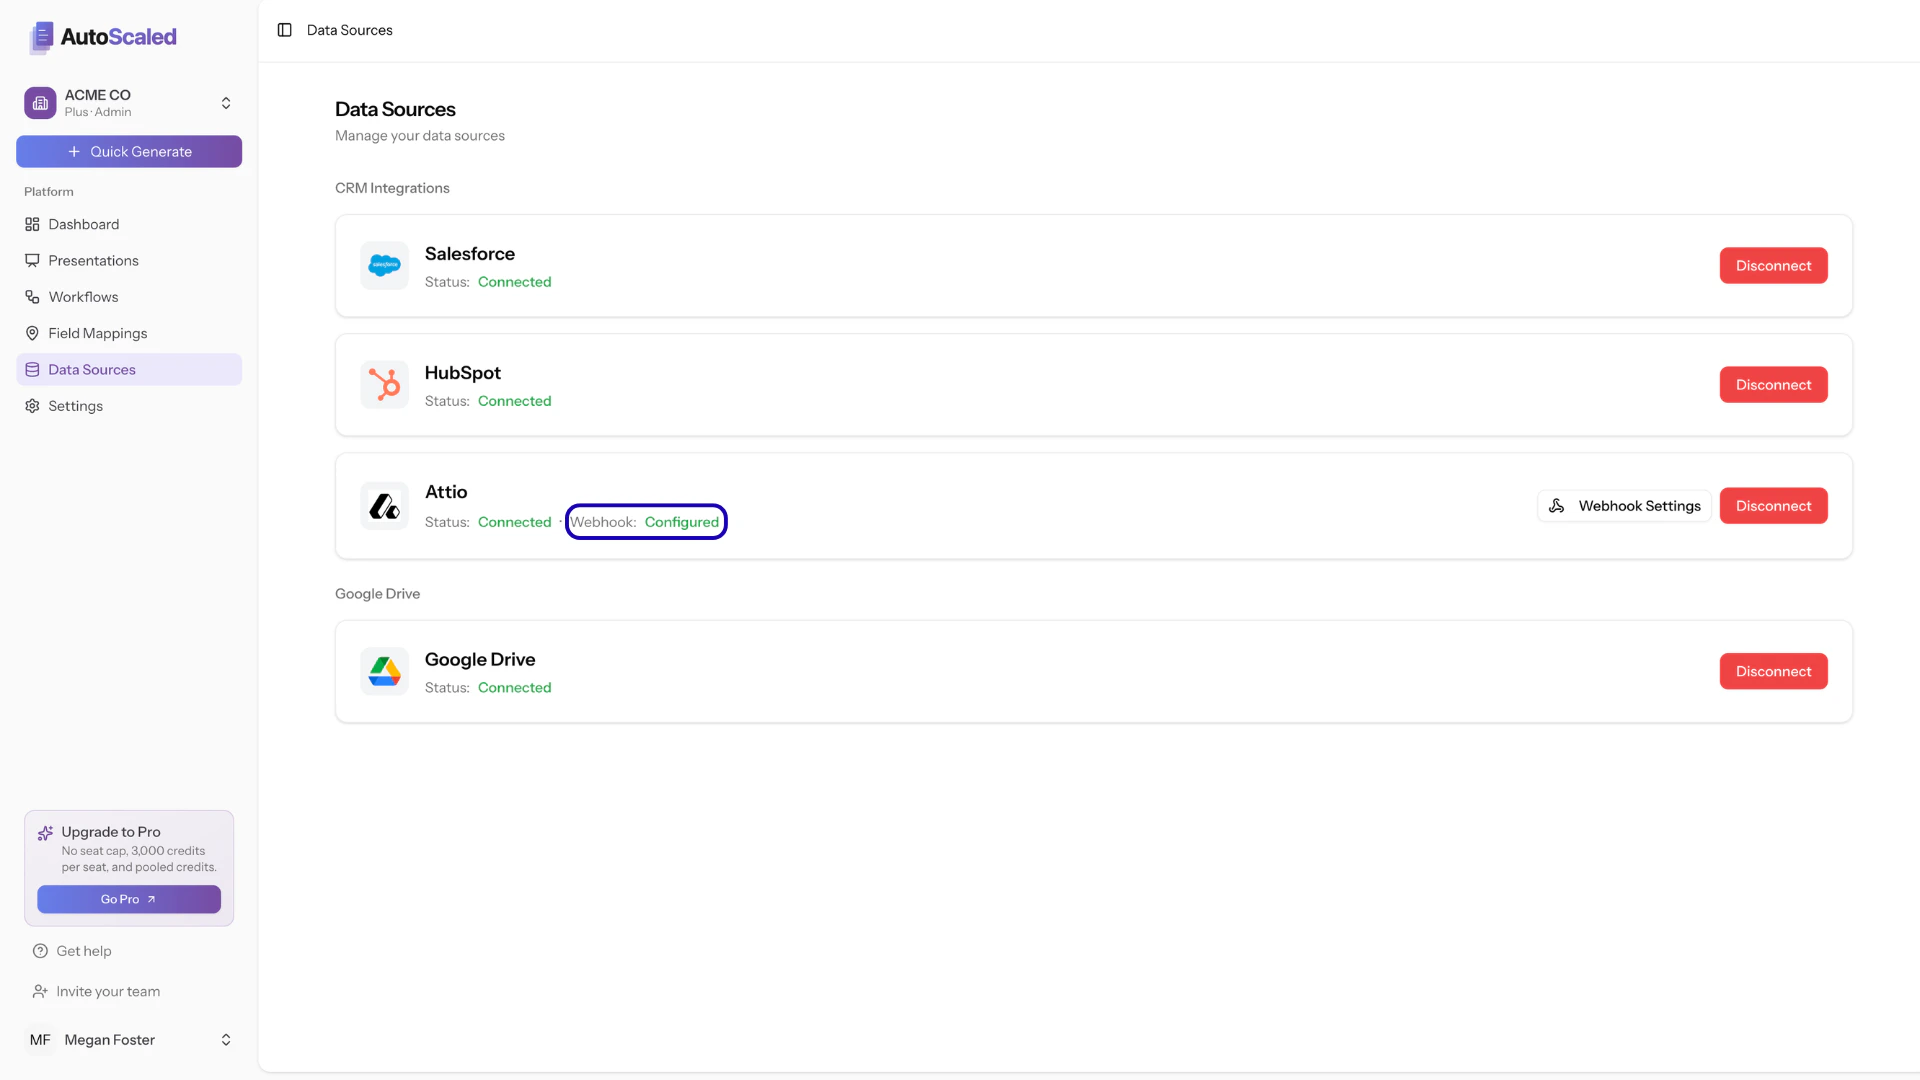
 Now save the secret. All steps are now done and you will see the webhook is configured 🎉
 ### Data access and permissions
Integration configurations in AutoScaled can be set up by any member of your organization, as long as they have the authorization within your CRM or Google Workspace to do so.
Permissions and data access are at the user level: users only see data, records, objects, fields, spreadsheets, and templates (presentations) they can access in the underlying integration.
There is no need to set up specific permissions for AutoScaled. All permissions of Google Workspace and your CRM are adhered to in AutoScaled.
## Other spreadsheet software integrations
### Microsoft Excel upload in AutoScaled
AutoScaled currently only supports **upload** of Microsoft Excel files. You do not need to integrate Microsoft Excel via API. Upload your Excel file with your prompt to generate presentations using that file as a data source.
### Data access and permissions
Integration configurations in AutoScaled can be set up by any member of your organization, as long as they have the authorization within your CRM or Google Workspace to do so.
Permissions and data access are at the user level: users only see data, records, objects, fields, spreadsheets, and templates (presentations) they can access in the underlying integration.
There is no need to set up specific permissions for AutoScaled. All permissions of Google Workspace and your CRM are adhered to in AutoScaled.
## Other spreadsheet software integrations
### Microsoft Excel upload in AutoScaled
AutoScaled currently only supports **upload** of Microsoft Excel files. You do not need to integrate Microsoft Excel via API. Upload your Excel file with your prompt to generate presentations using that file as a data source.
.png?fit=max&auto=format&n=JiWNT4SnEGqZr1ya&q=85&s=db4110b4c5a73c39422e371e870e5ad1) You do not require a Microsoft 365 account in order to utilize Microsoft Excel in AutoScaled.
### CSV upload in AutoScaled
AutoScaled currently only supports **upload** of CSV files. You do not need to integrate CSV via API. Upload your CSV file with your prompt to generate presentations using that file as a data source.
## Other presentation software integrations
### Microsoft PowerPoint download in AutoScaled
All presentations that are generated can be downloaded as Microsoft PowerPoint. You do not need an additional API connection for this. You can read more about downloading PowerPoint presentations on the [content management](/content-management/manage-presentations) page.
You do not require a Microsoft 365 account in order to utilize Microsoft PowerPoint in AutoScaled.
### PDF download in AutoScaled
All presentations that are generated can be downloaded as PDF. You do not need an additional API connection for this. You can read more about downloading PDFs on the [content management](/content-management/manage-presentations) page.
***
**Anything missing?** Let us know at [**support@autoscaled.com**](mailto:support@autoscaled.com) and we'll help you out!
You do not require a Microsoft 365 account in order to utilize Microsoft Excel in AutoScaled.
### CSV upload in AutoScaled
AutoScaled currently only supports **upload** of CSV files. You do not need to integrate CSV via API. Upload your CSV file with your prompt to generate presentations using that file as a data source.
## Other presentation software integrations
### Microsoft PowerPoint download in AutoScaled
All presentations that are generated can be downloaded as Microsoft PowerPoint. You do not need an additional API connection for this. You can read more about downloading PowerPoint presentations on the [content management](/content-management/manage-presentations) page.
You do not require a Microsoft 365 account in order to utilize Microsoft PowerPoint in AutoScaled.
### PDF download in AutoScaled
All presentations that are generated can be downloaded as PDF. You do not need an additional API connection for this. You can read more about downloading PDFs on the [content management](/content-management/manage-presentations) page.
***
**Anything missing?** Let us know at [**support@autoscaled.com**](mailto:support@autoscaled.com) and we'll help you out!