> ## Documentation Index
> Fetch the complete documentation index at: https://autoscaled.com/docs/llms.txt
> Use this file to discover all available pages before exploring further.
# Set up Attio to Generate Sales Decks Automatically
> Attio integration setup for AutoScaled: connect your account, configure scopes, and auto-generate sales decks from live CRM data. Start automating today.
## Get Started with Data-Driven Personalized Decks from Attio
### 3-minute full walkthrough of automating Attio CRM data to Decks
To use data from [Attio](https://attio.com/), authenticate your Attio account in **Data Sources**.
## Connect Attio
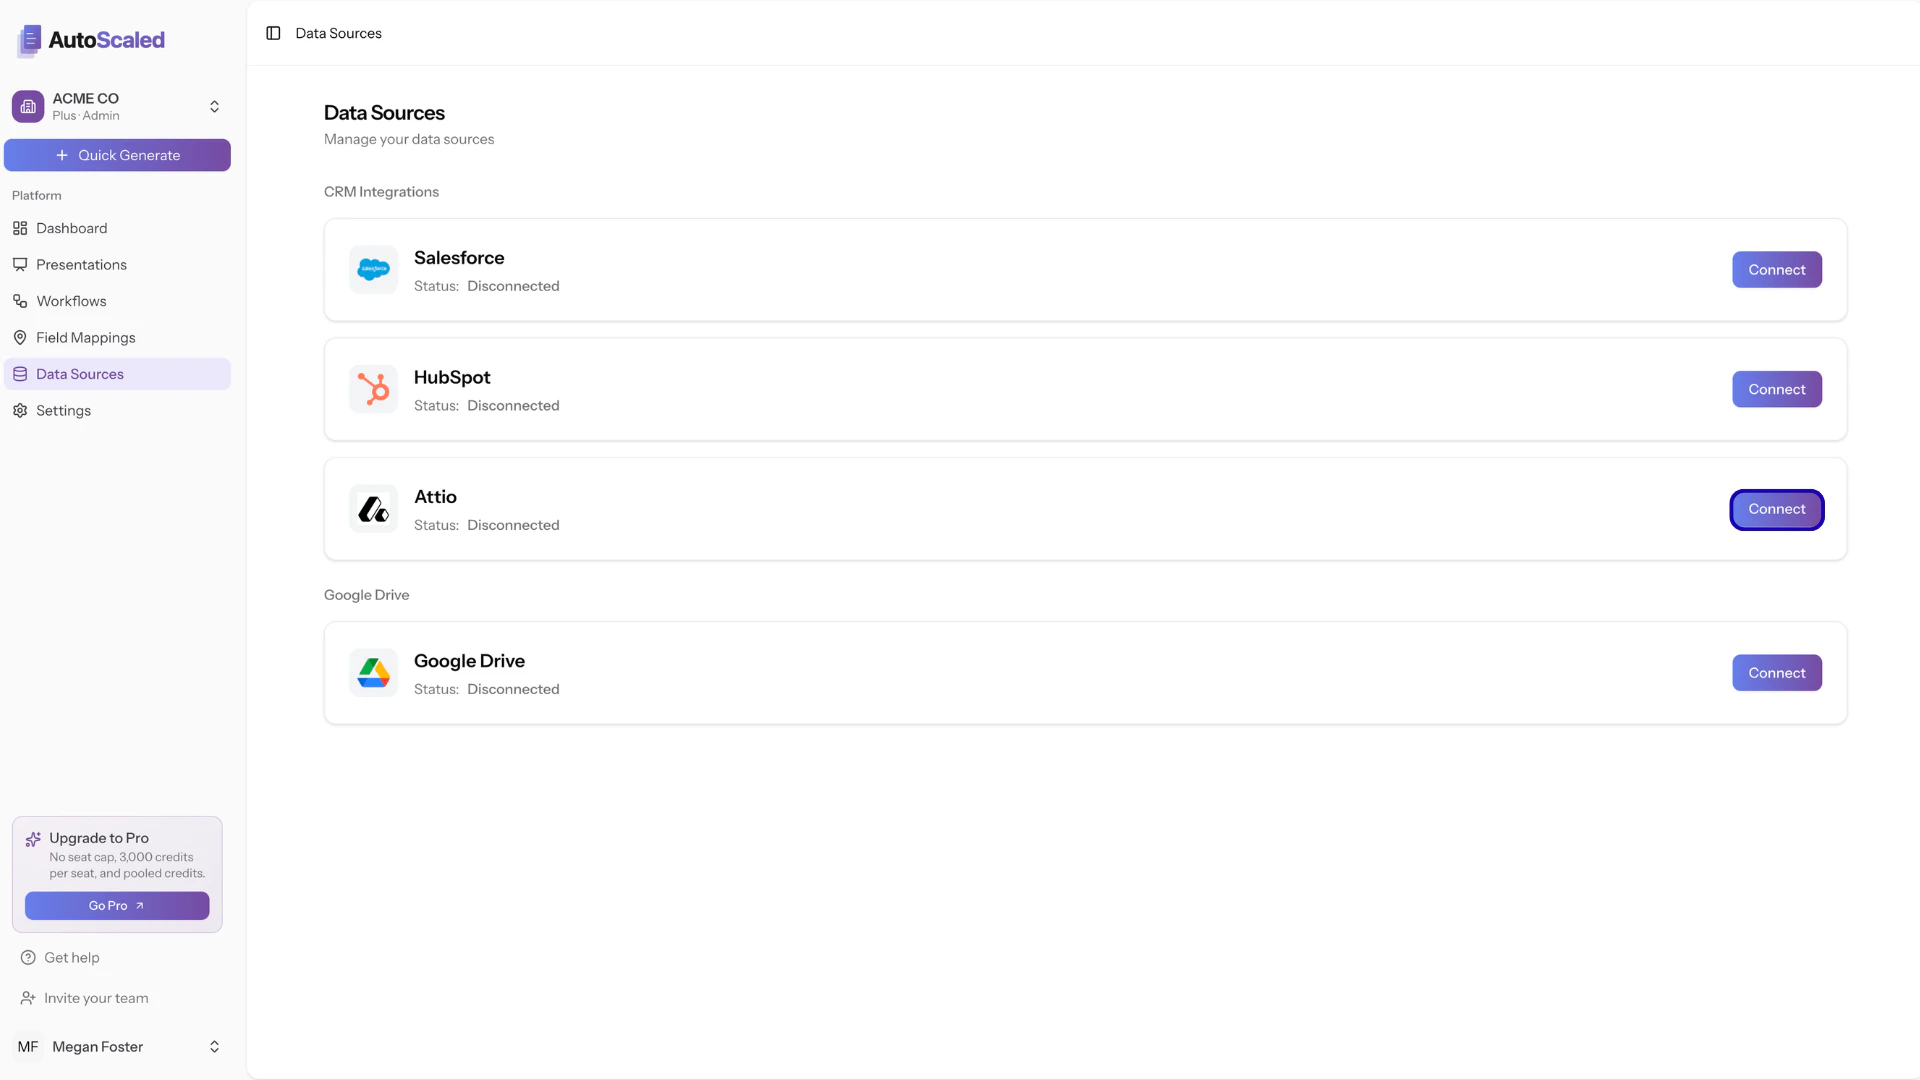
1. Go to **Data Sources** in AutoScaled.
2. Click **Connect** next to Attio.
3. Complete the Attio sign-in and authorization flow.
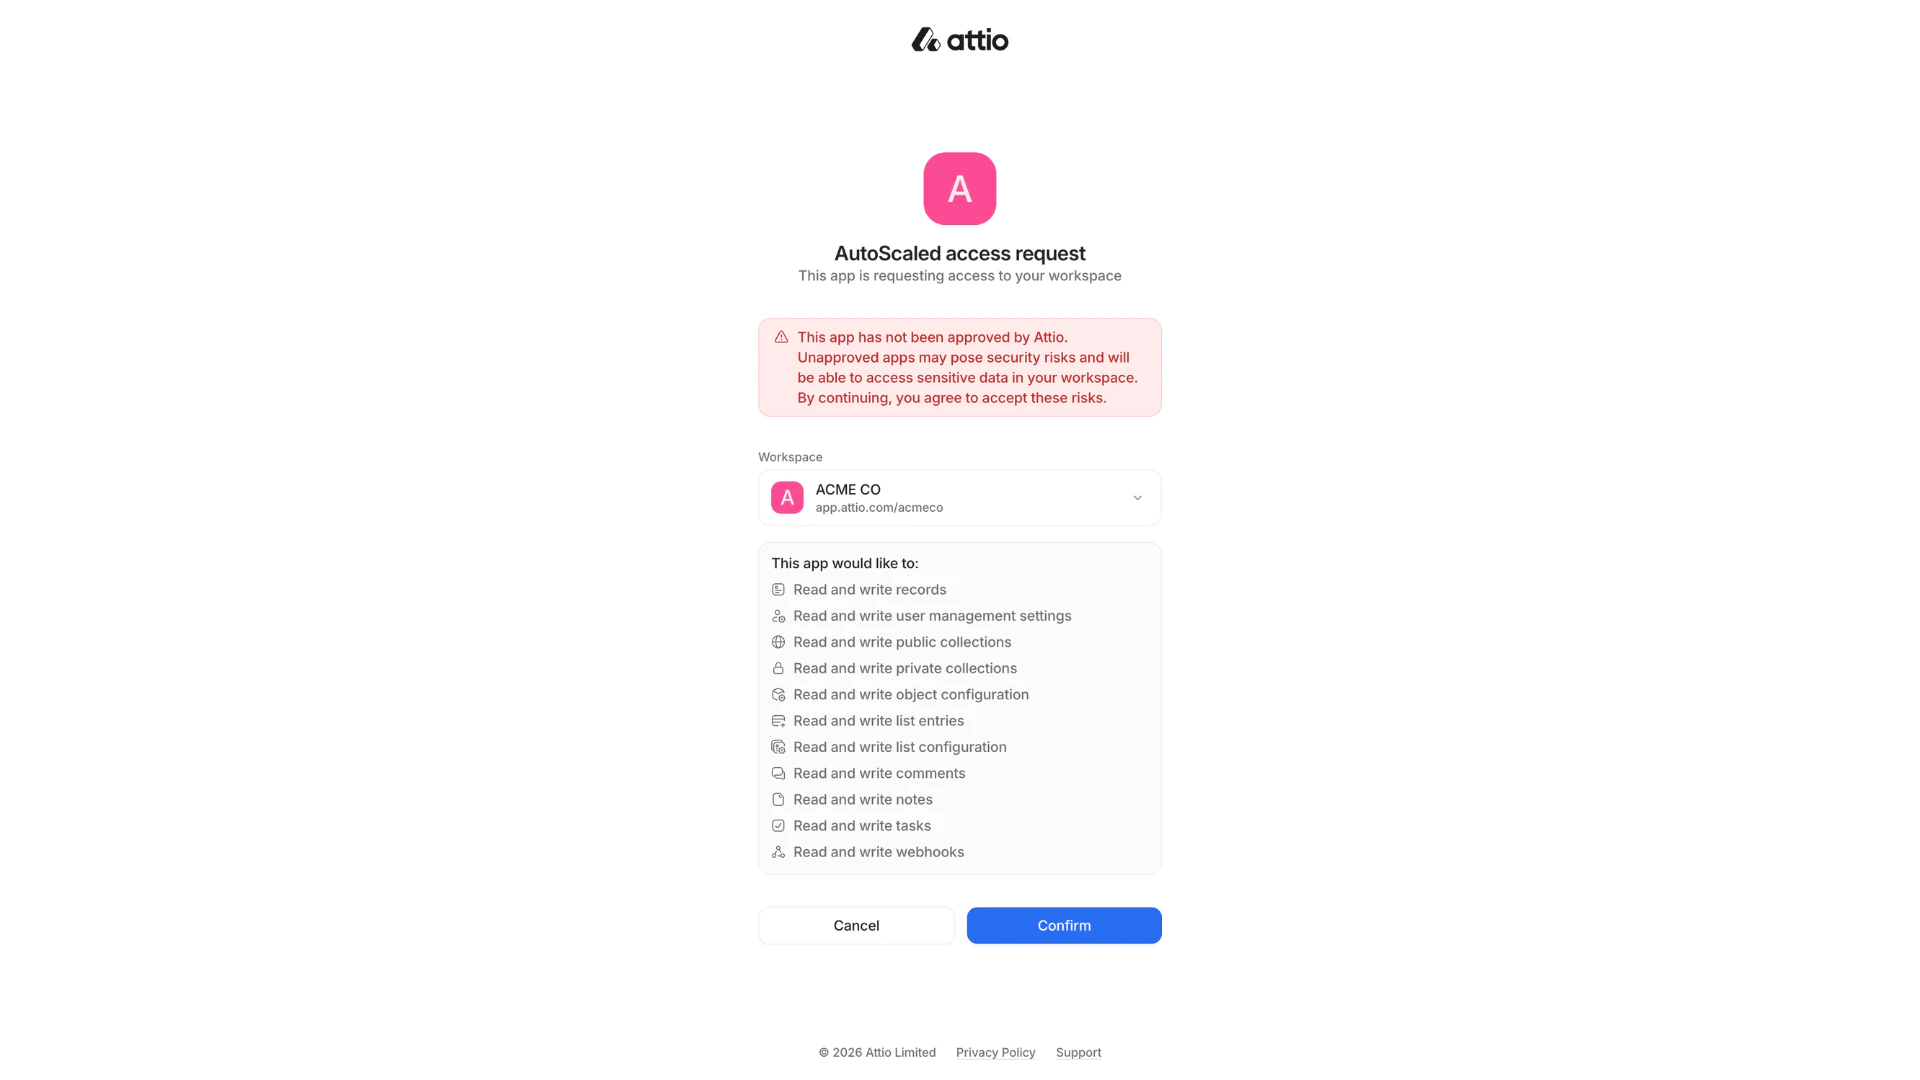
This will open an Attio dialog so you can sign in to your account:
Attio might show a warning as you're connecting a third-party tool to Attio. This is standard and default behavior. You can continue connecting AutoScaled and revoke access at any time.
Once connected, you will see the status update to **Connected**. You can use Attio for *running manual presentation generation* and *content scheduling*.
## Why connect Attio to AutoScaled
Connecting Attio helps you automate and scale presentation workflows:
* **Generate presentations from CRM events:** Trigger deck generation when records are created or updated.
* **Use live customer data:** Populate templates with Attio records and custom object data.
* **Schedule recurring updates:** Run scheduled workflows for pipeline reviews, account updates, and stakeholder syncs.
* **React faster to changes:** Combine webhook-based triggers with templates to deliver timely, relevant decks.
## Trigger configuration (webhook)
If you want Attio-based trigger automations, configure the Attio webhook from **Data Sources** using **Configure Triggers Webhook** and complete the setup in Attio.
To use **triggers in Attio**, you need to configure a **webhook**. The steps below walk through the full setup (four parts).
To use triggers (e.g. *generate a presentation when a deal gets updated in Attio* or *send a sales deck when a new lead signs up in Attio*) you will need to configure a webhook in Attio. The process is simple and straightforward.
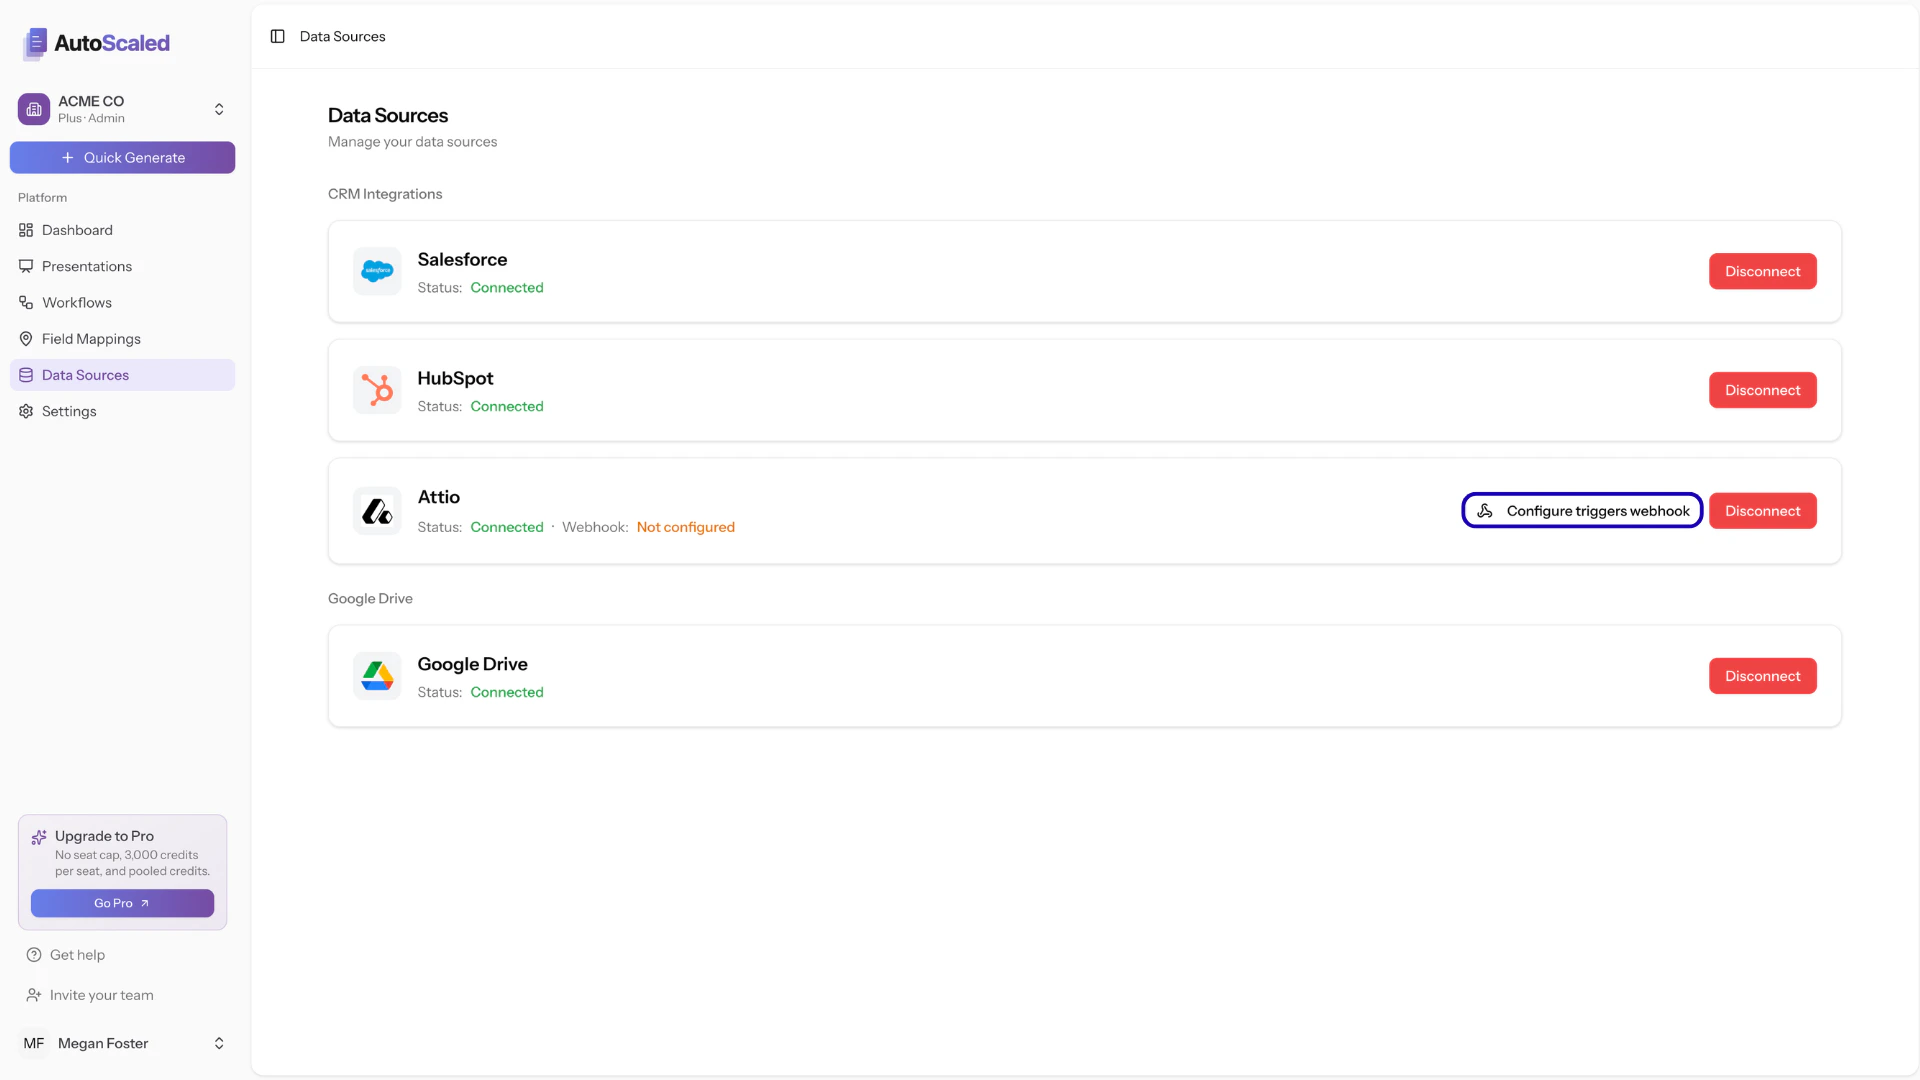
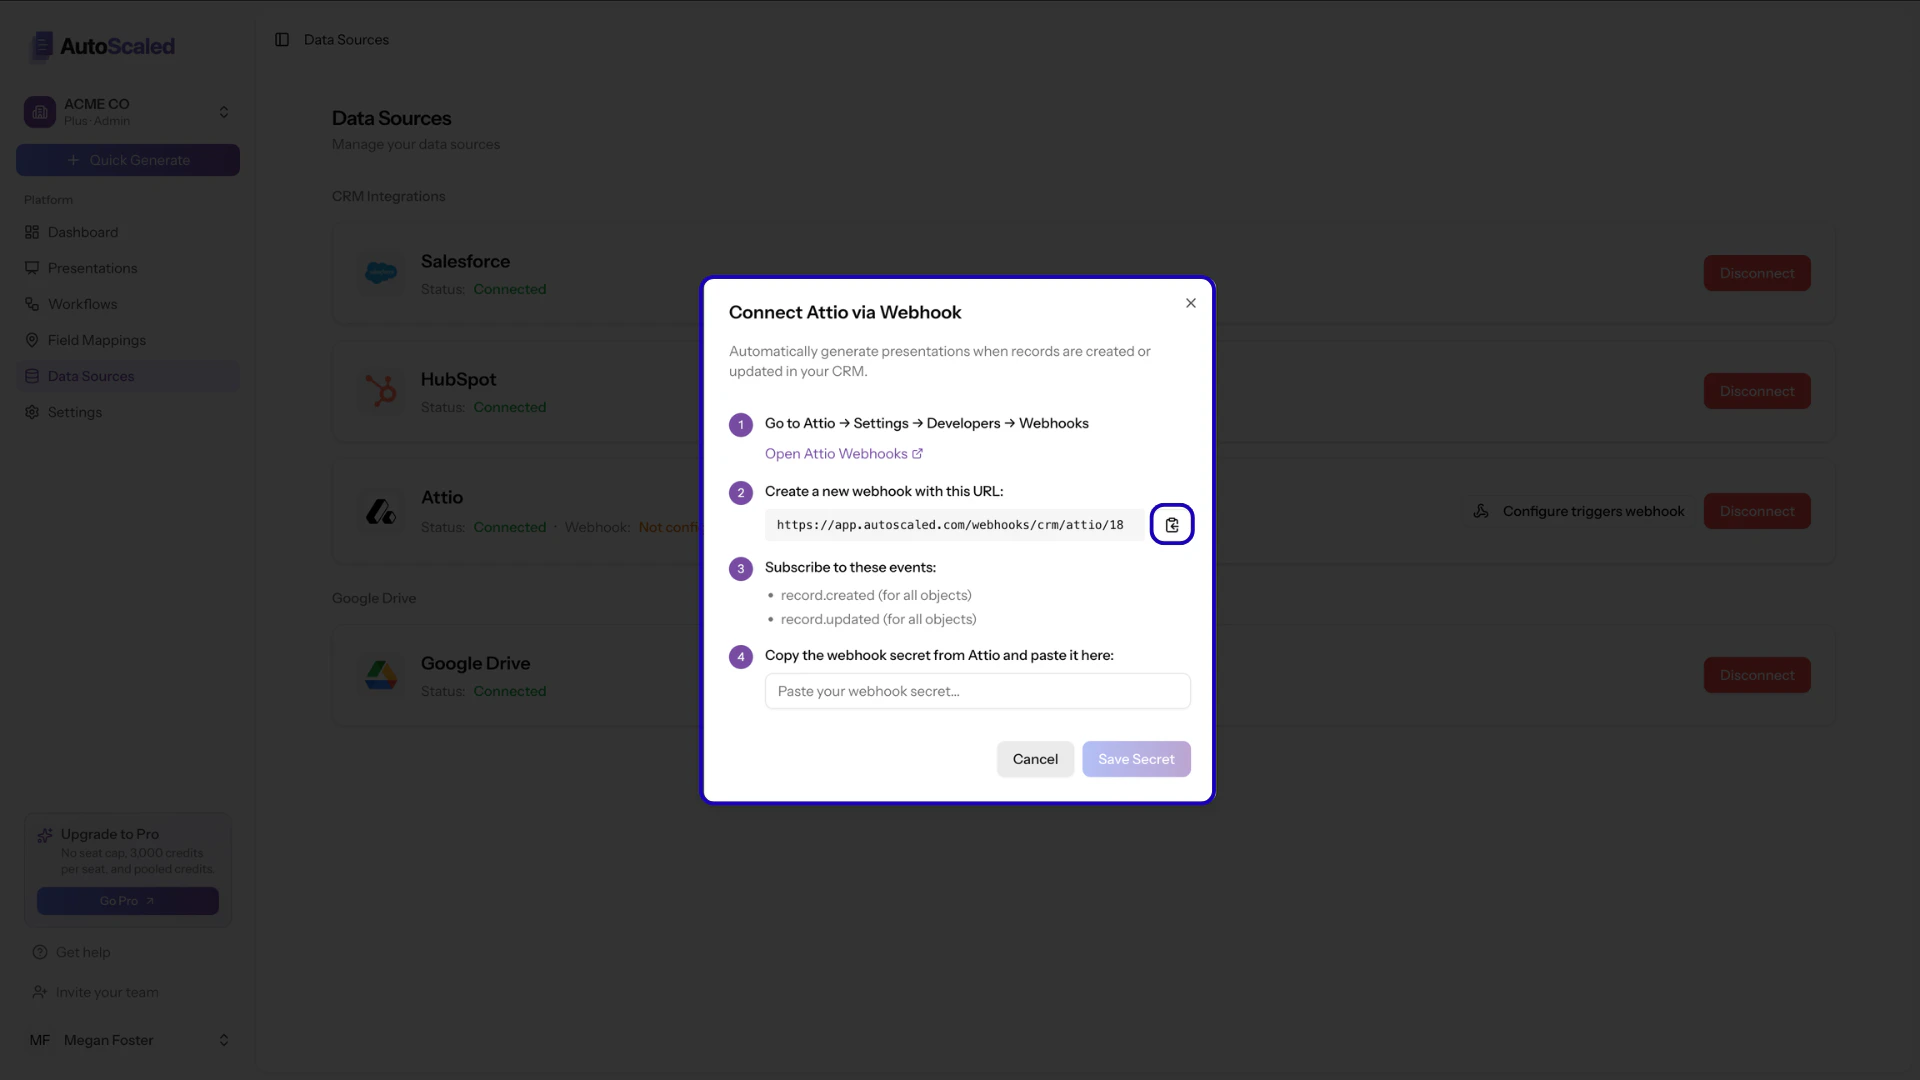
**Step 1:** In AutoScaled, open **Data Sources** and click **Configure Triggers Webhook**.
A modal will open with instructions. Copy the **webhook URL**.
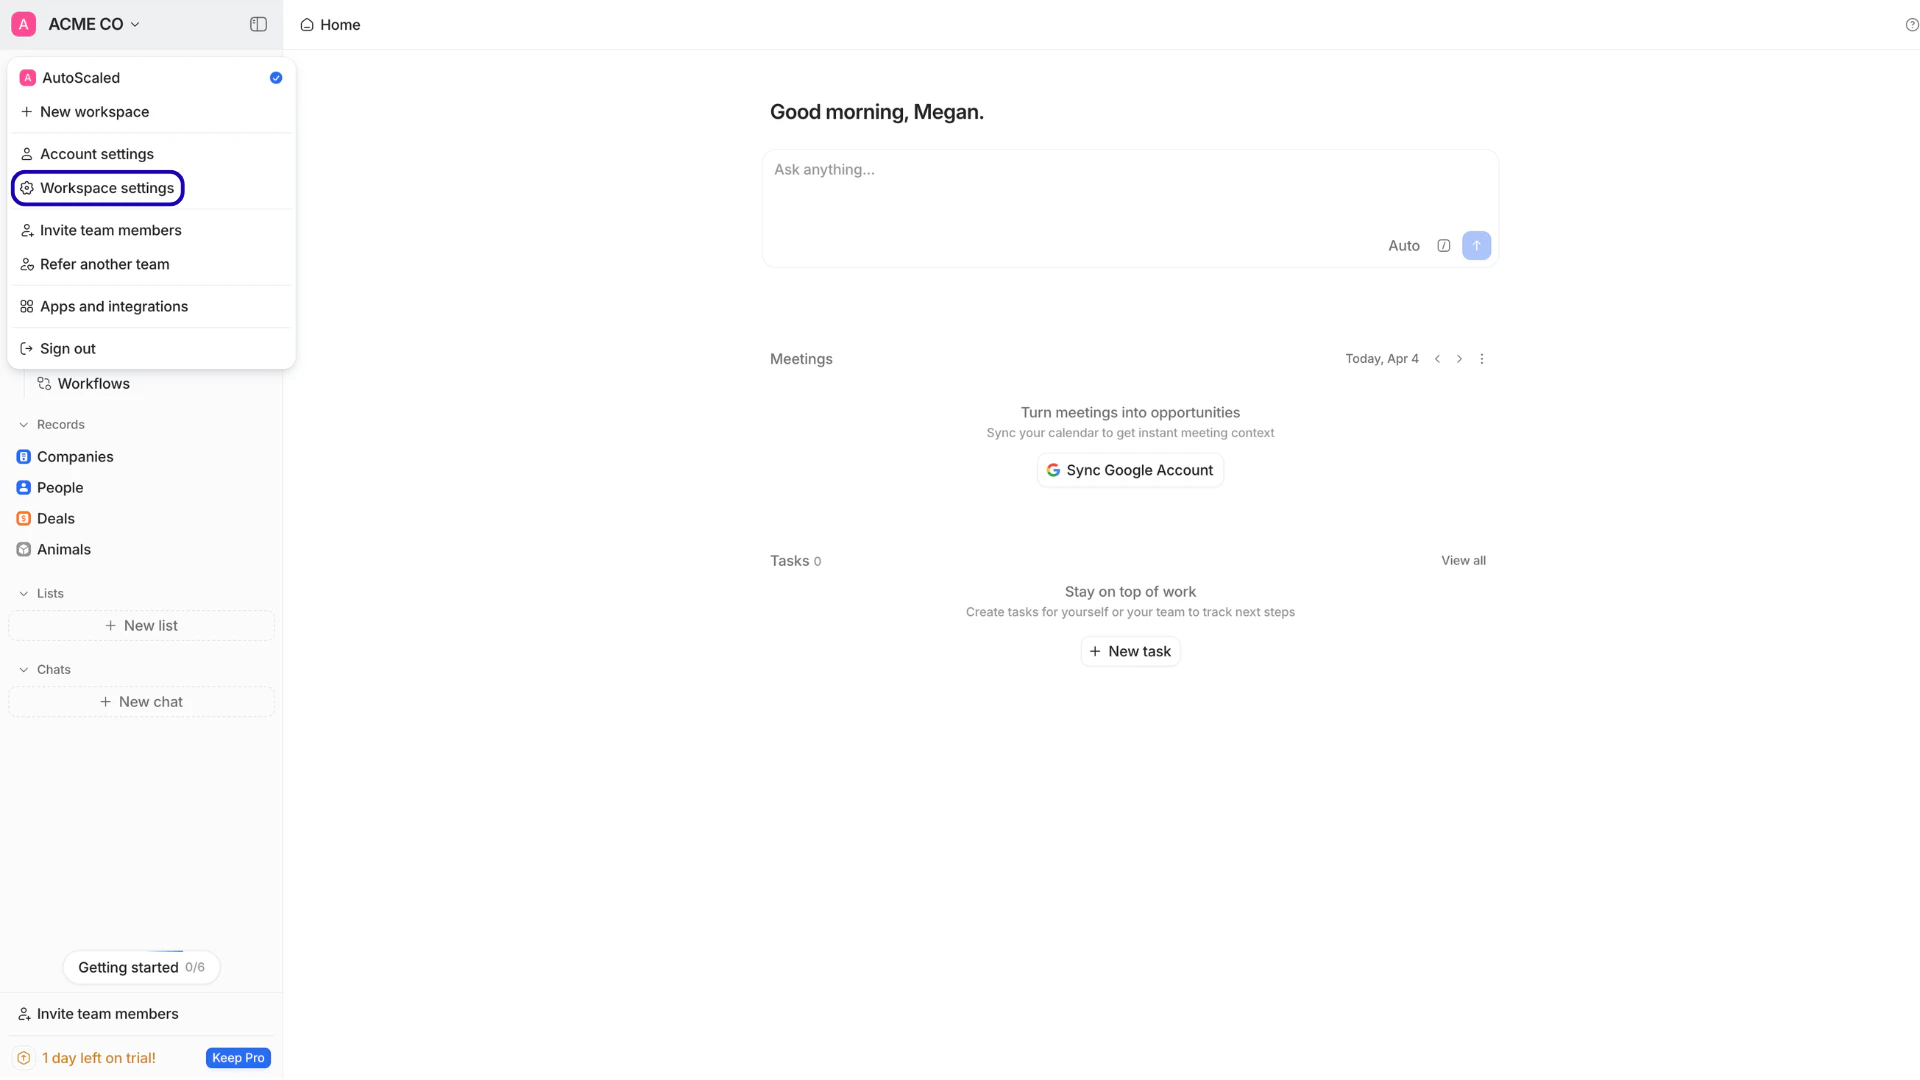
**Step 2:** Open Attio workspace settings
In your Attio account, open the menu in the top left, click your user name, and select **Workspace settings**.
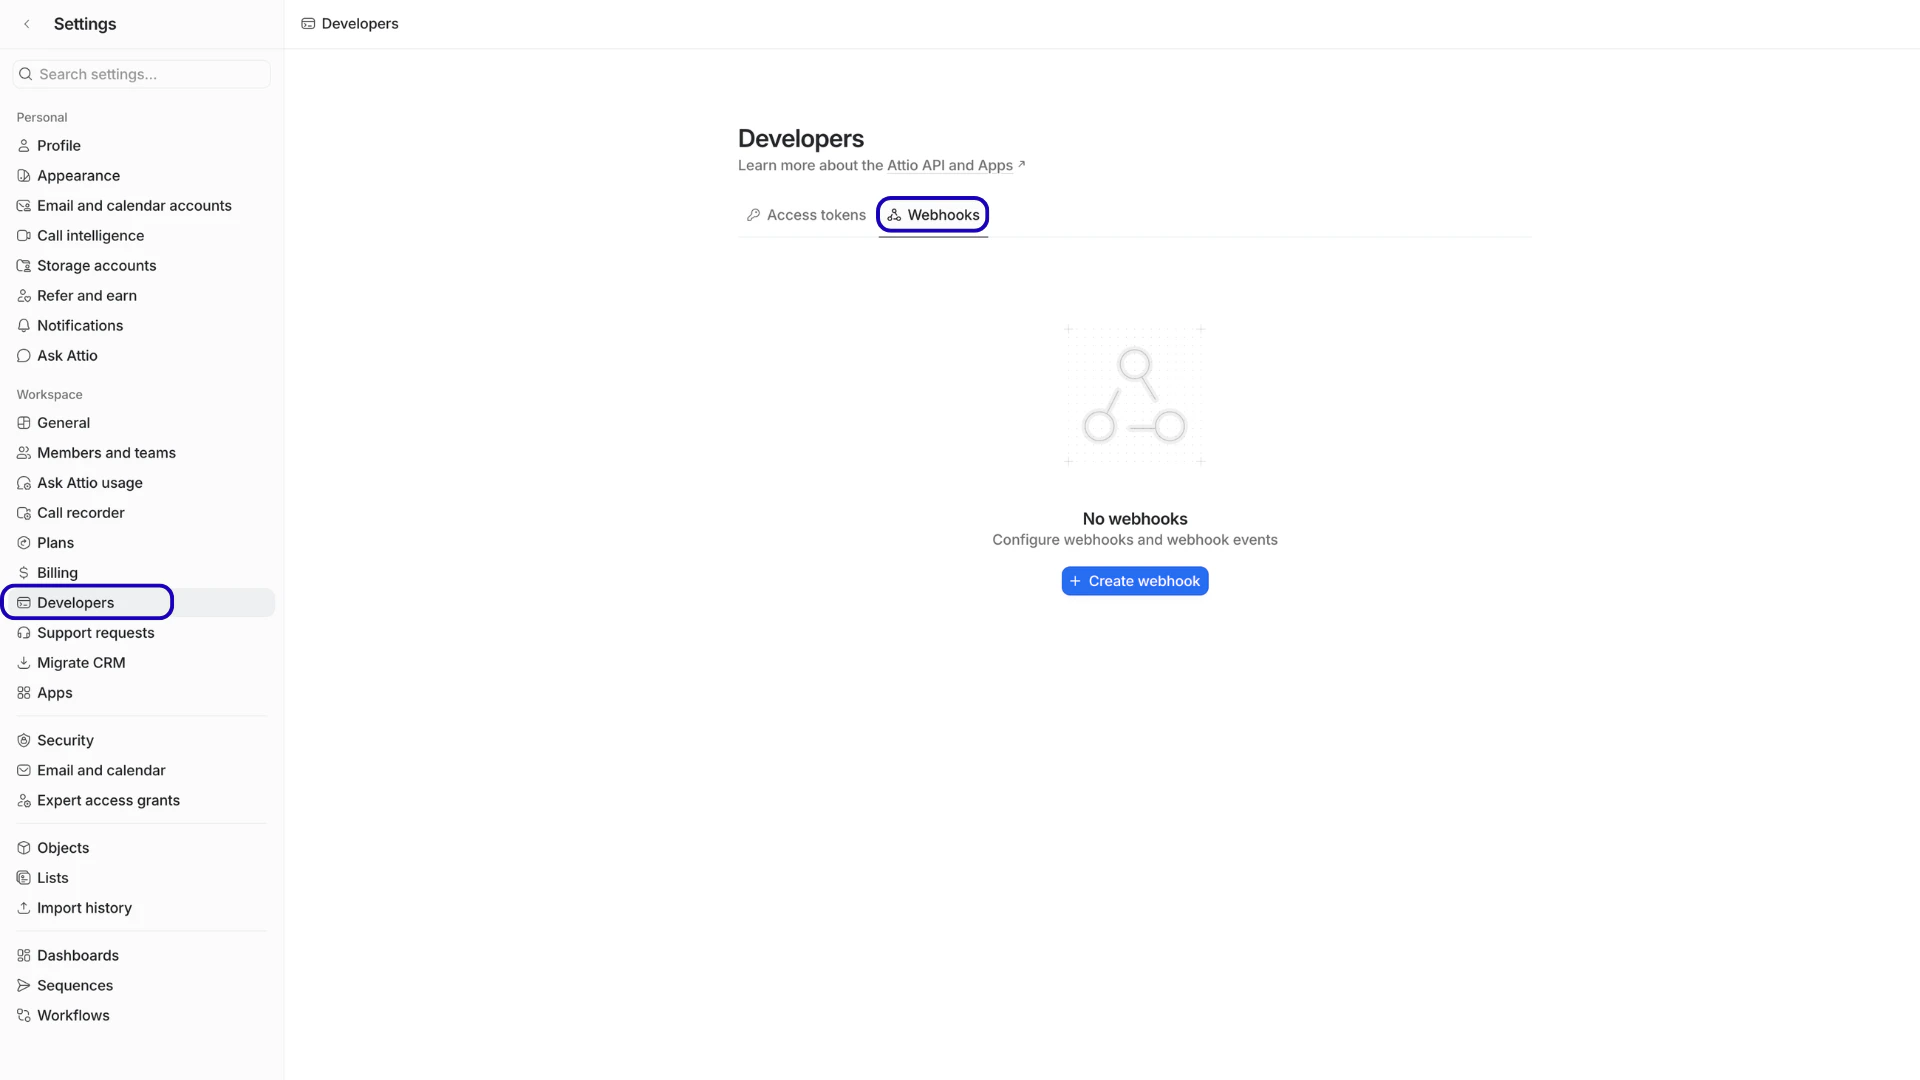
In the left-hand menu, select **Developers**, then **Webhooks**.
**Step 3:** Create a webhook and paste the URL
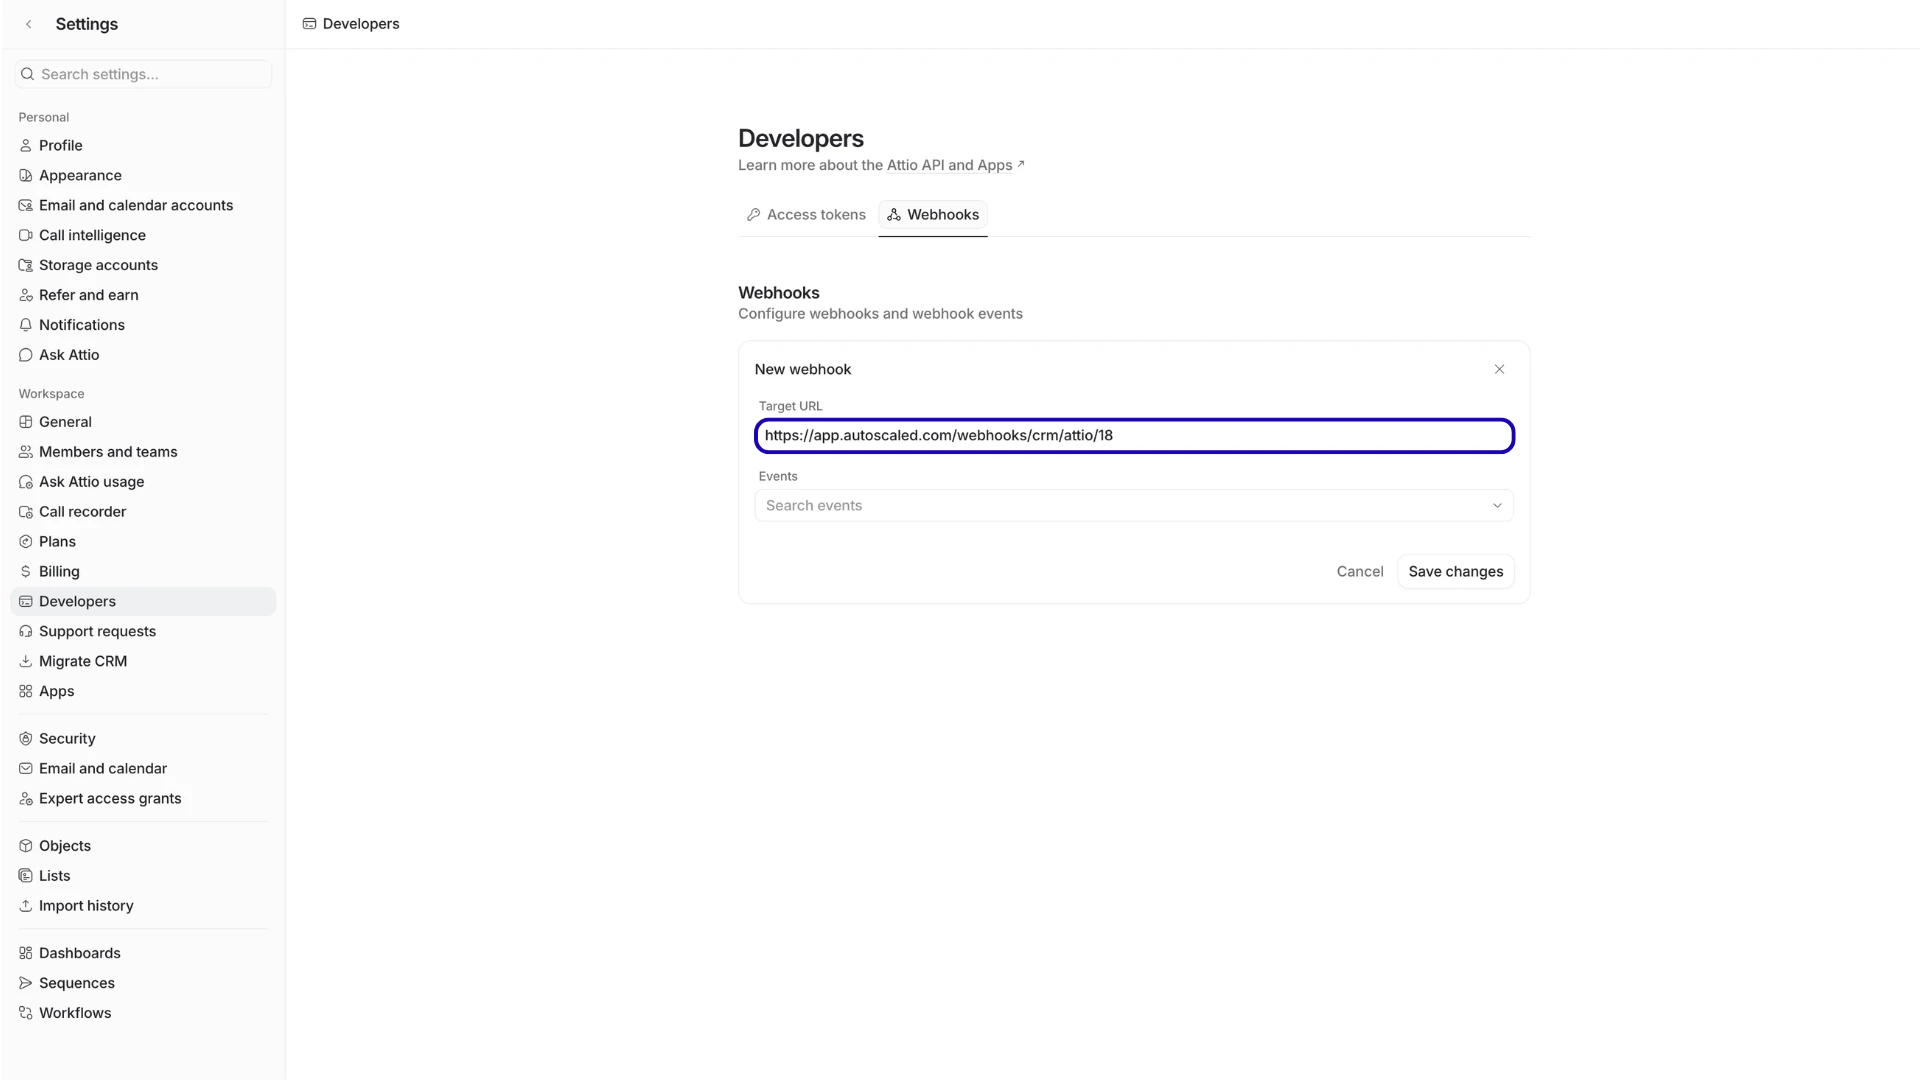
Click **Create Webhook**. When the modal opens, paste the URL you copied in step 1 into the **Target URL** field.
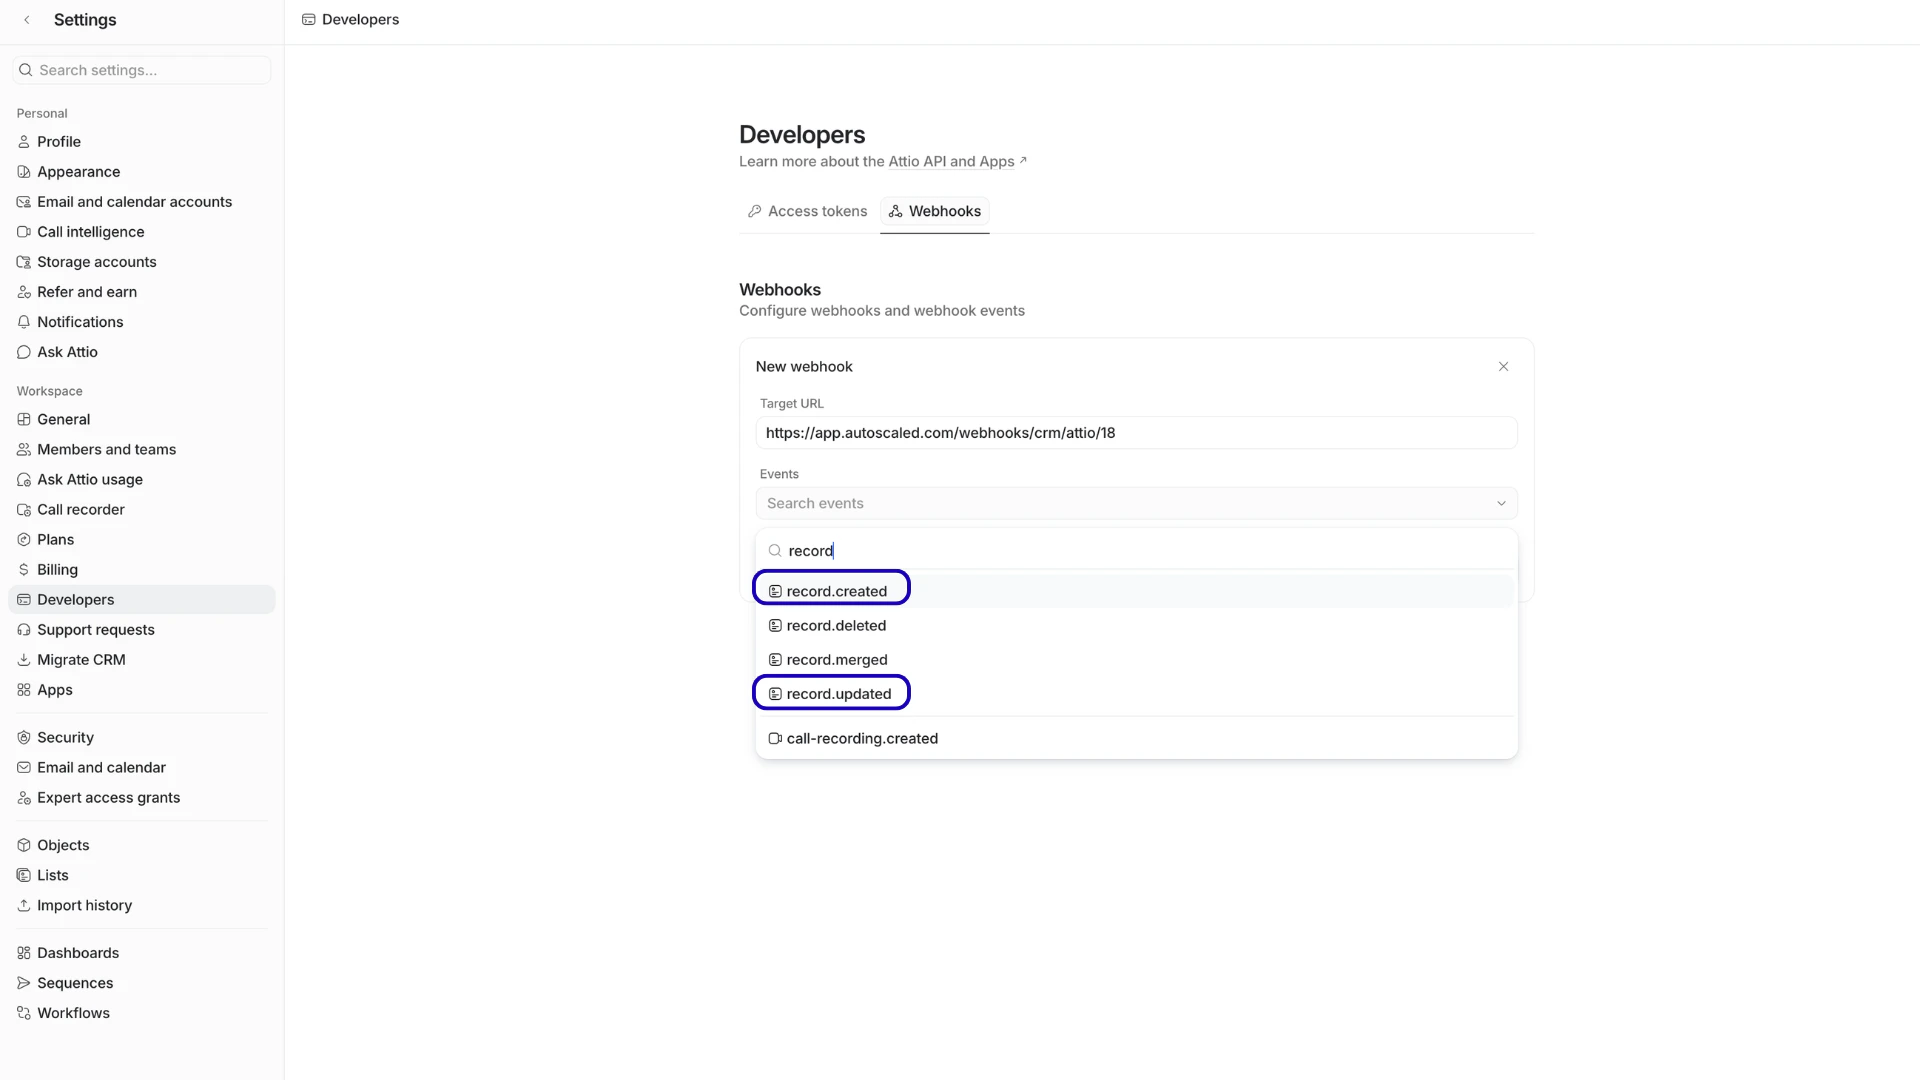
After pasting the target URL, search for the following two events:
```text theme={null}
record.created
record.updated
```
These events notify AutoScaled when a new record is created or when an object field is updated:
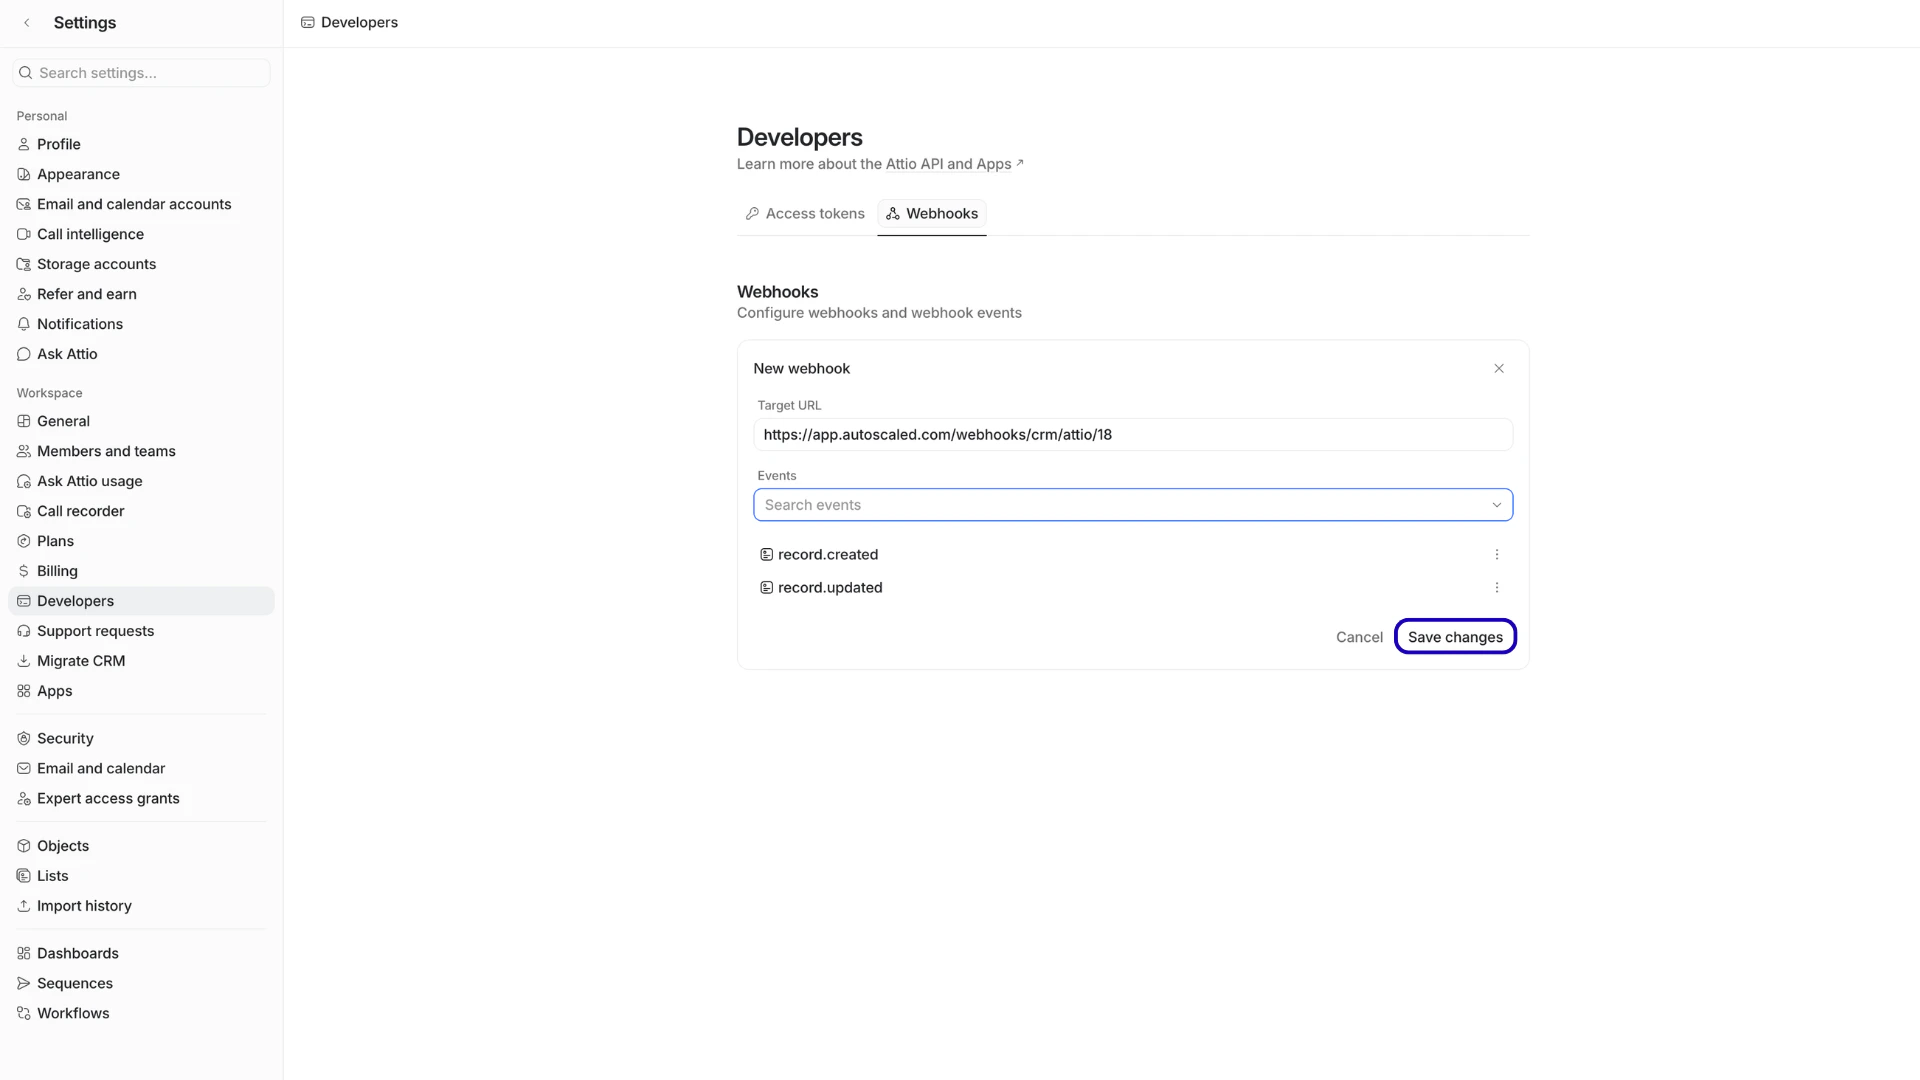
Now save the webhook in Attio:
**Step 4:** Adding the webhook secret to AutoScaled
Your webhook is now set up in Attio. Follow these steps to add the webhook details to AutoScaled.
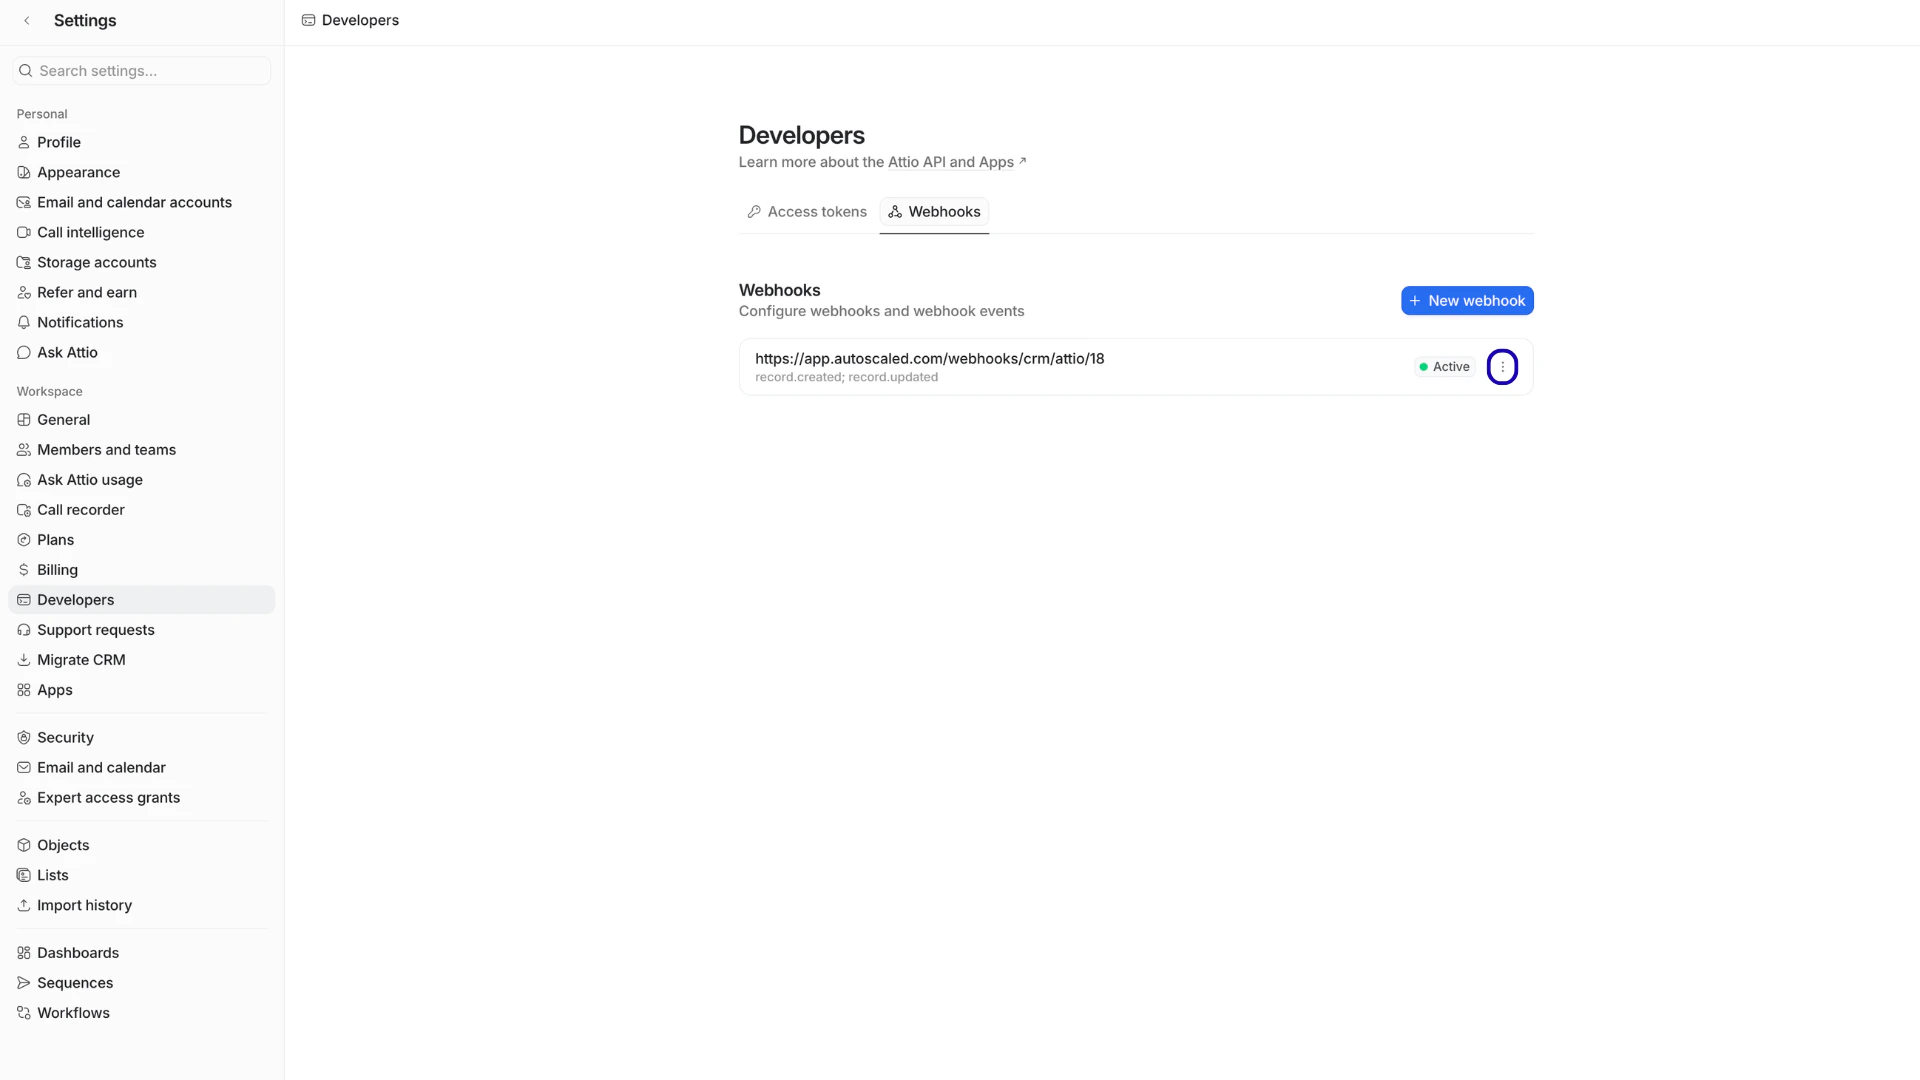
In the webhook overview in Attio, click on the *3-dots* next to the newly created webhook:
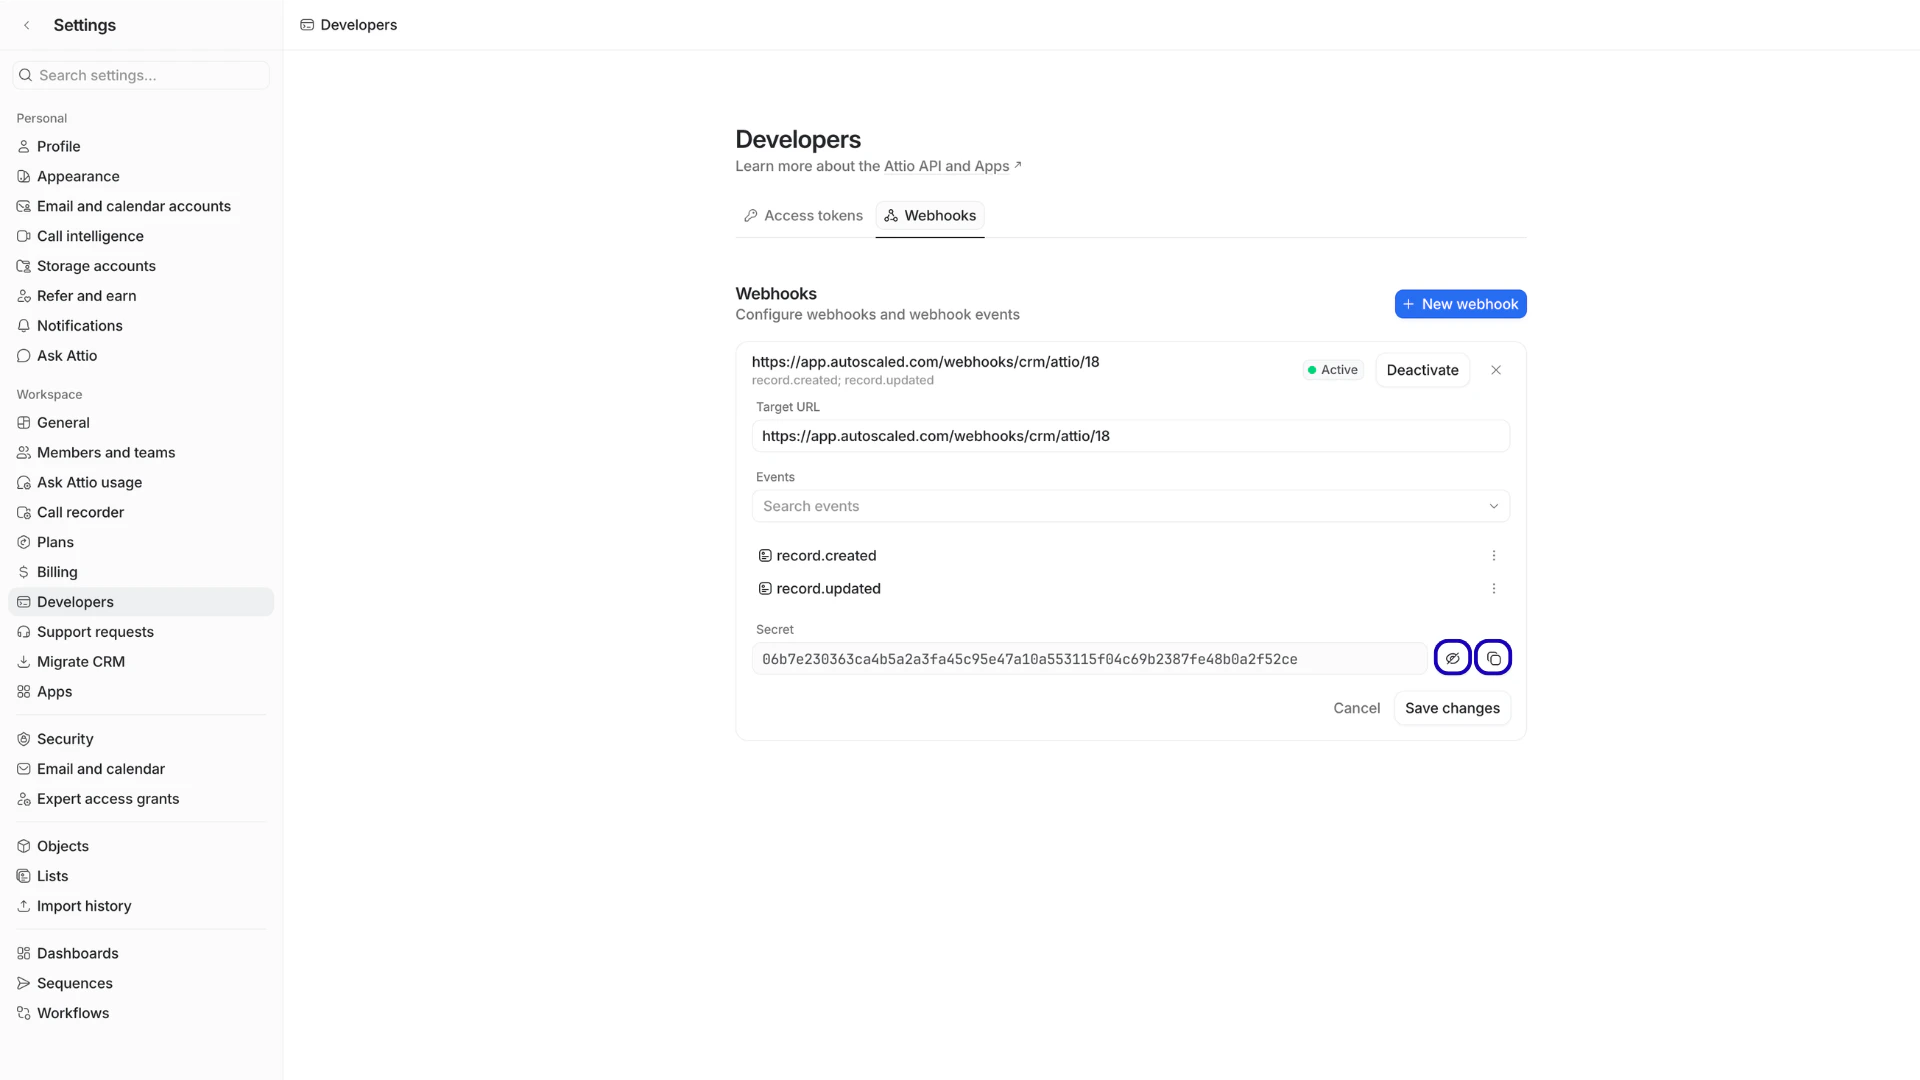
The modal reopens with the latest information about your webhook. Find **Secret** and copy the value to your clipboard.
Finally, return to the **Configure Triggers Webhook** modal in AutoScaled and paste the secret into the **webhook secret** field.
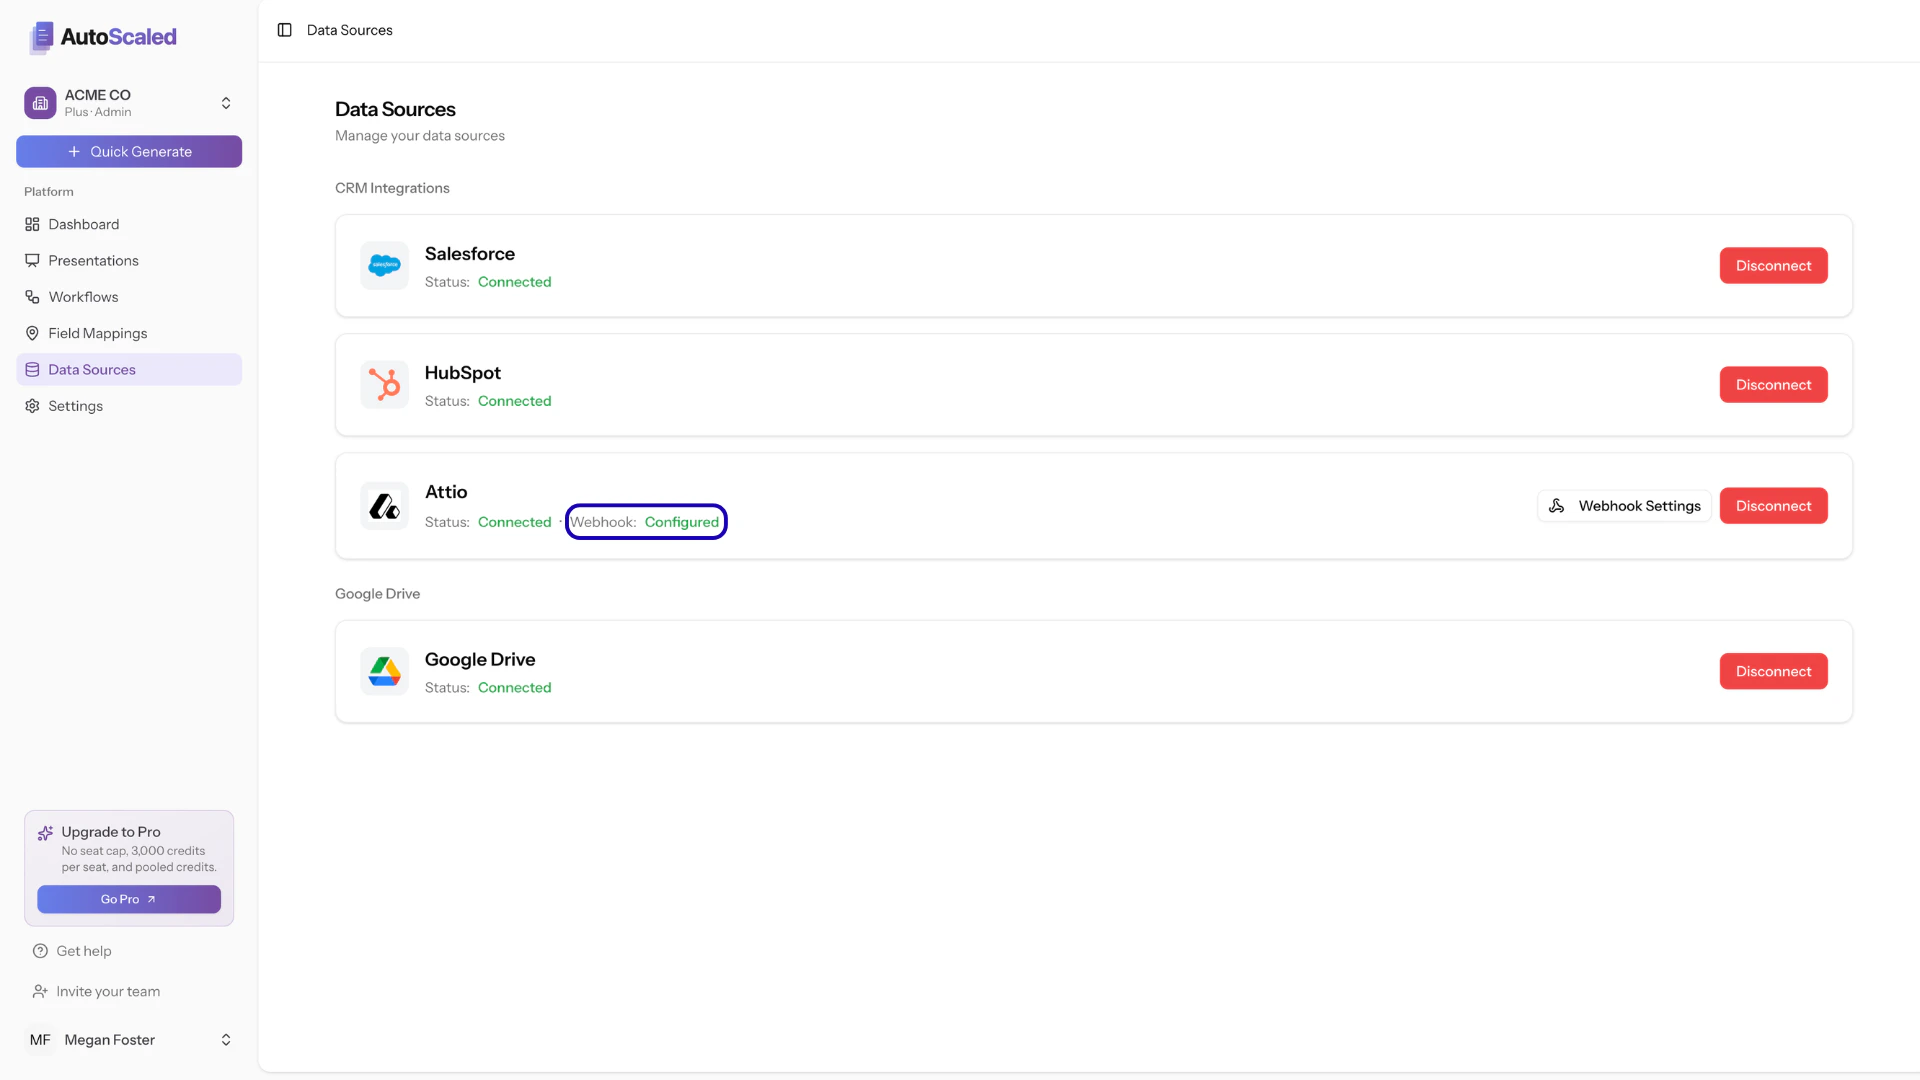
Now save the secret. All steps are now done and you will see the webhook is configured.
## Required scopes and access model
AutoScaled requests scopes for:
* **Read-only access** to default Attio records (deal-equivalent, contact-equivalent, company-equivalent objects)
* **Event listening access** for CRM change triggers (for example `record.created` and `record.updated`)
* **Equivalent access on custom objects** included in your automations
AutoScaled respects your Attio permissions model and only exposes data already available to the authorized Attio user. AutoScaled has no write access to Attio and cannot edit records, objects, or fields.
## Uninstall or disconnect Attio
To remove Attio access:
1. In AutoScaled, open **Data Sources** and disconnect Attio.
2. In Attio, remove or disable AutoScaled authorization and delete the webhook if you no longer use triggers.
After disconnecting, workflows that use Attio scheduling and triggers will stop working until the integration is reconnected.
View all integrations and platform-level data source guidance.
***
**Anything missing?** Let us know at [**support@autoscaled.com**](mailto:support@autoscaled.com) and we'll help you out!
 This will open an Attio dialog so you can sign in to your account:
 A modal will open with instructions. Copy the **webhook URL**.
 **Step 2:** Open Attio workspace settings
In your Attio account, open the menu in the top left, click your user name, and select **Workspace settings**.
**Step 2:** Open Attio workspace settings
In your Attio account, open the menu in the top left, click your user name, and select **Workspace settings**.
 In the left-hand menu, select **Developers**, then **Webhooks**.
 **Step 3:** Create a webhook and paste the URL
Click **Create Webhook**. When the modal opens, paste the URL you copied in step 1 into the **Target URL** field.
**Step 3:** Create a webhook and paste the URL
Click **Create Webhook**. When the modal opens, paste the URL you copied in step 1 into the **Target URL** field.
 After pasting the target URL, search for the following two events:
```text theme={null}
record.created
record.updated
```
These events notify AutoScaled when a new record is created or when an object field is updated:
After pasting the target URL, search for the following two events:
```text theme={null}
record.created
record.updated
```
These events notify AutoScaled when a new record is created or when an object field is updated:
 Now save the webhook in Attio:
 **Step 4:** Adding the webhook secret to AutoScaled
Your webhook is now set up in Attio. Follow these steps to add the webhook details to AutoScaled.
In the webhook overview in Attio, click on the *3-dots* next to the newly created webhook:
**Step 4:** Adding the webhook secret to AutoScaled
Your webhook is now set up in Attio. Follow these steps to add the webhook details to AutoScaled.
In the webhook overview in Attio, click on the *3-dots* next to the newly created webhook:
 The modal reopens with the latest information about your webhook. Find **Secret** and copy the value to your clipboard.
 Finally, return to the **Configure Triggers Webhook** modal in AutoScaled and paste the secret into the **webhook secret** field.
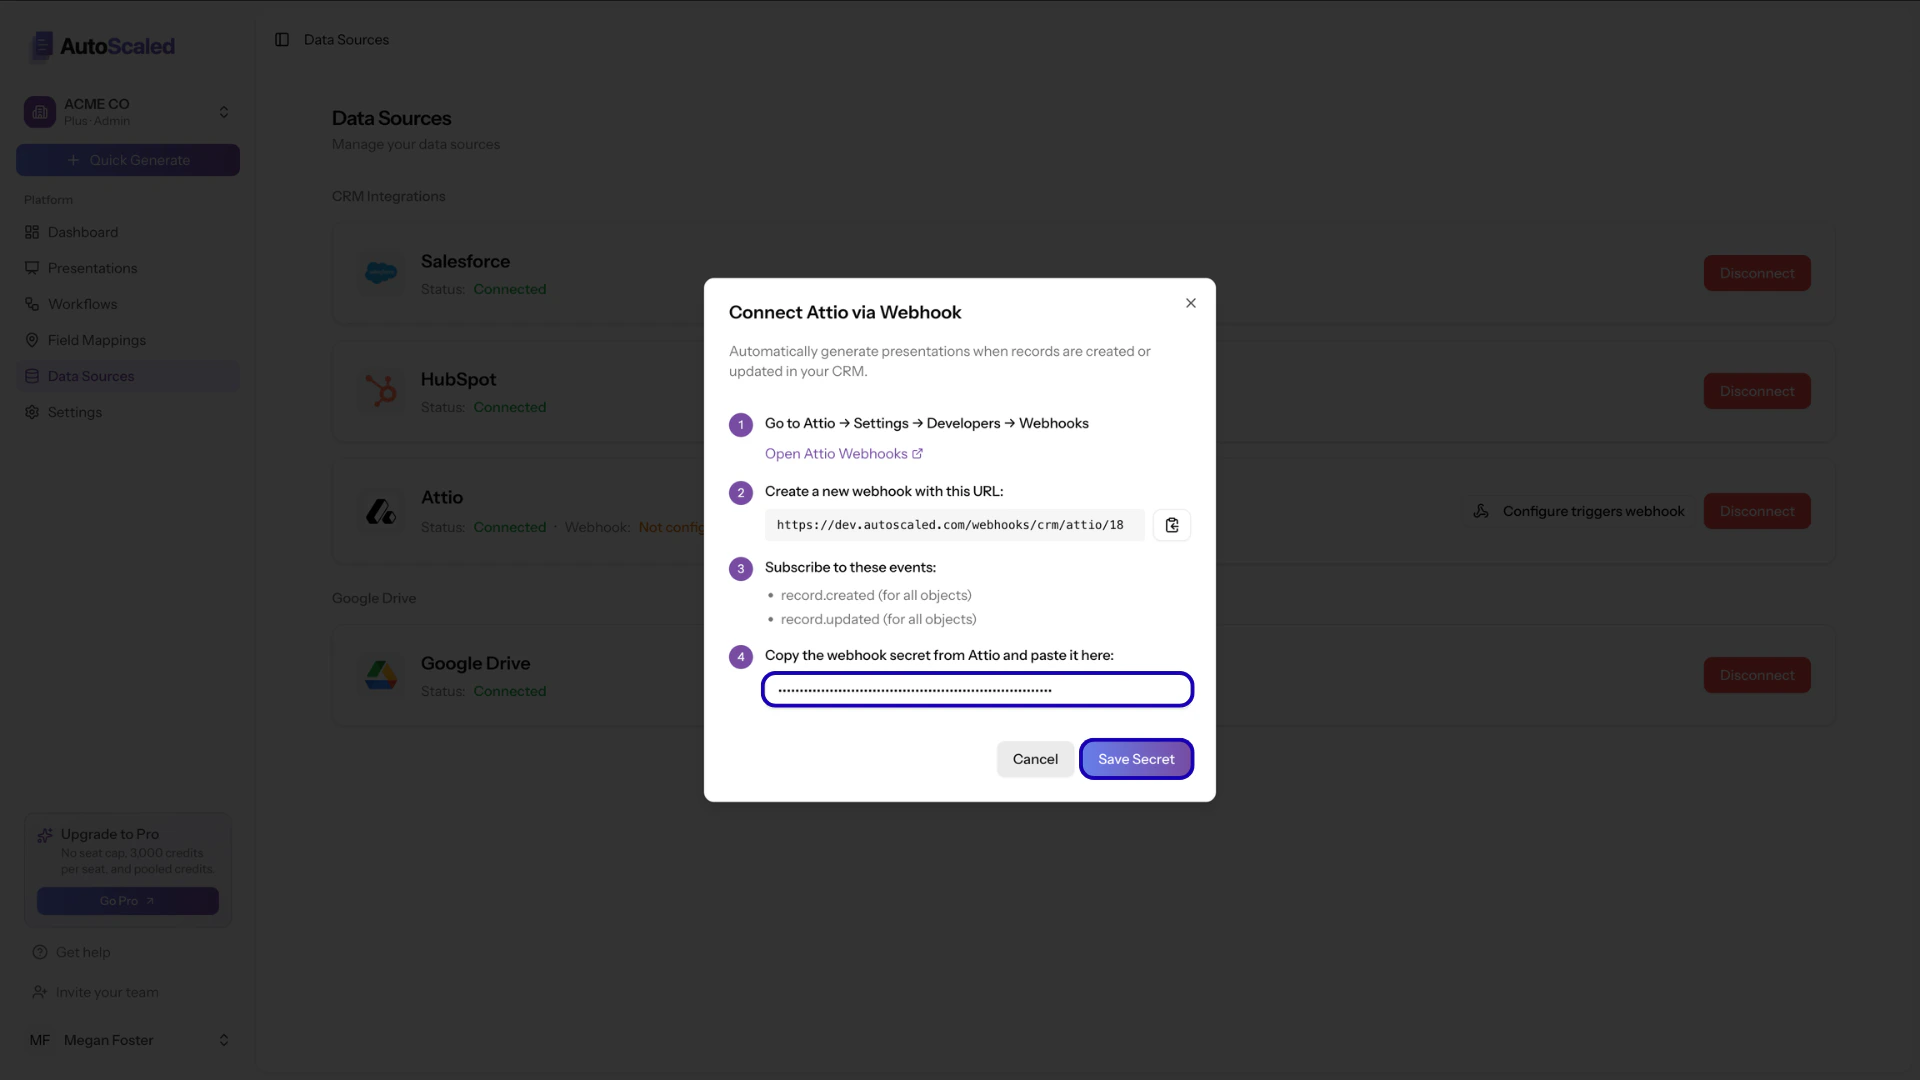 Now save the secret. All steps are now done and you will see the webhook is configured.