> ## Documentation Index
> Fetch the complete documentation index at: https://autoscaled.com/docs/llms.txt
> Use this file to discover all available pages before exploring further.

# Preparing a Presentation Template for Deck Automation

> Preparing a template in AutoScaled: add {{placeholders}} to Slides or PowerPoint to map data from your CRM or spreadsheet. Start creating your template.

AutoScaled works best with templates generated in Google Slides or Microsoft PowerPoint. You can use your current design and simply add placeholders to your template. You do not require additional software or technical knowledge.

## 2-minute full walkthrough of setting up templates

<iframe src="https://www.youtube.com/embed/JKgn8RXslyk" title="Automate Your Sales Presentations: How to Set Up Templates for AutoScaled" frameBorder="0" className="w-full aspect-video rounded-xl" allow="accelerometer; autoplay; clipboard-write; encrypted-media; gyroscope; picture-in-picture; web-share" allowFullScreen />

## Template placeholder locations

AutoScaled can dynamically find and replace placeholders with text, numbers, currencies, images, links etc. You can add placeholders in the following locations:

### Alphanumeric data placeholder placement

<table className="w-full table-fixed text-sm">
  <colgroup>
    <col style={{ width: "19rem" }} />

    <col />

    <col />
  </colgroup>

  <thead>
    <tr>
      <th scope="col" className="border-b border-gray-200 px-3 py-2 text-left font-medium normal-case whitespace-nowrap dark:border-gray-800">
        Placement
      </th>

      <th scope="col" className="border-b border-gray-200 px-3 py-2 text-left font-medium normal-case dark:border-gray-800">How</th>
      <th scope="col" className="border-b border-gray-200 px-3 py-2 text-left font-medium normal-case dark:border-gray-800">Description</th>
    </tr>
  </thead>

  <tbody>
    <tr>
      <td className="border-b border-gray-200 px-3 py-2 align-top whitespace-nowrap dark:border-gray-800">
        <span className="inline-flex items-center gap-2">
          <Icon icon="type" />

          Text
        </span>
      </td>

      <td className="border-b border-gray-200 px-3 py-2 align-top font-mono dark:border-gray-800">
        {"\u007B\u007Bplaceholder\u007D\u007D"}
      </td>

      <td className="border-b border-gray-200 px-3 py-2 align-top dark:border-gray-800">Replace in-line text with data</td>
    </tr>

    <tr>
      <td className="border-b border-gray-200 px-3 py-2 align-top whitespace-nowrap dark:border-gray-800">
        <span className="inline-flex items-center gap-2">
          <Icon icon="square" />

          Text Boxes
        </span>
      </td>

      <td className="border-b border-gray-200 px-3 py-2 align-top font-mono dark:border-gray-800">Alt description placeholder</td>
      <td className="border-b border-gray-200 px-3 py-2 align-top dark:border-gray-800">Replace entire text boxes with content</td>
    </tr>

    <tr>
      <td className="border-b border-gray-200 px-3 py-2 align-top whitespace-nowrap dark:border-gray-800">
        <span className="inline-flex items-center gap-2">
          <Icon icon="notebook-text" />

          Speaker Notes
        </span>
      </td>

      <td className="border-b border-gray-200 px-3 py-2 align-top font-mono dark:border-gray-800">
        {"\u007B\u007Bplaceholder\u007D\u007D"}
      </td>

      <td className="border-b border-gray-200 px-3 py-2 align-top dark:border-gray-800">Insert CRM or Spreadsheet data in Speaker Notes</td>
    </tr>

    <tr>
      <td className="border-b border-gray-200 px-3 py-2 align-top whitespace-nowrap dark:border-gray-800">
        <span className="inline-flex items-center gap-2">
          <Icon icon="palette" />

          Themes
        </span>
      </td>

      <td className="border-b border-gray-200 px-3 py-2 align-top font-mono dark:border-gray-800">
        {"\u007B\u007Bplaceholder\u007D\u007D"}
      </td>

      <td className="border-b border-gray-200 px-3 py-2 align-top dark:border-gray-800">Update theme elements via placeholders</td>
    </tr>

    <tr>
      <td className="border-b border-gray-200 px-3 py-2 align-top whitespace-nowrap dark:border-gray-800">
        <span className="inline-flex items-center gap-2">
          <Icon icon="grid-3x3" />

          Table (Cells)
        </span>
      </td>

      <td className="border-b border-gray-200 px-3 py-2 align-top font-mono dark:border-gray-800">
        {"\u007B\u007Bplaceholder\u007D\u007D"}
      </td>

      <td className="border-b border-gray-200 px-3 py-2 align-top dark:border-gray-800">Replace individual cells with data</td>
    </tr>
  </tbody>
</table>

### Media data placeholder placement

<table className="w-full text-sm">
  <thead>
    <tr>
      <th scope="col" className="border-b border-gray-200 px-3 py-2 text-left font-medium normal-case dark:border-gray-800">Placement</th>
      <th scope="col" className="border-b border-gray-200 px-3 py-2 text-left font-medium normal-case dark:border-gray-800">How</th>
      <th scope="col" className="border-b border-gray-200 px-3 py-2 text-left font-medium normal-case dark:border-gray-800">Description</th>
    </tr>
  </thead>

  <tbody>
    <tr>
      <td className="border-b border-gray-200 px-3 py-2 align-top dark:border-gray-800">
        <span className="inline-flex items-center gap-2">
          <Icon icon="image" />

          Images
        </span>
      </td>

      <td className="border-b border-gray-200 px-3 py-2 align-top font-mono dark:border-gray-800">Alt description placeholder</td>

      <td className="border-b border-gray-200 px-3 py-2 align-top dark:border-gray-800">
        Replace images using an image URL

        <br />

        (Use image address ending in .jpeg, .jpg, .png or .gif)
      </td>
    </tr>

    <tr>
      <td className="border-b border-gray-200 px-3 py-2 align-top dark:border-gray-800">
        <span className="inline-flex items-center gap-2">
          <Icon icon="video" />

          Videos
        </span>
      </td>

      <td className="border-b border-gray-200 px-3 py-2 align-top font-mono dark:border-gray-800">Alt description placeholder</td>

      <td className="border-b border-gray-200 px-3 py-2 align-top dark:border-gray-800">
        Add or replace videos via a video URL

        <br />

        (YouTube or video file link)
      </td>
    </tr>
  </tbody>
</table>

### URL data placeholder placement

<table className="w-full text-sm">
  <thead>
    <tr>
      <th scope="col" className="border-b border-gray-200 px-3 py-2 text-left font-medium normal-case dark:border-gray-800">Placement</th>
      <th scope="col" className="border-b border-gray-200 px-3 py-2 text-left font-medium normal-case dark:border-gray-800">How</th>
      <th scope="col" className="border-b border-gray-200 px-3 py-2 text-left font-medium normal-case dark:border-gray-800">Description</th>
    </tr>
  </thead>

  <tbody>
    <tr>
      <td className="border-b border-gray-200 px-3 py-2 align-top dark:border-gray-800">
        <span className="inline-flex items-center gap-2">
          <Icon icon="link" />

          URL
        </span>
      </td>

      <td className="border-b border-gray-200 px-3 py-2 align-top font-mono dark:border-gray-800">
        {"\u007B\u007Bplaceholder\u007D\u007D"}
      </td>

      <td className="border-b border-gray-200 px-3 py-2 align-top dark:border-gray-800">Insert clickable links from fields</td>
    </tr>

    <tr>
      <td className="border-b border-gray-200 px-3 py-2 align-top dark:border-gray-800">
        <span className="inline-flex items-center gap-2">
          <Icon icon="arrow-right" />

          URL destination
        </span>
      </td>

      <td className="border-b border-gray-200 px-3 py-2 align-top font-mono dark:border-gray-800">No placeholder</td>
      <td className="border-b border-gray-200 px-3 py-2 align-top dark:border-gray-800">Set link destinations directly in AutoScaled</td>
    </tr>
  </tbody>
</table>

## How to add placeholders

### Adding in text, cells, notes etc.

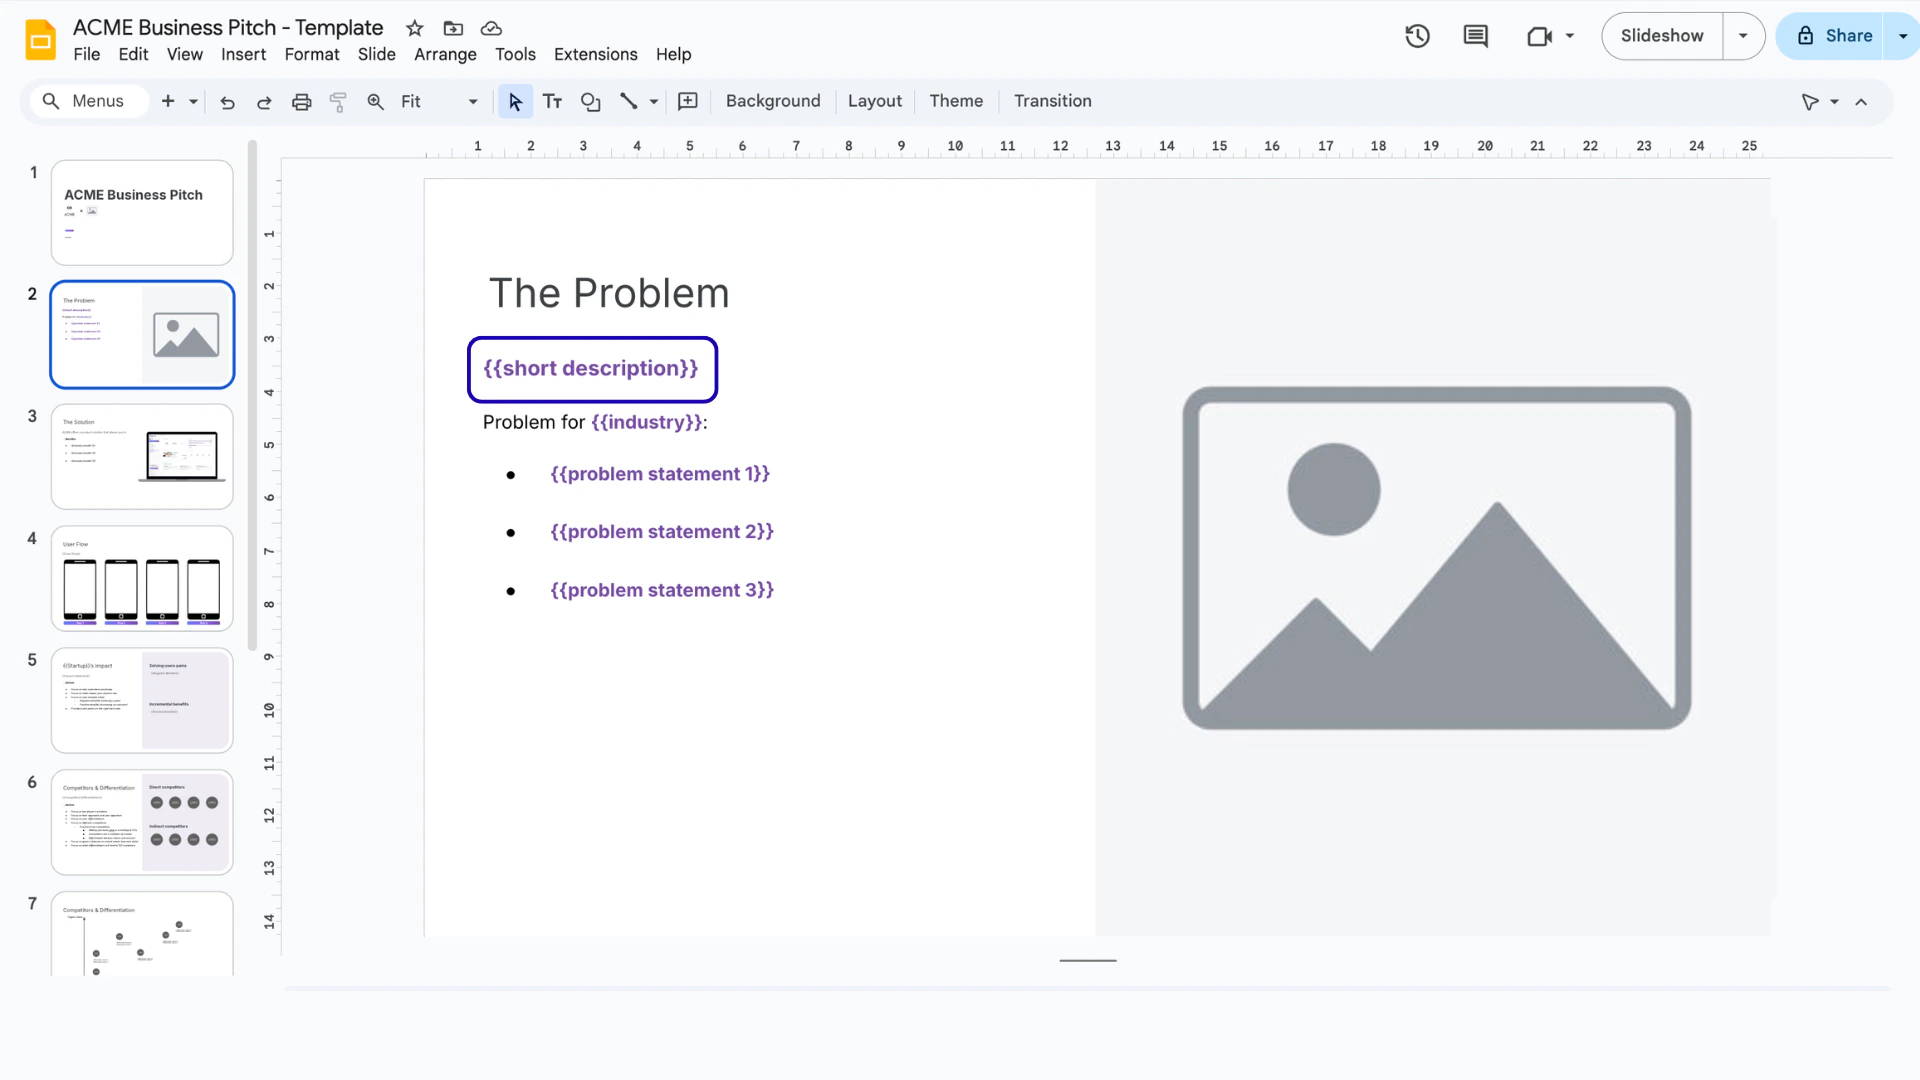
For non-media placeholders such as text, table cell data, speaker notes and theme elements; you simply type your placeholder where you want data to appear.

Use double curly braces and a field name that matches what you will map in AutoScaled (for example `{{company}}` or `{{deal_value}}`). Each table cell should contain its own placeholder if you want different values per cell.

<Frame caption="Adding placeholders to AutoScaled in Google Slides">
  <img src="https://mintcdn.com/autoscaled-9092cc1e/2npUS6bNgcxxwskg/images/81.png?fit=max&auto=format&n=2npUS6bNgcxxwskg&q=85&s=ad555428903e7f3df36ce0ce0e4aff3d" alt="Adding placeholders to AutoScaled in Google Slides" width="1920" height="1080" data-path="images/81.png" />
</Frame>

The process is the same across Google Slides and Microsoft Powerpoint.
<Tip>
  No reformatting after the fact. AutoScaled respects your slide design. If a placeholder is bold, your data comes in bold.
</Tip>

### Adding placeholders via alt attributes

For **images**, **videos**, and **text boxes** (shapes), set the placeholder in the element’s **alt text** (description) field in Google Slides or PowerPoint and not only in visible text.

AutoScaled reads that alt text to know which field to fill (for example an image URL or video link). Use the same `{{field_name}}` style in the alt field so it lines up with your workflow mappings.

To set the **alt-text** follow these steps:

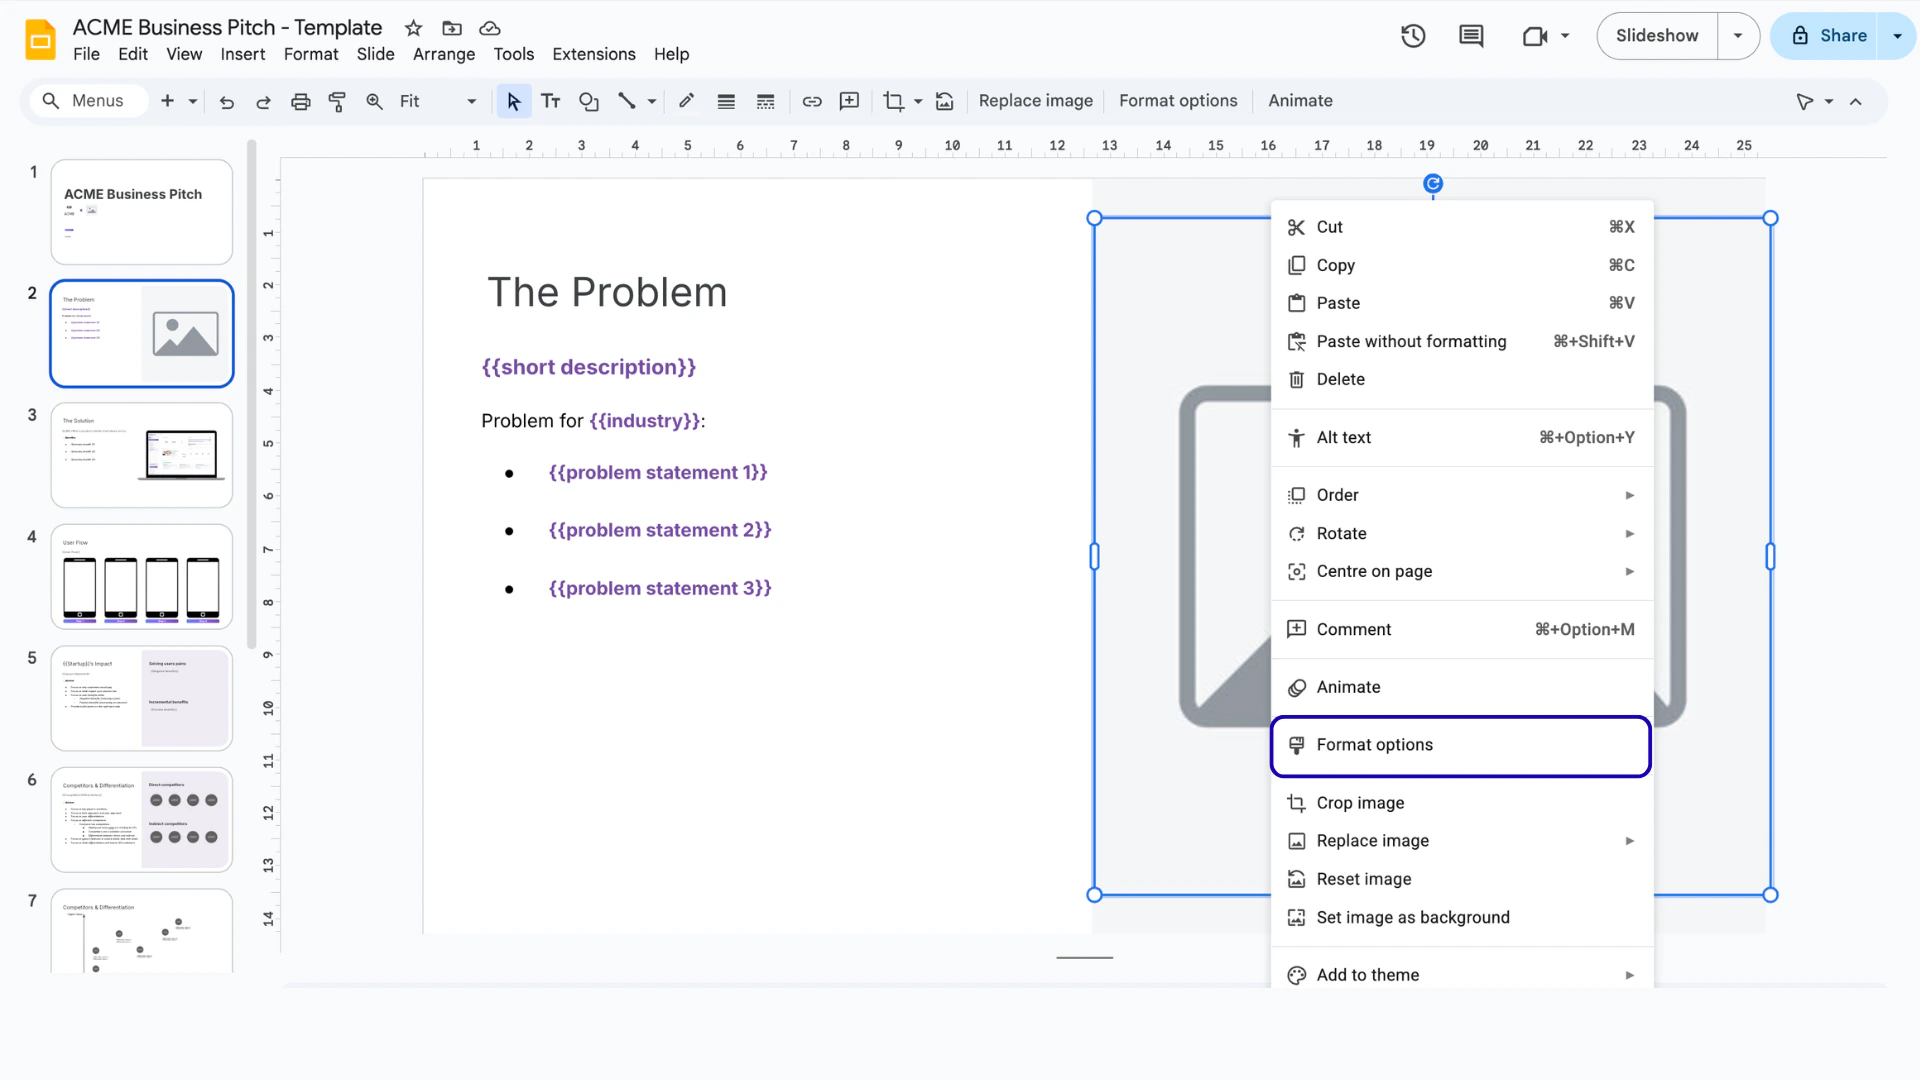
Step 1: Right click the target object (textbox, video or image) and select "Format Options"

<Frame caption="Step 1 - Right click the target and format options">
  <img src="https://mintcdn.com/autoscaled-9092cc1e/2npUS6bNgcxxwskg/images/82.png?fit=max&auto=format&n=2npUS6bNgcxxwskg&q=85&s=a273a74a50879b7a79312652980522a9" alt="Step 1 - Right click the target and format options" width="1920" height="1080" data-path="images/82.png" />
</Frame>

Step 2: Click on "Alt Text" in the right hand side navigation menu
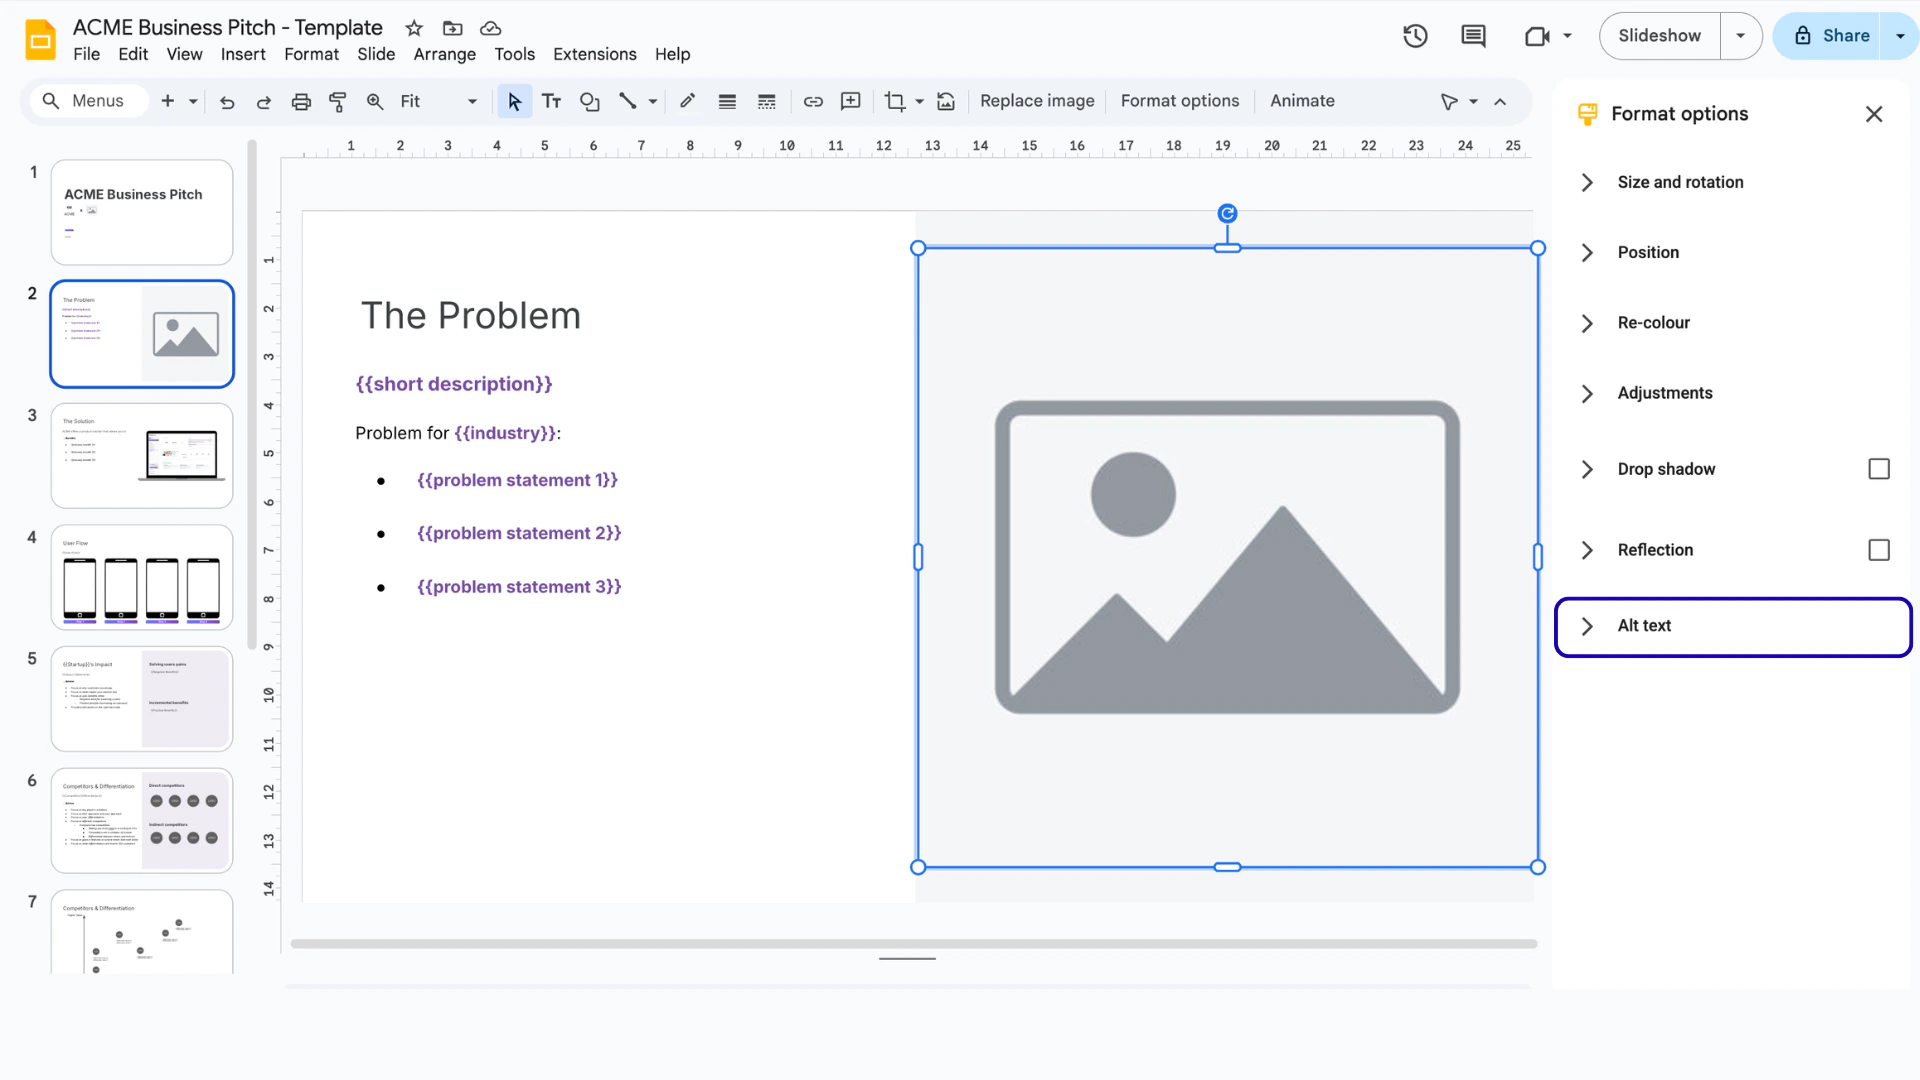
<Frame caption="Step 2 - Click on alt text in the right hand side menu">
  <img src="https://mintcdn.com/autoscaled-9092cc1e/2npUS6bNgcxxwskg/images/83.png?fit=max&auto=format&n=2npUS6bNgcxxwskg&q=85&s=e307798be0b9655d541bc0c51eff9dd6" alt="Step 2 - Click on alt text in the right hand side menu" title="83" lightAlt="Step 2 - Click on alt text in the right hand side menu" darkAlt="83" width="1920" height="1080" data-path="images/83.png" />
</Frame>

Step 3: Add the placeholder in the alt text description box
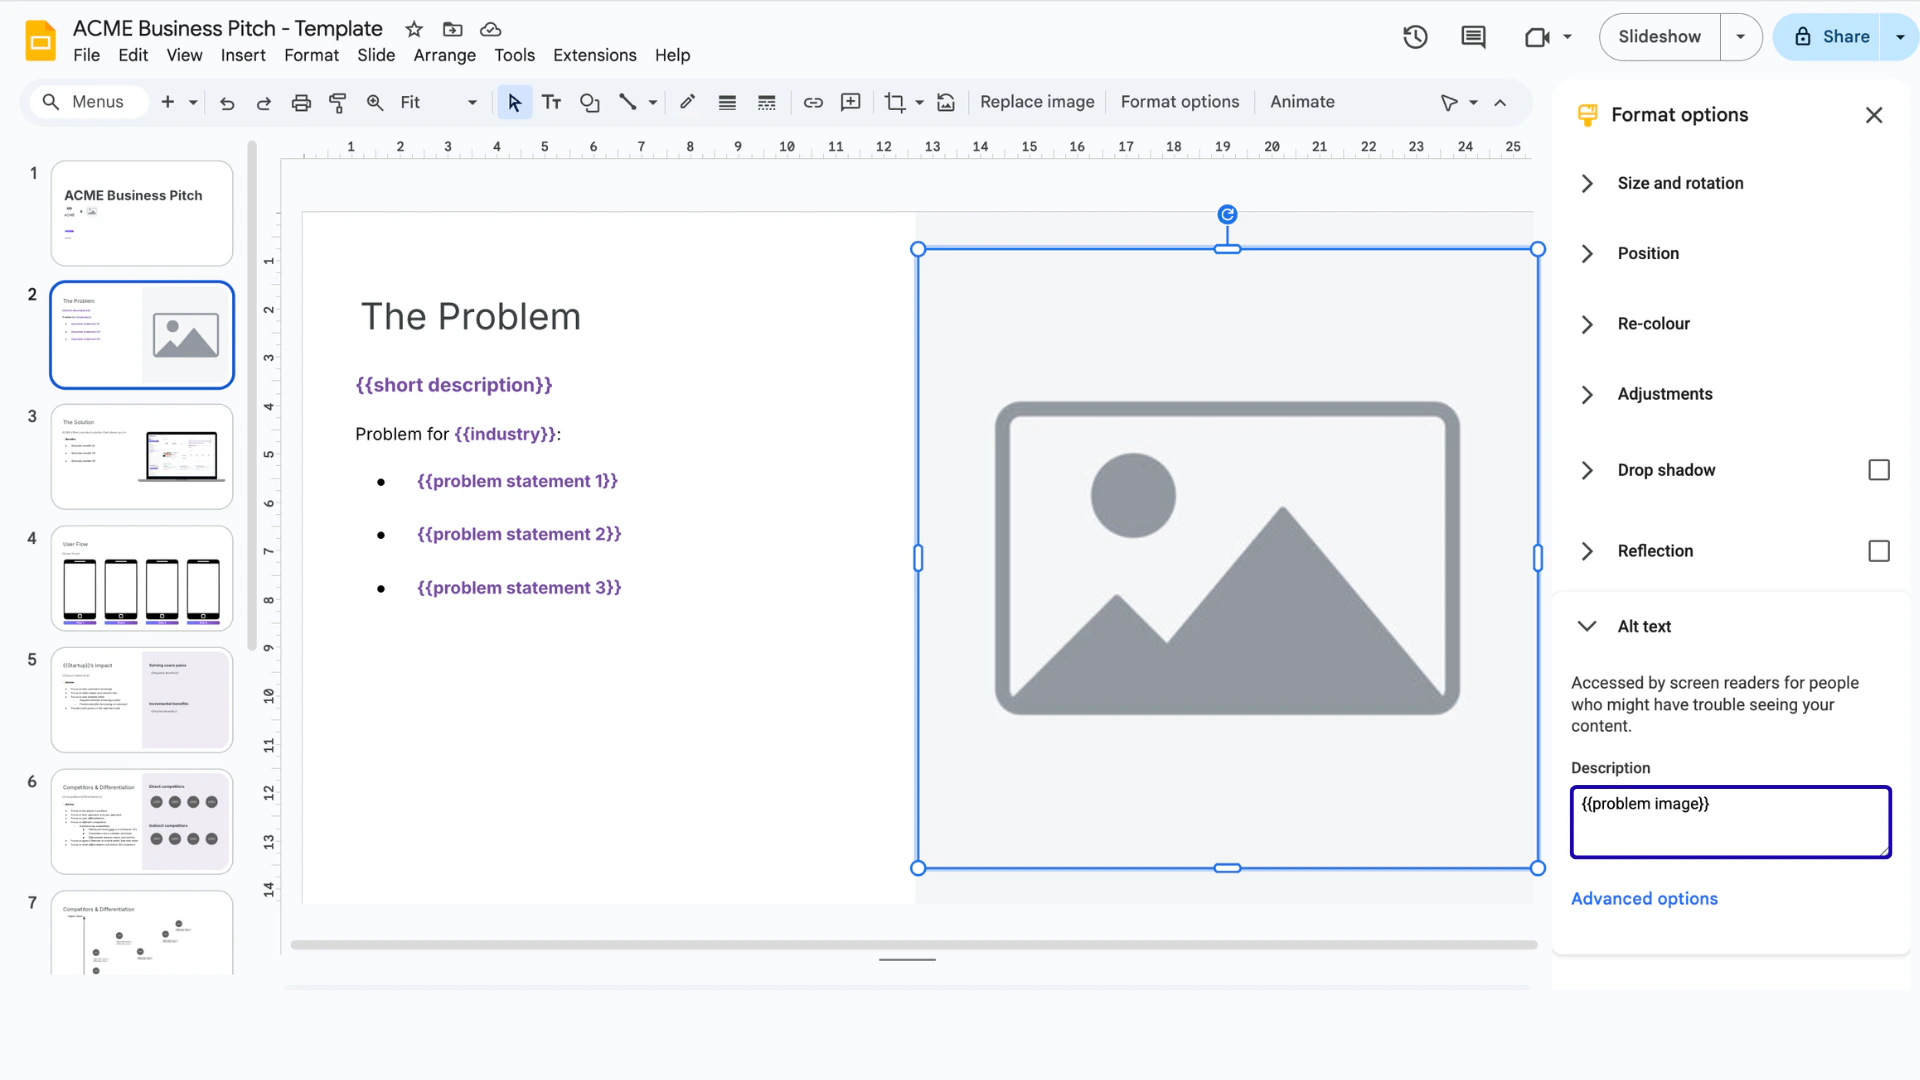
<Frame caption="Step 3 - Adding the placeholder for media files">
  <img src="https://mintcdn.com/autoscaled-9092cc1e/2npUS6bNgcxxwskg/images/84.png?fit=max&auto=format&n=2npUS6bNgcxxwskg&q=85&s=8d650c32da26abcfecbcef8cc7f12672" alt="Step 3 - Adding the placeholder for media files" width="1920" height="1080" data-path="images/84.png" />
</Frame>

For media files, it's important that the data source is a link:

* **Images:** use a link to an image. Additional settings like 'cover' and 'contain' are available.
* **Videos:** use a link to a video (including YouTube and Vimeo)

For text boxes, using alt text will replace the **whole text box** while adding placeholders in a textbox will just replace the placeholder.

Additional information about default formatting is available in the field mappings section of the product document:

<Card title="Field mappings, handling and formatting" icon="link" href="/presentation-automation/field-mappings/">
  Set specific formatting for currencies, numbers, timezones and media files. Decide how data is displayed in your presentations.
</Card>

***

**Anything missing?** Let us know at [**support@autoscaled.com**](mailto:support@autoscaled.com) and we'll help you out!